Serverless Parallel Selenium Grid Testing with VSTS and Azure Container Instances
I’ve written before about Selenium testing (Parallel Testing in a Selenium Grid with VSTS and Running Selenium Tests in Docker using VSTS and Release Management). The problem with these solutions, however, is that you need a VM! However, I was setting up a demo last week and decided to try to solve this challenge using Azure Container Instances (ACI), and I have a neat solution.
So why ACI? Why not a Kubernetes cluster? This solution would definitely work in a k8s cluster, but I wanted something more light-weight. If you don’t have a k8s cluster, spinning one up just for Selenium testing seemed a bit heavy handed. Also, I discovered that ACI now lets you spin up multiple containers in the same ACI group via a yaml file.
I’ve created a GitHub repo with all the source code for this post so you can follow along - it includes the following:
- a sample app (boilerplate File->New Project->MVC) with unit tests
- .NET Core Selenium test project and tokenized runsettings files
- ARM template for Azure Web App
- Tokenized yaml file for the ACI infrastructure
- CI yaml build definition (yay for build-as-code!)
- json release definition (release-as-code isn’t yet available, so we’ll have to do the release via the designer)
Architecture
Once we’ve built and package the application code, the release process (which we model in the Release Definition) is as follows:
- Provision infrastructure - both for the app as well as the ACI group with the Selenium hub, worker nodes and VSTS agents
- Deploy the app
- Install .NET Core and execute “dotnet test”, publishing test results
- Tear down the ACI
The component architecture for the ACI is pretty straight-forward: we run containers for the following:
- A Selenium Hub - this will listen for test requests and match the requested capabilities with a worker node
- Selenium nodes - Chrome and Firefox worker nodes
- VSTS Agent(s) - these connects to VSTS and execute tests as part of a release
To run in parallel I’m going to use a multi-configuration phase - so if you want to run Firefox and Chrome tests simultaneously you’ll need at least 2 VSTS agents (and 2 pipelines!). ACI quotas will let you spin up groups with up to 4 processors and 14GB of memory, so for this example we’ll use a Selenium hub, 2 workers and 2 VSTS agents each using .5 processor and .5GB memory.
One concern is security - how do you secure the test rig since it’s running in the public cloud? Fortunately, this solution doesn’t require any external ports - the networking is all internal (the worker nodes and VSTS agent connect to the hub using “internal” ports) and the VSTS agent itself connects out to VSTS and does not require incoming connections. So we don’t have to worry about securing endpoints - we don’t even expose any!
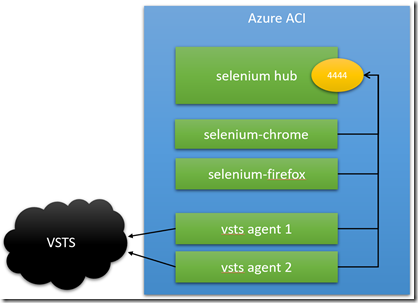
Let’s take a look at the architecture of this containers in ACI:
Notes:
- We are running 5 containers: selenium-hub, selenium-chrome and selenium-firefox and 2 vsts-agents
- The only port we have to think about is the hub port, 4444, which is available internally - we don’t have any external ports
- The vsts-agent is connected to our VSTS account, and again no external port is required
The trick to getting multiple Selenium nodes within the group to connect to the hub was to change the ports that they register themselves on - all taken care of in the yaml definition file.
As for the tests themselves, since I want to run the tests inside a vsts-agent container, they have to be written in .NET Core. Fortunately that’s not really a big deal - except that some methods (like the screenshot method) are not yet implemented in the .NET Core Selenium libraries.
We’ll get into the nitty-gritty of how to use this ACI in a release pipeline for testing your app, but before we do that let’s quickly consider how to deploy this setup in the first place.
Permanent or Transient?
There are two ways you can run the ACI - permanently or transiently. The permanent method spins up the ACI and leaves it running full-time, while the transient method spins the ACI up as part of an application pipeline (and then tears it down again after testing). If you are cost-sensitive, you probably want to opt for the transient method, though this will add a few minutes to your releases. That shouldn’t be too much of a problem since this phase of your pipeline is running integration tests which you probably expect to take a bit longer. If you are optimizing for speed, then you probably just want to spin the ACI up in a separate pipeline and just assume it’s up when your application pipeline runs. Fortunately the scripts/templates are exactly the same for both methods! In this post I’ll show you the transient method - just move the tasks for creating/deleting the ACI to a separate pipeline if you prefer the ACI to be up permanently.
Putting it all Together
To put this all together, you need the following:
- A VSTS account
- An Azure subscription
- A Service Endpoint to the Azure sub from VSTS
- Colin’s ALM Corner Build Extension pack installed onto your VSTS account
- An agent queue in VSTS (the ACI VSTS agents will register onto this queue)
- A personal access token (PAT) to your VSTS account
For the source code you can link directly to my GitHub repo. However, if you want to change the code, then you’ll either need to fork it to your own GitHub account or import the repo into your VSTS account.
The Build
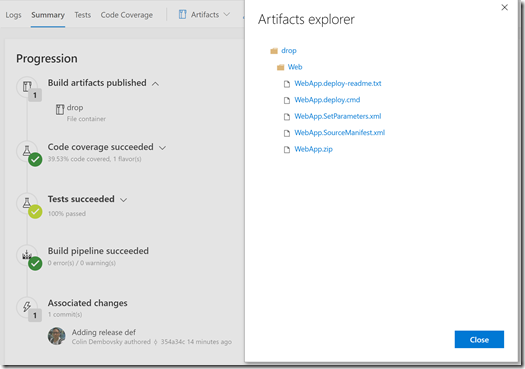
The build is really simple - and since it’s yaml-based, the code is already there. To create a build definition, enable the YAML build preview on your VSTS account, then browse to the Build page. Create a new YAML build and point to the .vsts-ci.yml file. The build compiles code, versions the assemblies, runs unit tests with code coverage and finally publishes the web app as a webdeploy package:
The Release
You’ll need to import the release definition to create it. First download the WebApp.ReleaseDefinition.json file (or clone the repo) so that you have the file on disk. Now, if you’re using the “old” release view, just navigate to the Releases page and click the + button at the top of the left menu, then select “Import release pipeline”. If you’re using the new preview release view, you’ll need to create a dummy release (since the landing page doesn’t show the toolbar). Once you’ve created a dummy release, click the “+ New” button in the toolbar and click “Import a pipeline”. Then browse to the WebApp.ReleaseDefinition.json file and click import. Once it’s imported, you’ll need to fix up a few settings:
Variables
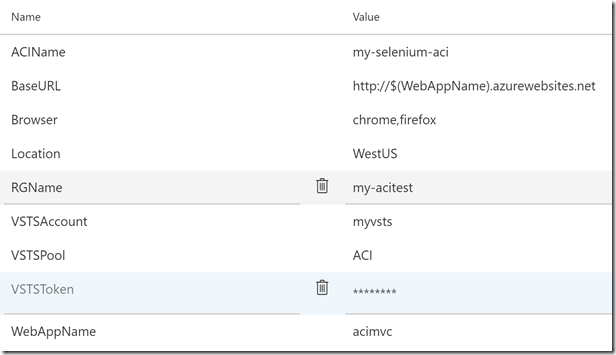
Click on the Variables tab and update the names for:
- RGName - the name of the resource group for all the infrastructure
- WebAppName - the name of the web app (must be globally unique in Azure)
- ACIName - the name for the Azure Container Instance
- Location - I’d suggest you leave this on WestUS for the ACI quotas
- VSTSAccount - the name of your VSTS account (i.e. the bit before .visualstudio.com)
- VSTSPool - the name of the agent pool that you created earlier
- VSTSToken - your PAT. Make sure to padlock this value (to make it secret)
Artifacts
Click on the Pipeline tab top open the designer. You’re going to have to delete and recreate the artifacts, since the id’s are specific to my VSTS, so I cleared them in the definition json file. The primary artifact (so add this first) is your web app build - so add a new artifact of type “Build” and point to the WebApp build. Make sure the “Source alias” of this artifact is set to “WebApp” to preserve the paths in the tasks. You can also enable the CD trigger (to queue a release when a new build is available) if you want to. Now add another artifact - this time point to the source code repo (either on GitHub or your VSTS account) and alias this artifact as “infra” to preserve paths.
Job Queues
Now click on the Tasks tab. Click on the “Provision Infrastructure” job header and then select “Hosted Linux Preview” for the agent pool (we’re running some Azure CLI commands via bash, so we need an Ubuntu agent). You can repeat this for the last job “Tear down ACI”.
The “Deploy using WebDeploy” task requires a Windows agent, so change the queue on this job to “Hosted VS2017”. Finally, change the “Run Tests” queue to the agent queue you created earlier (with the same name as the VSTSPool variable).
Azure Endpoints
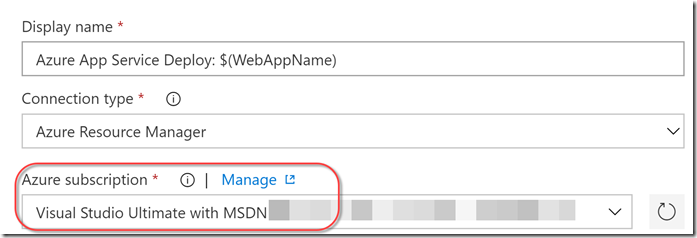
You’ll need to click on each “Azure” task (the Azure CLI tasks, the Azure Resource Group Deployment task and the Azure App Service Deploy task and configure the correct Azure endpoint:
You should now be able to save the definition - remove “Copy” from the name before you do!
The Jobs
Let’s have a quick look at the tasks and how they are configured:
Provision Infrastructure
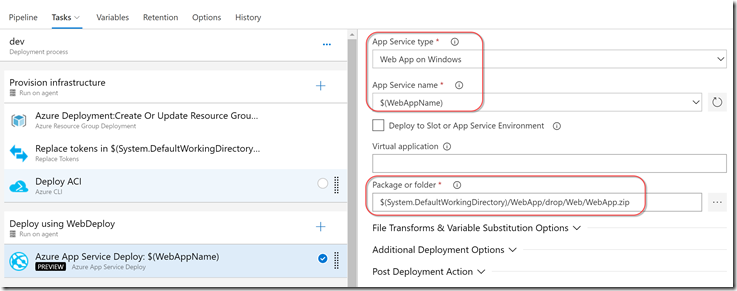
This job provisions infrastructure for the web app (via ARM template) as well as the ACI (via Azure CLI). The first task executes the ARM template, passing in the WebAppName. The template creates a Free tier App Service Plan and the App service itself. Next we replace some tokens in the ACI yaml definition file - this is somewhat akin to a Kubernetes pod file. In the file we specify that we require 5 containers: the Selenium hub (which opens port 4444), the worker nodes (one firefox and one chrome, running on different ports and connecting to the hub via localhost:4444) and 2 VSTS agents (with environment variables for the VSTS account, pool and PAT) so that the agent can connect to VSTS. I had to specify agent names since both containers get the same hostname, so if you don’t and the agents have the same name, the 2nd agent would override the 1st agent registration.
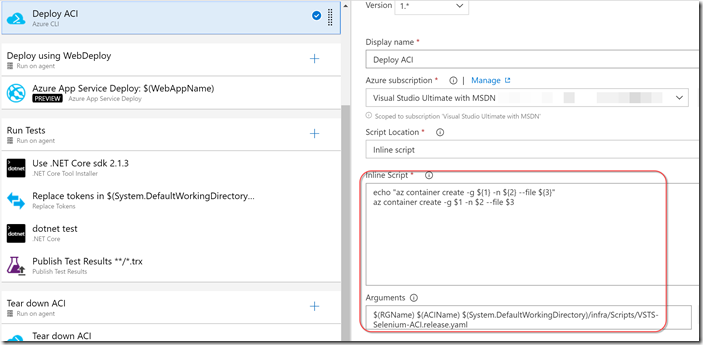
Finally we invoke the Azure CLI task using an inline script to create the ACI using the yaml file:
The script itself is really a one-liner to “az container create” and we pass in the resource group name, the ACI name and the path to the yaml file.
Deploy using WebDeploy
The deploy job is a single task: Deploy Azure App Service. This has to run on a windows agent because it’s invoking webdeploy. We specify the App name from the variable and point to the webdeploy zip file (the artifact from the build).
Of course a real application may require more deployment steps - but this single step is enough for this demo.
Run Tests
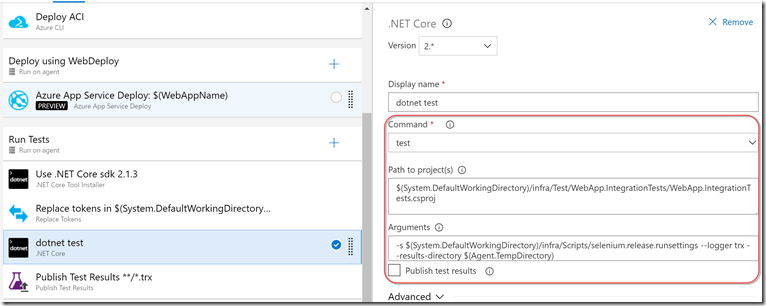
This job should be executing on the agent queue that you’ve configured in variables - this is the queue that the ACI agents are going to join in the first job. The first task installs the correct .NET core framework. We then replace the tokens in the runsettings file (to set the browser and the BaseURL). Then we execute “dotnet test” and finally publish the test results.
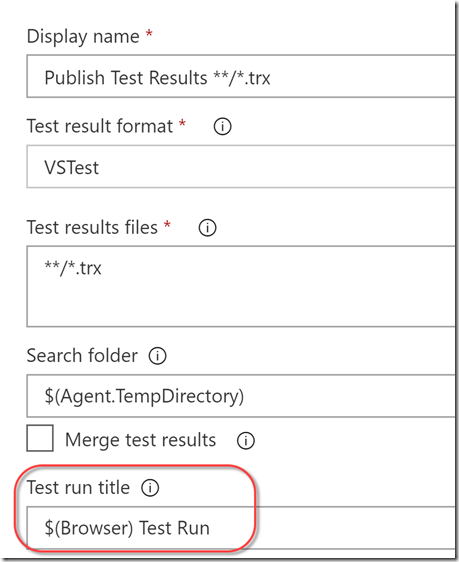
You’ll notice that I have unset “Publish test results” in the dotnet test task. This is because the run is always published as “VSTest Test Run” - there’s no way to distinguish which browser the test run is for. We tweak the test run title in the Publish Test Results step:
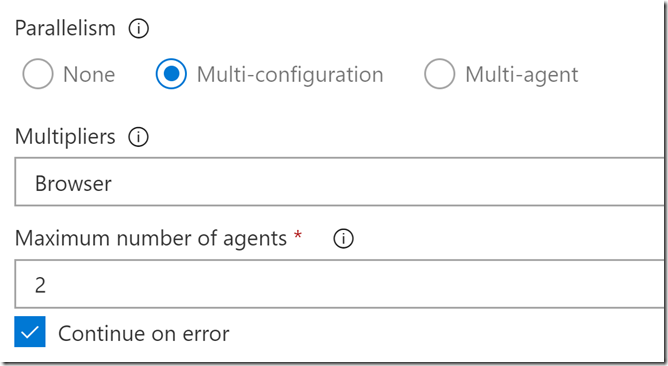
You’ll also notice that we only have a single job - so how does the parallelization work? If you click on the Job name, you’ll see that we’ve configured the parallelization settings for the job:
We’re “splitting” the values for the variable “Browser” - in this case it’s set to “chrome,firefox”. In other words, this job will spawn twice - once for Browser=chrome and once for Browser=firefox. I’ve set the maximum number of agents to 2 since we only have 2 anyway.
Teardown ACI
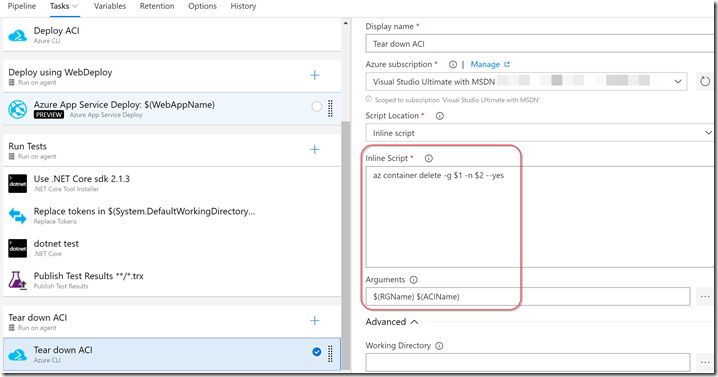
Finally we tear down the ACI in a single Azure CLI inline script where we call “az container delete” (passing in the resource group and ACI names):
To ensure that this job always runs (even if the tests fail) we configure the Advanced options for the job itself, specifying that it should always run:
Run It!
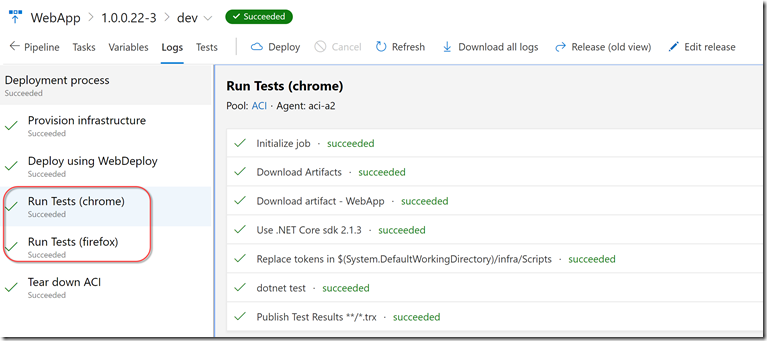
Now that we have all the pieces in place, we can run it! Once it has completed, we can see 2 “Run Test” jobs were spawned:
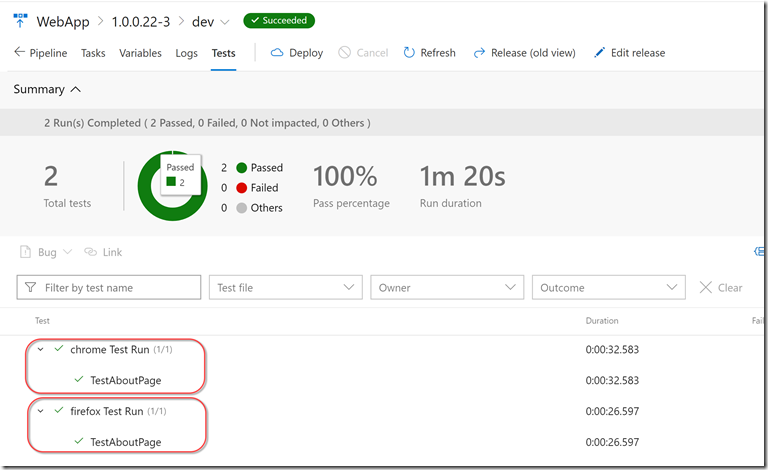
If we navigate to the Test tab, we can see both runs (with the browser name):
Conclusion
Using ACI we can get essentially serverless parallel Selenium tests running in a release pipeline. We’re only charged for the compute that we actually used in Azure, so this is a great cost optimization. We also gain parallelization or just better test coverage (we are running the same tests in 2 browsers). All in all this proved to be a useful experiment!
Happy testing!
