Parallel Testing in a Selenium Grid with VSTS

There are several different types of test – unit tests, functional test, load tests and so on. Generally, unit tests are the easiest to implement and have a high return on investment. Conversely, UI automation tests tend to be incredibly fragile, hard to maintain and don’t always deliver a huge amount of value. However, if you carefully design a good UI automation framework (especially for web testing) you can get some good mileage.
Even if you get a good framework going, you’re going to want to find ways of executing the tests in parallel, since they can take a while. Enter Selenium Grid. Selenium is a “web automation framework”. Under the hood, Selenium actually runs as a server which accepts ReST commands – those commands are wrapped in the Selenium client, so you usually see these HTTP commands. However, since the server is capable of driving a browser via HTTP, you can run tests remotely – that is, have tests run on one machine that execute over the wire to a browser on another machine. This allows you to scale your test infrastructure (by adding more machines). This is exactly what Selenium Grid does for you.
My intention with this post isn’t to show how you can create Selenium tests. Rather, I’ll show you some ins and outs of running Selenium tests in parallel in a Grid in a VSTS build/release pipeline.
Components for Testing in a Grid
There are a few moving parts we’ll need to keep track of in order for this to work:
- The target site
- The tests
- The Selenium Hub (the master that coordinates the Grid)
- The Selenium Nodes (the machines that are going to be executing the tests)
- Selenium drivers
- VSTS Build
- VSTS Release
The cool thing about a Selenium grid is that, from a test perspective, you only need to know about the Selenium Grid hub. The nodes register with the hub and await commands to execute (i.e. run tests). The tests themselves just target the hub: “Hey Hub, I’ve got this test I want you to run for me on a browser with these capabilities…”. The hub then finds a node that meets the required capabilities and executes the tests remotely (via HTTP) on the node. Pretty sweet. This means you can scale the grid out without having to modify the tests at all.
Again lifting Selenium’s skirts we’ll see that a Selenium Node receives an instruction (like “use Chrome and navigate to google.com”). The node uses a driver for each browser (Firefox doesn’t have a driver, since Selenium knows how to drive it “natively”) to drive the browser. So when you configure a grid, you need to configure the Selenium drivers for each browser you want to test with on the grid (and by configure I mean copy to a folder).
Setting Up a Selenium Grid
In experimenting with the grid, I decided to set up a two-machine Grid in Azure. Selenium Server (used to run the Hub and the Nodes) is a java application, so it’ll run wherever you can run Java. So I spun up a Resource Group with two VMs (Windows 2012 R2) and installed Java (and added the bin folder to the Path), Chrome and Firefox. I then downloaded the Selenium Server jar file, the IE driver and the Chrome driver (you can see the instructions on installing here). I put the IE and Chrome drivers into c:\selenium\drivers on both machines.
I wanted one machine to be the Hub and run Chrome/Firefox tests, and have the other machine run IE/Firefox tests (yes, Nodes can run happily on the same machine or even on the same machine as the Hub). There are a myriad of options you can specify when you start a Hub or Node, so I scripted a general config that I thought would work as a default case.
To start the Hub, I created a one-line bat file in c:\selenium\server folder (where I put the server jar file):
java -jar selenium-server-standalone-2.53.1.jar -role hub
This command starts up the Hub using port 4444 (the default) on the machine. Don’t forget to open the firewall for this port!
Configuring the nodes took a little longer to work out. The documentation is a bit all over the place (and ambiguous) so I eventually settled on putting some config in a JSON file and some I pass in to the startup command. Here’s the config JSON I have for the IE node:
{
  "capabilities":
  [
    {
      "browserName": "firefox",
      "platform": "WINDOWS",
      "maxInstances": 1
    },
    {
      "browserName": "internet explorer",
      "platform": "WINDOWS",
      "maxInstances": 1
    }
  ],
  "configuration":
  {
    "nodeTimeout": 120,
    "nodePolling": 2000,
    "timeout": 30000
  }
}
This is only the bare minimum of config that you can specify – there are tons of other options that I didn’t need to bother with. All I wanted was for the Node to be able to run Firefox and IE tests. In a similar vein I specify the config for the Chrome node:
{
  "capabilities": [
    {
      "browserName": "firefox",
      "platform": "WINDOWS",
      "maxInstances": 1
    },
    {
      "browserName": "chrome",
      "platform": "WINDOWS"
    }
  ],
  "configuration":
  {
    "nodeTimeout": 120,
    "nodePolling": 2000,
    "timeout": 30000
  }
}
You can see this is almost identical to the config of the IE node, except for the second browser type.
I saved these files as ieNode.json and chromeNode.json in c:\selenium\server\configs respectively.
Then I created a simple PowerShell script that would let me start a node:
param(
    $port,
    [string]$hubHost,
    $hubPort = 4444,

    [ValidateSet('ie', 'chrome')]
    [string]$browser,

    [string]$driverPath = "configs/drivers"
)

$hubUrl = "http://{0}:{1}/grid/register" -f $hubHost, $hubPort
$configFile = "./configs/{0}Node.json" -f $browser

java -jar selenium-server-standalone-2.53.1.jar -role node -port $port -nodeConfig $configFile -hub $hubUrl -D"webdriver.chrome.driver=$driverPath/chromedriver.exe" -D"webdriver.ie.driver=$driverPath/IEDriverServer.exe"
So now I can run the following command on the Hub machine to start a node:
.\startNode.ps1 -port 5555 -hubHost localhost -browser chrome -driverPath c:\selenium\drivers
This will start a node that can run Chrome/Firefox tests using drivers in the c:\selenium\server\drivers path running on port 5555. On the other machine, I copied the same files and just ran this command:
.\startNode.ps1 -port 5556 -hubHost 10.4.0.4 -browser ie -driverPath c:\selenium\drivers
This time the node isn’t on the same machine as the Hub, so I used the Azure vNet internal IP address of the Hub – I also specified I want IE/Firefox tests to run on this node.
Of course I made sure that all these files are in source control!
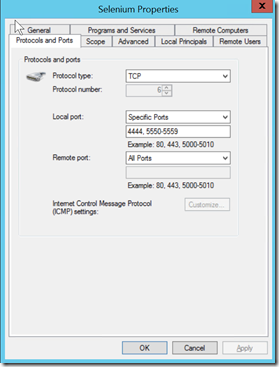
Again I had to make sure that the ports I specify were allowed in the Firewall. I just created a single Firewall rule to allow TCP traffic on ports 4444, 5550-5559 on both machines.
I also opened those ports in the Azure network security group that both machines’ network cards are connected to:
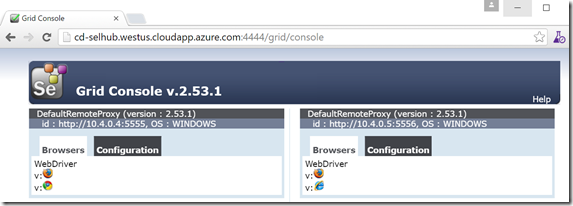
Now I can browse to the Selenium console of my Grid:
Now my hub is ready to run tests!
Writing Tests for Grid Execution
The Selenium Grid is capable of running tests in parallel, spreading tests across the grid. Spoiler alert: it doesn’t run tests in parallel. I can hear you now thinking, “What?!? You just said it can run tests in parallel, and now you say it can’t!”. Well, the grid can spread as many tests as you throw at it – but you have to parallelize the tests yourself!
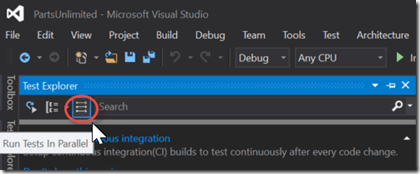
It turns out that you can do this in Visual Studio 2015 and VSTS – but it’s not pretty. If you open up the Test Explorer Window, you’ll see an option to “Run Tests In Parallel” in the toolbar (next to the Group By button):
Again I hear you thinking: “Just flip the switch! Easy!” Whoa, slow down, Dear Reader – it’s not that easy. You have to consider the unit of parallelization. In other words – what does it mean to “Run Tests In Parallel”? Well, Visual Studio runs different assemblies in parallel. Which means that you have to have at least two test projects (assemblies) in order to get any benefit.
In my case I had two tests that I wanted to run against three browsers – IE, Chrome and Firefox. Of course if you have several hundred tests, you probably have them in different assemblies already – hopefully grouped by something meaningful. In my case I chose to group the tests by browser. Here’s what I ended up doing:
- Create a base (abstract) class that contains the Selenium test methods (the actual test code)
- Create three additional projects – one for each browser type – that contains a class that derives from the base class
- Run in parallel
It’s a pity really – since the Selenium libraries abstract the test away from the actual browser. That means you can run the same test against any browser that you have a driver for! However, since we’re going to run tests in a Hub, we need to use a special driver called a RemoteWebDriver. This driver is going to connect the test to the hub using “capabilities” that we define (like what browser to run in).
Let’s consider an example test. Here’s a test I created to check the Search functionality of my website:
protected void SearchTest()
{
    driver.Navigate().GoToUrl(baseUrl + "/");
    driver.FindElement(By.Id("search-box")).Clear();
    driver.FindElement(By.Id("search-box")).SendKeys("tire");

    driver.FindElement(By.Id("search-link")).Click();

    // check that there are 3 results
    Assert.AreEqual(3, driver.FindElements(By.ClassName("list-item-part")).Count);
}
This is a pretty simple test – and as I mentioned before, this post isn’t about the Selenium tests themselves as much as it is about running the tests in a build/release pipeline – so excuse the simple nature of the test code. However, I have to show you some code in order to show you how I got the tests running successfully in the grid.
You can see how the code assumes that there is a “driver” object and that it is instantiated? There’s also a “baseUrl” object. Both of these are essential to running tests in the grid: the driver is an instantiated RemoteWebDriver object that connects us to the Hub, while baseUrl is the base URL of the site we’re testing.
The base class is going to instantiate a RemoteWebDriver for each test (in the test initializer). Each child (test) class is going to specify what capabilities the driver should be instantiated with. The driver constructor needs to know the URL of the grid hub as well as the capabilities required for the test. Here’s the constructor and test initializer in the base class:
public abstract class PartsTests
{
    private const string defaultBaseUrl = "http://localhost:5001";
    private const string defaultGridUrl = "http://10.0.75.1:4444/wd/hub";

    protected string baseUrl;
    protected string gridUrl;

    protected IWebDriver driver;
    private StringBuilder verificationErrors;
    protected ICapabilities capabilities;
    public TestContext TestContext { get; set; }

    public PartsTests(ICapabilities capabilities)
    {
        this.capabilities = capabilities;
    }

    [TestInitialize]
    public void SetupTest()
    {
        if (TestContext.Properties["baseUrl"] != null) //Set URL from a build
        {
            baseUrl = TestContext.Properties["baseUrl"].ToString();
        }
        else
        {
            baseUrl = defaultBaseUrl;
        }
        Trace.WriteLine($"BaseUrl: {baseUrl}");

        if (TestContext.Properties["gridUrl"] != null) //Set URL from a build
        {
            gridUrl = TestContext.Properties["gridUrl"].ToString();
        }
        else
        {
            gridUrl = defaultGridUrl;
        }
        Trace.WriteLine($"GridUrl: {gridUrl}");

        driver = new RemoteWebDriver(new Uri(gridUrl), capabilities);
        verificationErrors = new StringBuilder();
    }

    [TestCleanup]
    public void Teardown()
    {
        try
        {
            driver.Quit();
        }
        catch (Exception)
        {
            // Ignore errors if unable to close the browser
        }
        Assert.AreEqual("", verificationErrors.ToString());
    }

    ...
}
The constructor takes an ICapabilities object which will allow us to specify how we want the test run (or at least which browser to run against). We hold on to these capabilities. The SetupTest() method then reads the “gridUrl” and the “baseUrl” from the TestContext properties (defaulting values if none are present). Finally it created a new RemoteWebDriver using the gridUrl and capabilities. The Teardown() method calls the driver Quit() method, which closes the browser (ignoring errors) and checks that there are no verification errors. Pretty standard stuff.
So how do we pass in the gridUrl and baseUrl? To do that we need a runsettings file – this sets the value of the parameters in the TestContext object.
I added a new XML file to the base project called “selenium.runsettings” with the following contents:
<?xml version="1.0" encoding="utf-8"?>
<RunSettings>
  <TestRunParameters>
    <Parameter name="baseUrl" value="http://localhost:5001" />
    <Parameter name="gridUrl" value="http://localhost:4444/wd/hub" />
  </TestRunParameters>
</RunSettings>
Again I’m using default values for the values of the parameters – this is how I debug locally. Note the “/wd/hub” on the end of the grid hub URL.
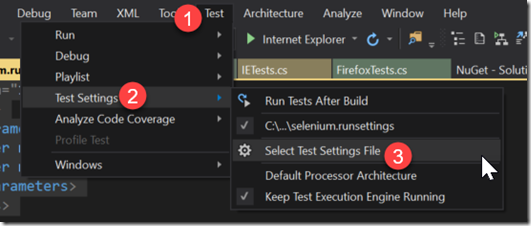
Now I can set the runsettings file in the Test menu:
So what about the child test classes? Here’s what I have for the Firefox tests:
[TestClass]
public class FFTests : PartsTests
{
    public FFTests()
        : base(DesiredCapabilities.Firefox())
    {
    }

    [TestMethod]
    [TestCategory("Firefox")]
    public void Firefox_AddToCartTest()
    {
        AddToCartTest();
    }

    [TestMethod]
    [TestCategory("Firefox")]
    public void Firefox_SearchTest()
    {
        SearchTest();
    }
}
I’ve prepended the test name with Firefox_ (you’ll see why when we run the tests in the release pipeline). I’ve also added the [TestClass] and [TestMethod] attributes as well as [TestCategory]. This is using the MSTest framework, but the same will work with nUnit or xUnit too. Unfortunately the non-MSTest frameworks don’t have the TestContext, so you’re going to have to figure out another method of providing the baseUrl and gridUrl to the test. The constructor is using a vanilla Firefox capability for this test – you can instantiate more complex capabilities if you need them here.
Just for comparison, here’s my code for the ChromeTests file:
[TestClass]
public class ChromeTests : PartsTests
{
    public ChromeTests()
        : base(DesiredCapabilities.Chrome())
    {
    }

    [TestMethod]
    [TestCategory("Chrome")]
    public void Chrome_AddToCartTest()
    {
        AddToCartTest();
    }

    [TestMethod]
    [TestCategory("Chrome")]
    public void Chrome_SearchTest()
    {
        SearchTest();
    }
}
You can see it’s almost identical except for the class name prefix, the [TestCategory] and the capabilities in the constructor.
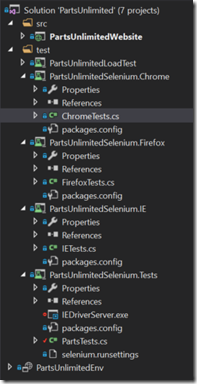
Here’s my project layout:
At this point I can run tests (in parallel) against my “local” grid (I started a hub and two nodes locally to test). Next we need to put all of this into a build/release pipeline.
Creating a Build
You could run the tests during the build, but I wanted my UI tests to be run against a test site that I deploy to, so I felt it more appropriate to run the tests in the release. Before we get to that, we have to build the application (and test code) so that it’s available in the release.
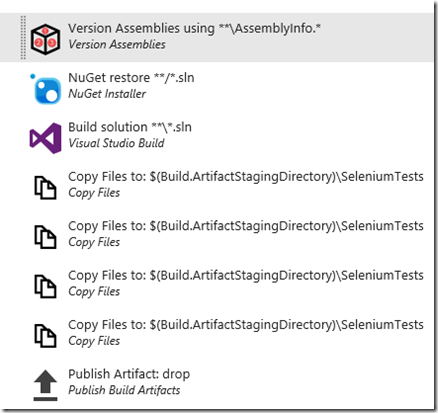
I committed all the code to source control in VSTS and created a build definition. Here’s what the tasks look like:
The first three steps are for building the application and the solution – I won’t bore you with the details. Let’s look at the next five steps though:
The first three “Copy Files” steps copy the binaries for the three test projects I want (one for IE, for Chrome and Firefox):
In each case I’m copying the compiled assemblies of the test project (from say test/PartsUnlimitedSelenium.Chrome\bin$(BuildConfiguration) to $(Build.ArtifactStagingDirectory)\SeleniumTests.
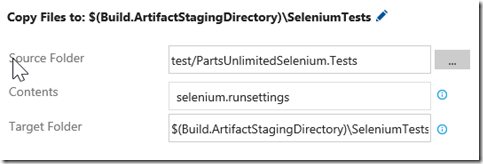
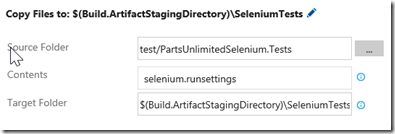
The fourth copy task copies the runsettings file:
The final task publishes the $(Build.ArtifactStagingDirectory) to the server:
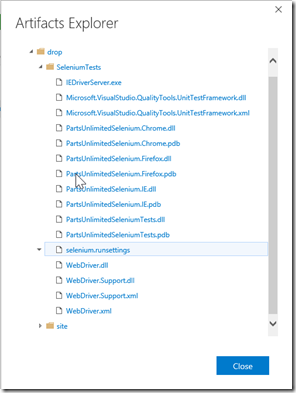
After running the build, I have the following drop:
The “site” folder contains the webdeploy package for my site – but the important bit here is that all the test assemblies (and the runsettings file) are in the SeleniumTests folder.
Running Tests in the Release
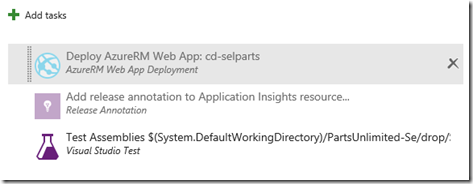
Now that we have the app code (the site) and the test assemblies in a drop location, we’re ready to define a Release. In the release for Dev I have the following steps:
I have all the steps that I need to deploy the application (in this case I’m deploying to Azure). Again, that’s not the focus of this post. The Test Assemblies task is the important step to look at here:
It turns out to be pretty straightforward. I just make sure that “Test Assembly” includes all the assemblies I want to execute – remember you need at least two in order for “Run In Parallel” to have any effect. For Filter Criteria I’ve excluded IE tests – IE tests seem to fail for all sorts of arbitrary reasons that I couldn’t work out – you can leave this empty (or put in a positive expression) if you want to only run certain tests. I specify the path to the runsettings file, and then in “Override TestRun Parameters” I specify the gridUrl and baseUrl that I want to test in this particular environment. I’ve used variables that I define on the environment so that I can clone this for other environments if I need to.
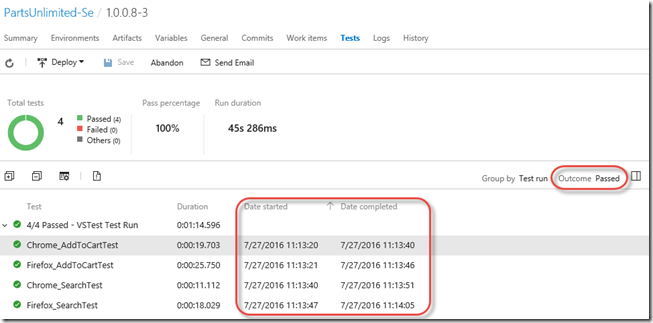
Now when I release, I see that the tests run as part of the release. Clicking on the Tests tab I see the test results. I changed the Outcome filter to show Passed tests and configured the columns to show the “Date started” and “Date completed”. Sure enough I can see that the tests are running in parallel:
Now you can see why I wanted to add the prefix to the test names – this lets me see exactly which browsers are behaving and which aren’t (ahem, IE).
Final Thoughts
Running Selenium Tests in a Grid in VSTS is possible – there are a few hacks required though. You need to create multiple assemblies in order to take advantage of the grid scalability, and this can lead to lots of duplicated and error-prone code (for example when I initially created the Firefox tests, I copied the Chrome class and forgot to change the prefix and [TestCategory] which lead to interesting results). There are probably other ways of dividing your tests into multiple assemblies, and then you could pass the browser in as a Test Parameter and have multiple runs – but then the runs wouldn’t be simultaneous across browsers. A final gotcha is that the runsettings only work for MSTest – if you’re using another framework, chances are you’ll end up creating a json file that you read when the tests start.
You can see that there are challenges whichever way you slice it up. Hopefully the work the test team is doing in VSTS/TFS will improve this story at some stage.
For now, happy Grid testing!
