Running Selenium Tests in Docker using VSTS Release Management

The other day I was doing a POC to run some Selenium tests in a Release. I came across some Selenium docker images that I thought would be perfect – you can spin up a Selenium grid (or hub) container and then join as many node containers as you want to (the node container is where the tests will actually run). The really cool thing about the node containers is that the container is configured with a browser (there are images for Chrome and Firefox) meaning you don’t have to install and configure a browser or manually run Selenium to join the grid. Just fire up a couple containers and you’re ready to test!
The source code for this post is on Github.
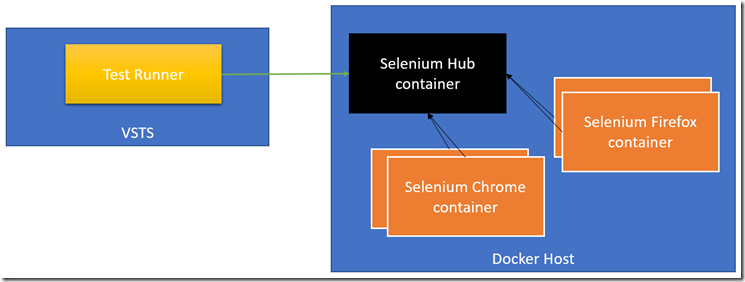
Here’s a diagram of the components:
The Tests
To code the tests, I use Selenium WebDriver. When it comes to instantiating a driver instance, I use the RemoteWebDriver class and pass in the Selenium Grid hub URL as well as the capabilities that I need for the test (including which browser to use) – see line 3:
private void Test(ICapabilities capabilities)
{
    var driver = new RemoteWebDriver(new Uri(HubUrl), capabilities);
    driver.Navigate().GoToUrl(BaseUrl);
    // other test steps here
}

[TestMethod]
public void HomePage()
{
    Test(DesiredCapabilities.Chrome());
    Test(DesiredCapabilities.Firefox());
}
Line 4 includes a setting that is specific to the test – in this case the first page to navigate to.
When running this test, we need to be able to pass the environment specific values for the HubUrl and BaseUrl into the invocation. That’s where we can use a runsettings file.
Test RunSettings
The runsettings file for this example is simple – it’s just XML and we’re just using the TestRunParameters element to set the properties:
<?xml version="1.0" encoding="utf-8" ?>
<RunSettings>
    <TestRunParameters>
        <Parameter name="BaseUrl" value="http://bing.com" />
        <Parameter name="HubUrl" value="http://localhost:4444/wd/hub" />
    </TestRunParameters>
</RunSettings>
You can of course add other settings to the runsettings file for the other environment specific values you need to run your tests. To test the setting in VS, make sure to go to Test->Test Settings->Select Test Settings File and browse to your runsettings file.
The Build
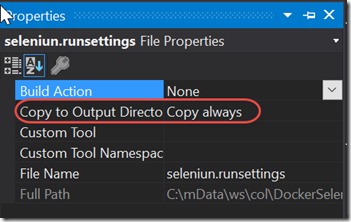
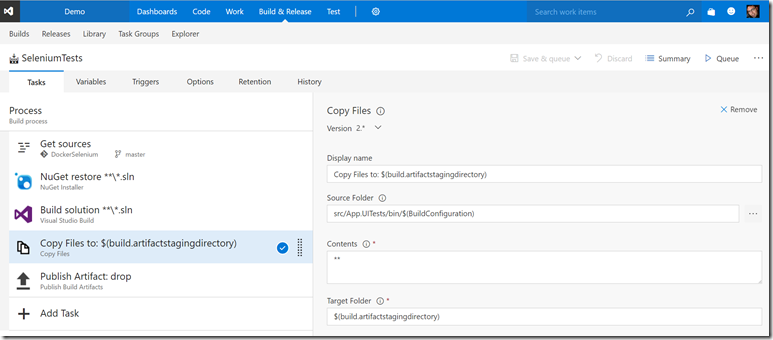
The build is really simple – in my case I just build the test project. Of course in the real world you’ll be building your application as well as the test assemblies. The key here is to ensure that you upload the test assemblies as well as the runsettings file to the drop (more on what’s in the runsettings file later). The runsettings file can be uploaded using two methods: either copy it using a Copy Files task into the artifact staging directory – or you can mark the file’s properties in the solution to “Copy Always” to ensure it’s copied to the bin folder when you compile. I’ve selected the latter option.
Here’s what the properties for the file look like in VS:
Here’s the build definition:
The Docker Host
If you don’t have a docker host, the fastest way to get one is to spin it up in Azure using the Azure CLI – especially since that will create the certificates to secure the docker connection for you! If you’ve got a docker host already, you can skip this section – but you will need to know where the certs are for your host for later steps.
Here are the steps you need to take to do that (I did this all in my Windows Bash terminal):
- Install node and npm
- Install the azure-cli using “npm install –g azure-cli”
- Run “azure login” and log in to your Azure account
- Don’t forget to set your subscription if you have more than one
- Create an Azure Resource Group using “azure group create <name> <location>”
- Run “azure vm image list –l westus –p Canonical” to get a list of the Ubuntu images. Select the Urn of the image you want to base the VM on and store it – it will be something like “Canonical:UbuntuServer:16.04-LTS:16.04.201702240”. I’ve saved the value into $urn for the next command.
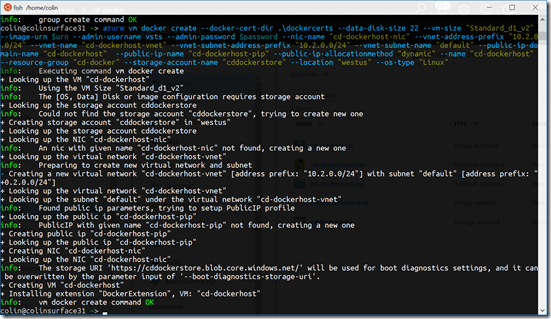
- Run the azure vm docker create command – something like this: azure vm docker create --data-disk-size 22 --vm-size "Standard_d1_v2" --image-urn $urn --admin-username vsts --admin-password $password --nic-name "cd-dockerhost-nic" --vnet-address-prefix "10.2.0.0/24" --vnet-name "cd-dockerhost-vnet" --vnet-subnet-address-prefix "10.2.0.0/24" --vnet-subnet-name "default" --public-ip-domain-name "cd-dockerhost" --public-ip-name "cd-dockerhost-pip" --public-ip-allocationmethod "dynamic" --name "cd-dockerhost" --resource-group "cd-docker" --storage-account-name "cddockerstore" --location "westus" --os-type "Linux" --docker-cert-cn "cd-dockerhost.westus.cloudapp.azure.com"
Here’s the run from within my bash terminal:
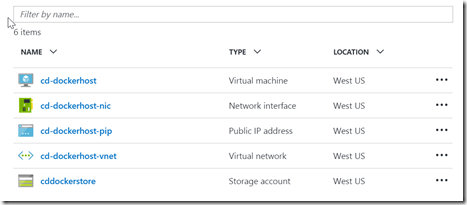
Here’s the result in the Portal:
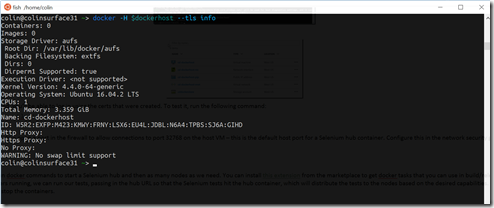
Once the docker host is created, you’ll be able to log in using the certs that were created. To test it, run the following command: docker -H $dockerhost --tls info
I’ve included the commands in a fish script here.
The docker-compose.yml
The plan is to run multiple containers – one for the Selenium Grid hub and any number of containers for however many nodes we want to run tests in. We can call docker run for each container, or we can be smart and use docker-compose!
Here’s the docker-compose.yml file:
hub:
  image: selenium/hub
  ports:
    - "4444:4444"

chrome-node:
  image: selenium/node-chrome
  links:
    - hub

ff-node:
  image: selenium/node-firefox
  links:
    - hub
Here we define three containers – named hub, chrome-node and ff-node. For each container we specify what image should be used (this is the image that is passed to a docker run command). For the hub, we map the container port 4444 to the host port 4444. This is the only port that needs to be accessible outside the docker host. The node containers don’t need to map ports since we’re never going to target them directly. To connect the nodes to the hub, we simple use the links keyword and specify the name(s) of the containers we want to link to – in this case, we’re linking both nodes to the hub container. Internally, the node containers will use this link to wire themselves up to the hub – we don’t need to do any of that plumbing ourselves - really elegant!
The Release
The release requires us to run docker commands to start a Selenium hub and then as many nodes as we need. You can install this extension from the marketplace to get docker tasks that you can use in build/release. Once the docker tasks get the containers running, we can run our tests, passing in the hub URL so that the Selenium tests hit the hub container, which will distribute the tests to the nodes based on the desired capabilities. Once the tests complete, we can optionally stop the containers.
Define the Docker Endpoint
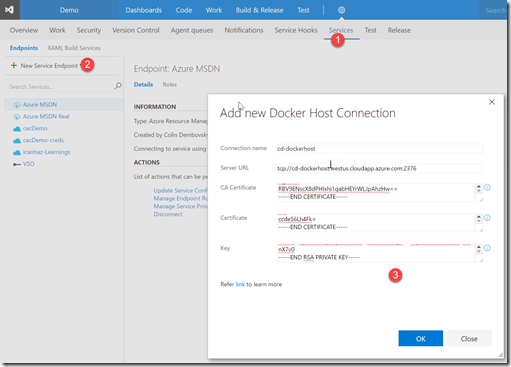
In order to run commands against the docker host from within the release, we’ll need to configure a docker endpoint. Once you’ve installed the docker extension from the marketplace, navigate to your team project and click the gear icon and select Services. Then add a new Docker Host service, entering your certificates:
Docker VSTS Agent
We’re almost ready to create the release – but you need an agent that has the docker client installed so that it can run docker commands! The easiest way to do this – is to run the vsts agent docker image on your docker host. Here’s the command:
docker -H $dockerhost --tls run --env VSTS_ACCOUNT=$vstsAcc --env VSTS_TOKEN=$pat --env VSTS_POOL=docker -it microsoft/vsts-agent
I am connecting this agent to a queue called docker – so I had to create that queue in my VSTS project. I wanted a separate queue because I want to use the docker agent to run the docker commands and then use the hosted agent to run the tests – since the tests need to run on Windows. Of course I could have just created a Windows VM with the agent and the docker bits – that way I could run the release on the single agent.
The Release Definition
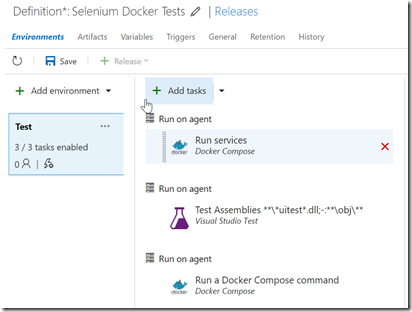
Create a new Release Definition and start from the empty template. Set the build to the build that contains your tests so that the tests become an artifact for the release. Conceptually, we want to spin up the Selenium containers for the test, run the tests and then (optionally) stop the containers. You also want to deploy your app, typically before you run your tests – I’ll skip the deployment steps for this post. You can do all three of these phases on a single agent – as long as the agent has docker (and docker-compose) installed and VS 2017 to run tests. Alternatively, you can do what I’m doing and create three separate phases – the docker commands run against a docker-enabled agent (the VSTS docker image that I we just got running) while the tests run off a Windows agent. Here’s what that looks like in a release:
Here are the steps to get the release configured:
- Create a new Release Definition and rename the release by clicking the pencil icon next to the name
- Rename “Environment 1” to “Test” or whatever you want to call the environment
- Add a “Run on agent” phase (click the dropdown next to the “Add Tasks” button)
- Set the queue for that phase to “docker” (or whatever queue you are using for your docker-enabled agents)

- In this phase, add a “Docker-compose” task and configure it as follows:
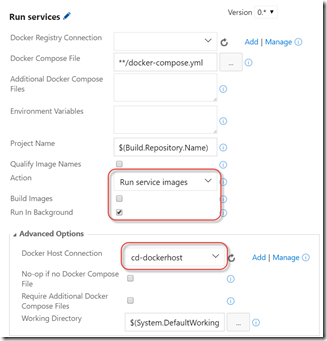
- Change the action to “Run service images” (this ends up calling docker-compose up)
- Uncheck Build Images and check Run in Background
- Set the Docker Host Connection
- In the next phase, add tasks to deploy your app (I’m skipping these tasks for this post)
- Add a VSTest task and configure it as follows:
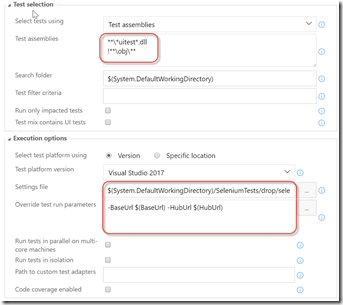
- I’m using V2 of the Test Agent task
- I update the Test Assemblies filter to find any assembly with UITest in the name
- I point the Settings File to the runsettings file
- I override the values for the HubUrl and BaseUrl using environment variables
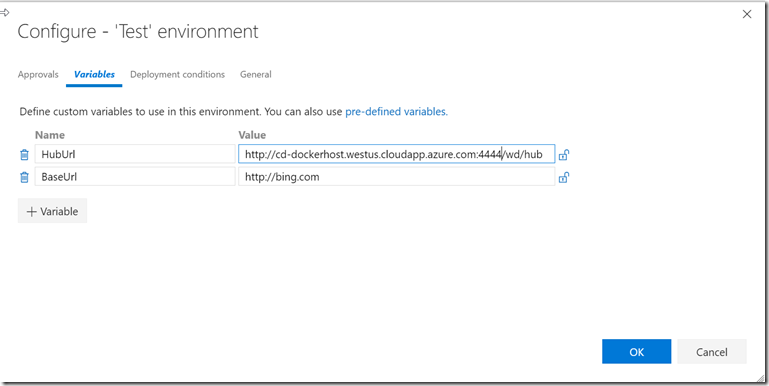
- Click the ellipses button on the Test environment and configure the variables, using the name of your docker host for the HubUrl (note also how the port is the port from the docker-compose.yml file):
- In the third (optional) phase, I use another Docker Compose task to run docker-compose down to shut down the containers
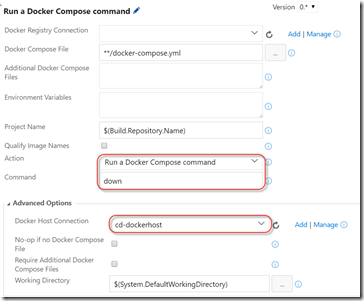
- This time set the Action to “Run a Docker Compose command” and enter “down” for the Command
- Again use the docker host connection
We can now queue and run the release!
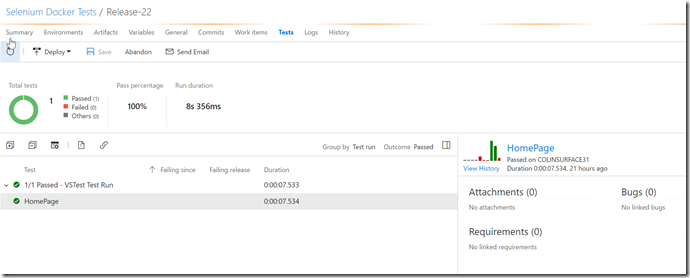
My release is successful and I can see the tests in the Tests tab (don’t forget to change the Outcome filter to Passed – the grid defaults this to Failed):
Some Challenges
Docker-compose SSL failures
I could not get the docker-compose task to work using the VSTS agent docker image. I kept getting certificate errors like this: SSL error: [SSL: CERTIFICATE_VERIFY_FAILED] certificate verify failed (_ssl.c:581)
I did log an issue on the VSTS Docker Tasks repo, but I’m not sure if this is a bug in the extension or the VSTS docker agent. I was able to replicate this behavior locally by running docker-compose. What I found is that I can run docker-compose successfully if I explicitly pass in the ca.pem, cert.pem and key.pem files as command arguments – but if I specified them using environment variables, docker-compose failes with the SSL error. I was able to run docker commands successfully using the Docker tasks in the release – but that would mean running three commands (assuming I only want three containers) in the pre-test phase and another three in the post-test phase to stop each container. Here’s what that would look like:
You can use the following commands to run the containers and link them (manually doing what the docker-compose.yml file does): run -d -P --name selenium-hub selenium/hub run -d --link selenium-hub:hub selenium/node-chrome run -d --link selenium-hub:hub selenium/node-firefox
To get the run for this post working, I just ran the docker-compose from my local machine (passing in the certs explicitly) and disabled the Docker Compose task in my release.
EDIT (3/9/2017): I figured out the issue I was having: when I created the docker host I wasn’t specifying a CN for the certificates. The default is *, which was causing my SSL issues. When I configured the CN correctly using
–docker-cert-cn” “cd-dockerhost.westus.cloudapp.azure.com”, everything worked nicely.
Running Tests in the Hosted Agent
I also could not get the test task to run successfully using the hosted agent – but it did run successfully if I used a private windows agent. This is because at this time VS 2017 is not yet installed on the hosted agent. Running tests from the hosted agent will work just fine once VS 2017 is installed onto it.
Pros and Cons
This technique is quite elegant – but there are pros and cons.
Pros:
- Get lots of Selenium nodes registered to a Selenium hub to enable lots of parallel testing (refer to my previous blog on how to run tests in parallel in a grid)
- No config required – you can run tests on the nodes as-is
Cons:
- Only Chrome and Firefox tests supported, since there are only docker images for these browsers. Technically you could join any node you want to to the hub container if you wanted other browsers, but at that point you may as well configure the hub outside docker anyway.
Conclusion
I really like how easy it is to get a Selenium grid up and running using Docker. This should make testing fast – especially if you’re running tests in parallel. Once again VSTS makes advanced pipelines easy to tame!
Happy testing!
