End to End Walkthrough: Deploying Web Applications Using Team Build and Release Management
I’ve posted previously about deploying web applications using Team Build and Release Management (see Config Per Environment vs Tokenization in Release Management and WebDeploy, Configs and Web Release Management). However, reviewing those posts recently at customers I’ve been working with, I’ve realized that these posts are a little outdated, you need pieces of both to form a full picture and the scripts that I wrote for those posts are now encapsulated in Tasks in my marketplace extension. So in this post I’m going to do a complete end-to-end walkthrough of deploying web applications using Team Build and Release Management. I’ll be including handling configs – arguably the hardest part of the whole process.
Overview
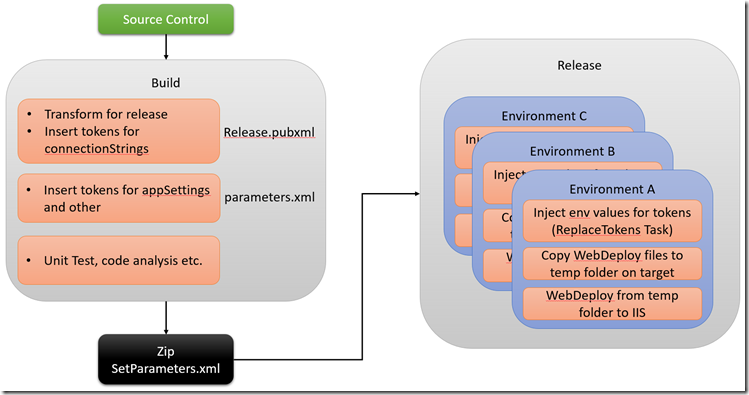
Let’s start with an overview of the process. I like to think of three distinct “areas” – source control, build and release. Conceptually you have tokenized config in source control (more on how to do this coming up). Then you have a build that takes in the source control and produces a WebDeploy package – a single tokenized package that is potentially deployable to multiple environments. The build should not have to know about anything environment specific (such as the correct connection string for Staging or Production, for example). Then release takes in the package and (conceptually) performs two steps: inject environment values for the tokens, and then deploy using WebDeploy. Here’s a graphic (which I’ll refer to as the Flow Diagram) of the process:
I’ve got some details in this diagram that we’ll cover shortly, so don’t worry about the details for now. The point is to clearly separate responsibilities (especially for build and release): build compiles source code, runs tests and performs static code analysis and so on. It shouldn’t have to know anything about environments – the output of the build is a single package with “holes” for environment values (tokens). Release will take in this single package and deploy it to each environment, plugging environment values into the holes as it goes. This guarantees that the bits you test in Dev and Staging are the same bits that get deployed to Prod!
Deep Dive: Configuration
Let’s get down into the weeds of configuration. If you’re going to produce a single package from build, then how should you handle config? Typically you have (at least) a connection string that you want to be different for each environment. Beyond that you probably have appSettings as well. If the build shouldn’t know about these values when it’s creating the package, then how do you manage config? Here are a some options:
- Create a web.config for each environment in source control
- Pros: All your configs are in source control in their entirety
- Cons: Lots of duplications – and you have to copy the correct config to the correct environment; requires a re-build to change config values in release management
- Create a config transform for each environment
- Pros: Less duplication, and you have all the environment values in source control
- Cons: Requires a project (or solution) config per environment, which can lead to config bloat; requires that you create a package per environment during build; requires a re-build to change config values in release management
- Tokenize using a single transform and parameters.xml
- Pros: No duplication; enables a single package that can be deployed to multiple environments; no rebuild required to change config values in release management
- Cons: Environment values aren’t in source control (though they’re in Release Management); learning curve
Furthermore, if you’re targeting Azure, you can use the same techniques as targeting IIS, or you can use Azure Resource Manager (ARM) templates to manage your configuration. This offloads the config management to the template and you assume that the target Azure Web App is correctly configured at the time you run WebDeploy.
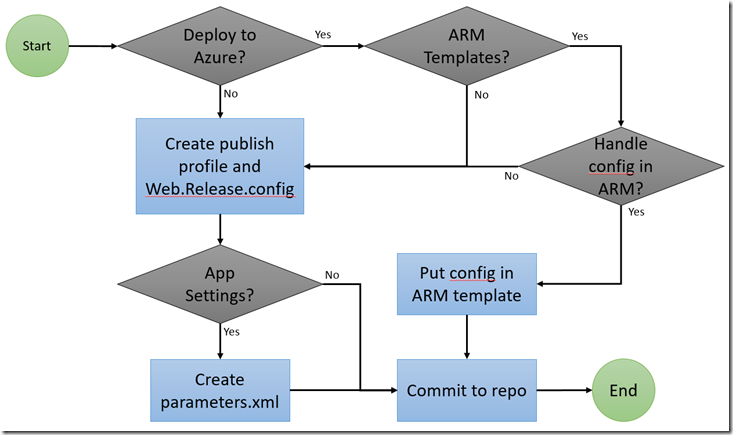
Here’s a decision tree to make this a bit easier to digest:
Let’s walk through it:
- If you’re deploying to Azure, and using ARM templates, just make sure that you configure the settings correctly in the template (I won’t cover how to do this in this post)
- If you’re deploying to IIS (or you’re deploying to Azure and don’t have ARM templates or just want to manage config in the same manner as you would for IIS), you should create a single publish profile using right-click->Publish (on the web application) called “Release”. This should target the release configuration and you should tokenize the connection strings in the wizard (details coming up)
- Next, if you have appSettings, you’ll have to create a parameters.xml file (details coming up)
- Commit to source control
For the remainder of this post I’m going to assume that you’re deploying to IIS (or to Azure and handling config outside of an ARM template).
Creating a Publish Profile
So what is this publish profile and why do you need it? The publish profile enables you to:
- provide a single transform (via the Web.release.config) that makes your config release-ready (removing the debug compilation property, for example)
- tokenize the connection strings
To create the profile, right-click your web application project and select “Publish…”. Then do the following:
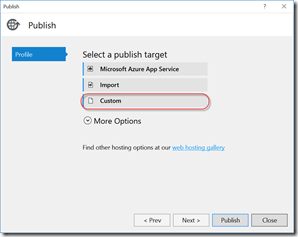
- Select “Custom” to create a new custom profile. Name this “Release” (you can name this anything, but you’ll need to remember the name for the build later)
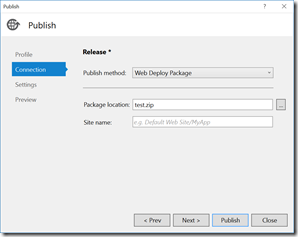
- On the Connection page, change the Publish method to “Web Deploy Package”. Type anything you want for the filename and leave the site name empty. Click Next.
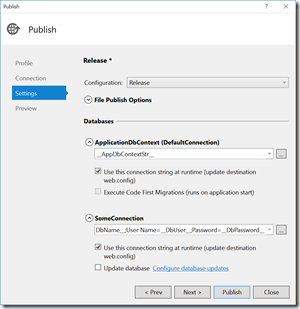
- On the Settings page, select the configuration you want to compile. Typically this is Release – remember that the name of the configuration here is how the build will know which transform to apply. If you set this to Release, it will apply Web.Release.config – if you set it to Debug it will apply Web.Debug.Release. Typically you want to specify Release here since you’re aiming to get this site into Prod (otherwise why are you coding at all?) and you probably don’t want debug configuration in Prod!
- You’ll see a textbox for each connection string you have in your Web.config. You can either put a single token in or a tokenized connection string. In the example below, I’ve used a single token (“__AppDbContextStr__”) for the one connection string and a tokenized string (“Server=__DbServer__;Initial Catalog=__DbName__;User Name=__DbUser__;Password=__DbPassword__”) for the other (just so you can see the difference). I’m using double underscore pre- and post-fix for the tokens:
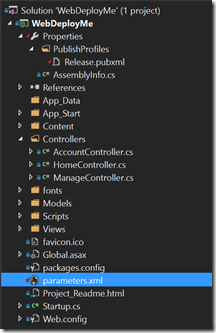
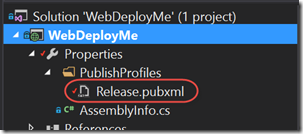
- Now click “Close” (don’t hit publish). When prompted to save the profile, select yes. This creates a Release.pubxml file in the Properties folder (the name of the file is the name of the profile you selected earlier):
Creating a parameters.xml File
The publish profile takes care of the connection strings – but you will have noticed that it doesn’t ask for values for appSettings (or any other configuration) anywhere. In order to tokenize anything in your web.config other than connection strings, you’ll need to create a parameters.xml file (yes, it has to be called that) in the root of your web application project. When the build runs, it will use this file to expose properties for you to tokenize (it doesn’t actually transform the config at build time).
Here’s a concrete example: in my web.config, I have the following snippet:
<appSettings>
  ...
  <add key="Environment" value="debug!" />
</appSettings>
There’s an appSetting key called “Environment” that has the value “debug!”. When I run or debug out of Visual Studio, this is the value that will be used. If I want this value to change on each environment I target for deployment, I need to add a parameters.xml file to the root of my web application with the following xml:
<?xml version="1.0" encoding="utf-8" ?>
<parameters>
  <parameter name="Environment" description="doesn't matter" defaultvalue=" __Environment__" tags="">
    <parameterentry kind="XmlFile" scope="\\web.config$" match="/configuration/appSettings/add[@key='Environment']/@value">
    </parameterentry>
  </parameter>
</parameters>
Lines 3-6 are repeated for each parameter I want to configure. Let’s take a deeper look:
- parameter name (line 3) – by convention it should be the name of the setting you’re tokenizing
- parameter description (line 3) – totally immaterial for this process, but you can use it if you need to. Same with tags.
- parameter defaultvalue (line 3) – this is the token you want injected – notice the double underscore again. Note that this can be a single token or a tokenized string (like the connection strings above)
- parameterentry match (line 4) – this is the xpath to the bit of config you want to replace. In this case, the xpath says in the “configuration” element, find the “appSetting” element, then find the “add” element with the key property = ‘Environment’ and replace the value parameter with the defaultvalue.
Here you can see the parameters.xml file in my project:
To test your transform, right-click and publish the project using the publish profile (for this you may want to specify a proper path for the Filename in the Connection page of the profile). After a successful publish, you’ll see 5 files. The important files are the zip file (where the bits are kept – this is all the binary and content files, no source files) and the SetParameters.xml file:
Opening the SetParameters.xml file, you’ll see the following:
<?xml version="1.0" encoding="utf-8"?>
<parameters>
  <setParameter name="IIS Web Application Name" value="Default Web Site/WebDeployMe_deploy" />
  <setParameter name="Environment" value=" __Environment__" />
  <setParameter name="DefaultConnection-Web.config Connection String" value=" __AppDbContextStr__" />
  <setParameter name="SomeConnection-Web.config Connection String" value="Server= __DbServer__ ;Initial Catalog= __DbName__ ;User Name= __DbUser__ ;Password= __DbPassword__" />
</parameters>
You’ll see the tokens for the appSetting (Environment, line 4) and the connection strings (lines 5 and 6). Note how the tokens live in the SetParameters.xml file, not in the web.config file! In fact, if you dive into the zip file and view the web.config file, you’ll see this:
<connectionStrings>
  <add name="DefaultConnection" connectionString="$(ReplacableToken_DefaultConnection-Web.config Connection String_0)" providerName="System.Data.SqlClient" />
  <add name="SomeConnection" connectionString="$(ReplacableToken_SomeConnection-Web.config Connection String_0)" providerName="System.Data.SqlClient" />
</connectionStrings>
<appSettings>
  ...
  <add key="Environment" value="debug!" />
</appSettings>
You can see that there are placeholders for the connection strings, but the appSetting is unchanged from what you have in your web.config! As long as your connection strings have placeholders and your appSettings are in the SetParameters.xml file, you’re good to go – don’t worry, WebDeploy will still inject the correct values for your appSettings at deploy time (using the xpath you supplied in the parameters.xml file).
Deep Dive: Build
You’re now ready to create the build definition. There are some additional build tasks which may be relevant – such as creating dacpacs from SQL Server Data Tools (SSDT) projects to manage database schema changes – that are beyond the scope of this post. As for the web application itself, I like to have builds do the following:
- Version assemblies to match the build number (optional, but recommended)
- Run unit tests, code analysis and other build verification tasks
- Create the WebDeploy package
To version the assemblies, you can use the VersionAssemblies task from my build tasks extension in the marketplace. You’ll need the ReplaceTokens task for the release later, so just install the extension even if you’re not versioning. To show the minimum setup required to get the release working, I’m skipping unit tests and code analysis – but this is only for brevity. I highly recommend that unit testing and code analysis become part of every build you have.
Once you’ve created a build definition:
- Click on the General tab and change the build number format to 1.0.0$(rev:.r). This makes the first build have the number 1.0.0.1, the second build 1.0.0.2 etc.
- Add a VersionAssemblies task as the first task. Set the Source Path to the folder that contains the projects you want to version (typically the root folder). Leave the rest defaulted.
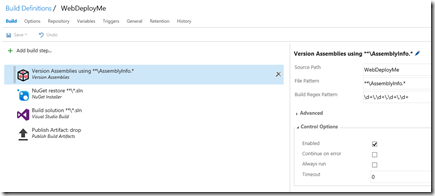
- Leave the NuGet restore task as-is (you may need to edit the solution filter if you have multiple solutions in the repo)
- On the VS Build task, edit the MSBuild Arguments parameter to be /p:DeployOnBuild=true /p:PublishProfile=Release /p:PackageLocation=$(build.artifactstagingdirectory)
- This tells MSBuild to publish the site using the profile called Release (or whatever name you used for the publish profile you created) and place the package in the build artifact staging directory

- Now you should put in all your code analysis and test tasks – I’m omitting them for brevity
- The final task should be to publish the artifact staging directory, which at this time contains the WebDeploy package for your site
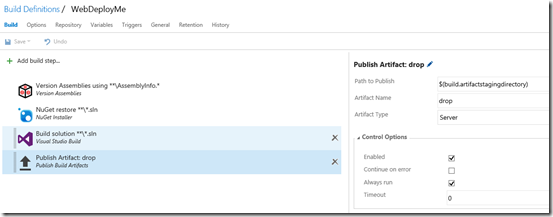
Run the build. When complete, the build drop should contain the site zip and SetParameters.xml file (as well as some other files):
You now have a build that is potentially deployable to multiple environments.
Deep Dive: Release
In order for the release to work correctly, you’ll need to install some extensions from the Marketplace. If you’re targeting IIS, you need to install the IIS Web App Deployment Using WinRM Extension. For both IIS and Azure deployments, you’ll need the ReplaceTokens task from my custom build tasks extension.
There are a couple of ways you can push the WebDeploy package to IIS:
- Use the IIS Web App Deployment using WinRM task. This is fairly easy to use, but requires that you copy the zip and SetParameters files to the target server deploying.
- Use the cmd file that gets generated with the zip and SetParameters files to deploy remotely. This requires you to know the cmd parameters and to have the WebDeploy remote agent running on the target server.
I recommend the IIS task generally – unless for some or other reason you don’t want to open up WinRM.
So there’s some configuration required on the target IIS server:
- Install WebDeploy
- Install WebDeploy Remote Agent – for using the cmd. Note: if you install via Web Platform Installer you’ll need to go to Programs and Features and Modify the existing install, since the remote agent isn’t configured when installing WebDeploy via WPI
- Configure WinRM – for the IIS task. You can run “winrm quickconfig” to get the service started. If you need to deploy using certificates, then you’ll have to configure that too (I won’t cover that here)
- Firewall – remember to open ports for WinRM (5895 or 5986 for default WinRM HTTP or HTTPS respectively) or 8172 for the WebDeploy remote agent (again, this is the default port)
- Create a service account that has permissions to copy files and “do stuff” in IIS – I usually recommend that this user account be a local admin on the target server
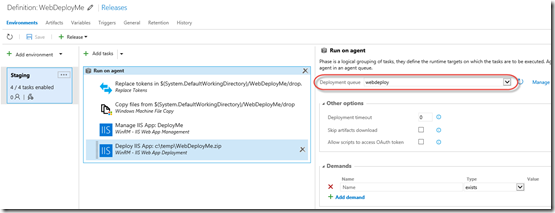
Once you’ve done that, you can create the Release Definition. Create a new release and specify the build as the primary artifact source. For this example I’m using the IIS task to deploy (and create the site in IIS – this is optional). Here are the tasks you’ll need and their configs:
- Replace Tokens Task
- Source Path – the path to the folder that contains the SetParameters.xml file within the drop
- Target File Pattern – set to *.SetParameters.xml

- Windows Machine File Copy Task
- Copy the drop folder (containing the SetParameters.xml and website zip files) to a temp folder on the target server. Use the credentials of the service account you created earlier. I recommend using variables for all the settings.
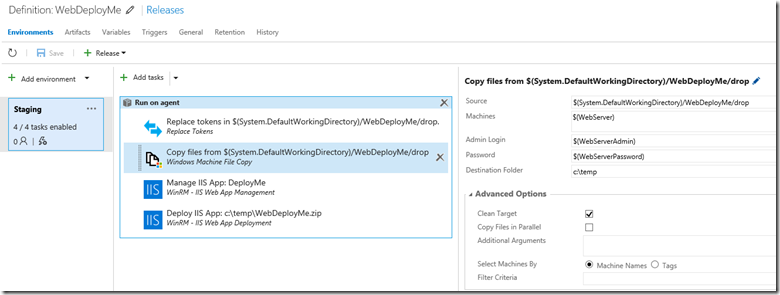
- (Optional) WinRM – IIS Web App Management Task
- Use this task to create (or update) the site in IIS, including the physical path, host name, ports and app pool. If you have an existing site that you don’t want to mess with, then skip this task.
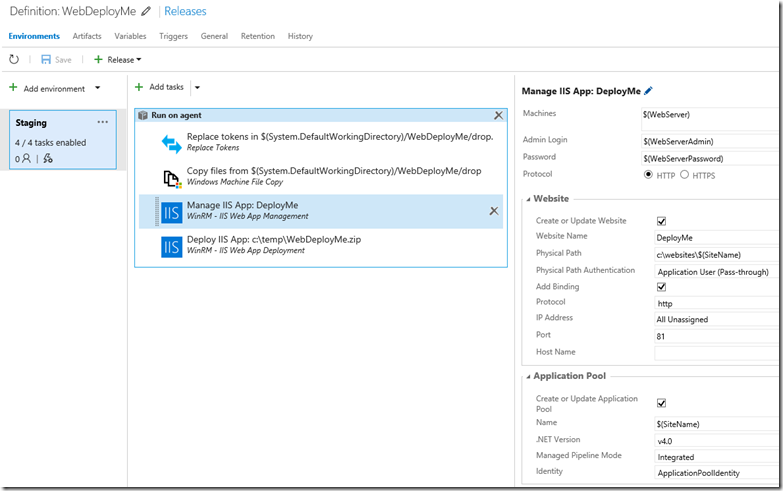
- WinRM – IIS Web App Deployment Task
- This task takes the (local) path of the site zip file and the SetParameters.xml file and deploys to the target IIS site.
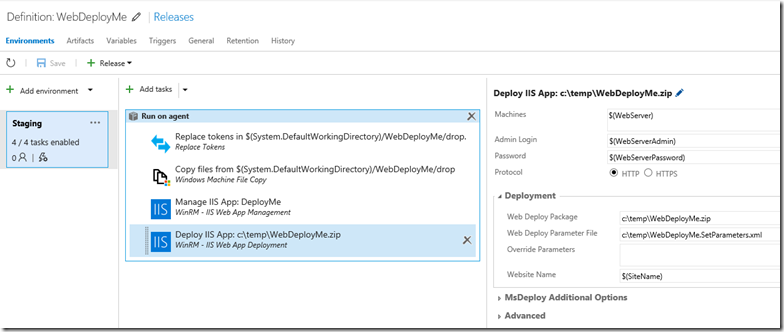
- You can supply extra WebDeploy args if you like – there are some other interesting switches under the MSDeploy Additional Options section.
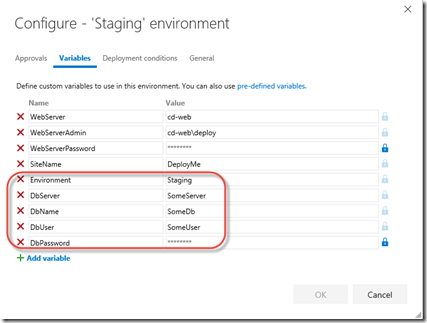
Finally, open the Environment variables and supply name/value pairs for the values you want injected. In the example I’ve been using, I’ve got a token for Environment and then I have a tokenized connection string with tokens for server, database, user and password. These are the variables that the Replace Tokens task uses to inject the real environment-specific values into the SetParameters file (in place of the tokens). When WebDeploy runs, it transforms the web.config in the zip file with the values that are in the SetParameters.xml file. Here you can see the variables:
You’ll notice that I also created variables for the Webserver name and admin credentials that the IIS and Copy Files tasks use.
You can of course do other things in the release – like run integration tests or UI tests. Again for brevity I’m skipping those tasks. Also remember to make the agent queue for the environment one that has an agent that can reach the target IIS server for that environment. For example I have an agent queue called “webdeploy” with an agent that can reach my IIS server:
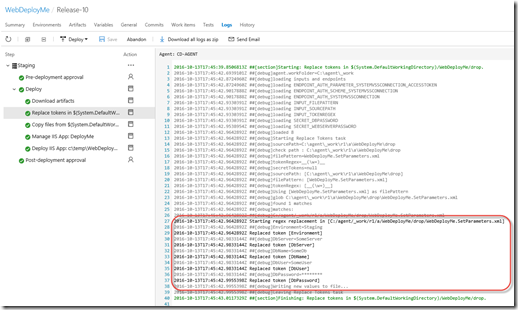
I’m now ready to run the deployment. After creating a release, I can see that the tasks completed successfully! Of course the web.config is correct on the target server too.
Deploying to Azure
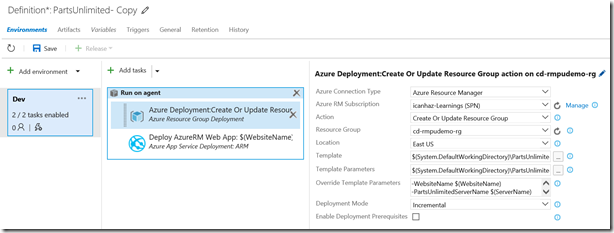
As I’ve noted previously if you’re deploying to Azure, you can put all the configuration into the ARM template (see an example here – note how the connection strings and Application Insights appSettings are configured on the web application resource). That means you don’t need the publish profile or parameters.xml file. You’ll follow exactly the same process for the build (just don’t specify the PublishProfile argument). The release is a bit easier too – you first deploy the resource group using the Azure Deployment: Create or Update Resource Group task like so:
You can see how I override the template parameters – that’s how you “inject” environment specific values.
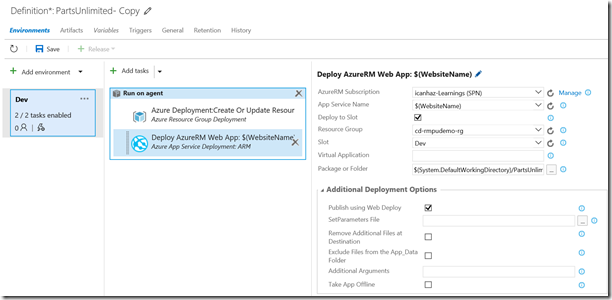
Then you use a Deploy AzureRM Web App task (no need to copy files anywhere) to deploy the web app like so:
I specify the Azure Subscription – this is an Azure ARM service endpoint that I’ve preconfigured – and then the website name and optionally the deployment slot. Here I am deploying to the Dev slot – there are a couple extensions in the marketplace that allow you to swap slots (usually after you’ve smoke-tested the non-prod slot to warm it up and ensure it’s working correctly). This allows you to have zero downtime. The important bit here is the Package or Folder argument – this is where you’ll specify the path to the zip file.
Of course if you don’t have the configuration in an ARM template, then you can just skip the ARM deployment task and run the Deploy AzureRM Web App task. There is a parameter called SetParameters file (my contribution to this task!) that allows you to specify the SetParameters file. You’ll need to do a Replace Tokens task prior to this to make sure that environment specific values are injected.
For a complete walkthrough of deploying a Web App to Azure with an ARM template, look at this hands-on-lab.
Conclusion
Once you understand the pieces involved in building, packaging and deploying web applications, you can fairly easily manage configuration without duplicating yourself – including connection strings, appSettings and any other config – using a publish profile and a parameters.xml file. Then using marketplace extensions, you can build, version, test and package the site. Finally, in Release Management you can inject environment specific values for your tokens and WebDeploy to IIS or to Azure.
Happy deploying!
