Config Per Environment vs Tokenization in Release Management
In my previous post I experimented with WebDeploy to Azure websites. My issue with the out-of-the-box Azure Web App Deploy task is that you can specify the WebDeploy zip file, but you can’t specify any environment variables other than connection strings. I showed you how to tokenize your configuration and then use some PowerShell to get values defined in the Release to replace the tokens at deploy time. However, the solution still felt like it needed some more work.
At the same time that I was experimenting with Release Management in VSTS, I was also writing a Hands On Lab for Release Management using the PartsUnlimited repo. While writing the HOL, I had some debate with the Microsoft team about how to manage environment variables. I like a clean separation between build and deploy. To achieve that, I recommend tokenizing configuration, as I showed in my previous post. That way the build produces a single logical package (this could be a number of files, but logically it’s a single output) that has tokens instead of values for environment config. The deployment process then fills in the values at deployment time. The Microsoft team were advocating hard-coding environment variables and checking them into source control – a la “infrastructure as code”. The debate, while friendly, quickly seemed to take on the the feel of an unwinnable debate like “Git merge vs rebase”. I think having both techniques in your tool belt is good, allowing you to select the one which makes sense for any release.
Config Per Environment vs Tokenization
There are then (at least) two techniques for handling configuration. I’ll call them “config per environment” and “tokenization”.
In “config per environment”, you essentially hard-code a config file per environment. At deploy time, you overwrite the target environment config with the config from source control. This could be an xcopy operation, but hopefully something a bit more intelligent – like an ARM Template param.json file. When you define an ARM template, you define parameters that are passed to the template when it is executed. You can also then define a param.json file that supplies the parameters. For example, look at the FullEnvironmentSetup.json and FullEnvironmentSetup.param.json file in this folder of the PartsUnlimited repo. Here’s the param.json file:
{
    "$schema": "http://schema.management.azure.com/schemas/2015-01-01/deploymentParameters.json#",
    "contentVersion": "1.0.0.0",
    "parameters": {
        "WebsiteName": {
            "value": ""
        },
        "PartsUnlimitedServerName": {
            "value": ""
        },
        "PartsUnlimitedHostingPlanName": {
            "value": ""
        },
        "CdnStorageAccountName": {
            "value": ""
        },
        "CdnStorageContainerName": {
            "value": ""
        },
        "CdnStorageAccountNameForDev": {
            "value": ""
        },
        "CdnStorageContainerNameForDev": {
            "value": ""
        },
        "CdnStorageAccountNameForStaging": {
            "value": ""
        },
        "CdnStorageContainerNameForStaging": {
            "value": ""
        }
    }
}
You can see how the parameters match the parameters defined in the template json file. In this case, since the repo is public, the values are just empty strings – but you can imagine how you could define “dev.param.json” and “staging.param.json” and so on – each environment gets its own param.json file. Then at deploy time, you specify to the release which param.json file to use for that environment in the Deploy Azure Resource Group task.
I’m still not sure I like hard-coding values and committing them to source control. The Microsoft team argued that this is “config as code” – but I still think that defining values in Release Management constitutes config as code, even if the code isn’t committed into source control. I’m willing to concede if you’re deploying to Azure using ARM – but I don’t think too many people are at present. Also, there’s the issue of sensitive information going to source control – in this case, the template actually requires a password field (not defined in the param file) – are you going to hardcode usernames/passwords into source control? And even if you do, if you just want to change a value, you need to create a new build since there’s no way to use the existing build – which is probably not what you want!
Let’s imagine you’re deploying your web app to IIS instead of Azure. How do you manage your configuration in that case? “Use config transformations!” you cry. The problem – as I pointed out in my previous post – is that if you have a config transform for each environment, you have to build a package for each environment, since the transformation occurs at build time, not at deploy time. Hence my preference for a single transform that inserts tokens into the WebDeploy package at build time that can be filled in with actual values at deploy time. This is what I call “tokenization”.
So when do you use config-per-environment and when do you use tokenization? I think that if you’ve got ARM templates, use config-per-environment. It’s powerful and elegant. However, even if you’re using ARM, if you have numerous environments, and environment configs change frequently, you may want to opt for tokenization. When you use config-per-environment, you’ll have to queue a new build to get the new config files into the drop that the release is deploying – while tokenization lets you change the value in Release Management and re-deploy an existing package. So if you prefer not to rebuild your binaries just to change an environment variable, then use tokenization. Also, if you don’t want to store usernames/passwords or other sensitive data in source control, then tokenization is better – sensitive information can be masked in Release Management. Of course you could do a combination – storing some config in source code and then just using Release Management for defining sensitive values.
Docker Environment Variables
As an aside, I think that Docker encourages tokenization. Think about how you wouldn’t hard-code config into the Dockerfile – you’d “assume” that certain environment variables are set. Then when you run an instance of the image, you would specify the environment variable values as part of the run command. This is (conceptually anyway) tokenization – the image has “placeholders” for the config that are “filled in” at deploy time. Of course, nothing stops you from specifying a Dockerfile per environment, but it would seem a bit strange to do so in the context of Docker.
You, dear reader, will have to decide which is better for yourself!
New Custom Build Tasks – Replace Tokens and Azure WebDeploy
So I still like WebDeploy with tokenization – but the PowerShell-based solution I hacked out in my previous post still felt like it could use some work. I set about seeing if I could wrap the PowerShell scripts into custom Tasks. I also felt that I could improve on the arguments passed to the WebDeploy cmd file – specifically for Azure Web Apps. Why should you download the Web App publishing profile manually if you can specify credentials to the Azure subscription as a Service Endpoint? Surely it would be possible to suck down the publishing profile of the website automatically? So I’ve created two new build tasks – Replace Tokens and Azure WebDeploy.
Replace Tokens Task
I love how Octopus Deploy automatically replaces web.config keys if you specify matching environment variables in a deployment project. I did something similar in my previous post with some PowerShell. The Replace Tokens task does exactly that – using some Regex, it will replace any matching token with the environment variable (if defined) in Release Management. It will work nicely on the WebDeploy SetParams.xml file, but could be used to replace tokens on any file you want. Just specify the path to the file (and optionally configure the Regex) and you’re done. This task is implemented in node, so it’ll work on any platform that the VSTS agent can run on.
Azure WebDeploy Task
I did indeed manage to work out how to get the publishing username and password of an Azure website from the context of an Azure subscription. So now you drop a “Replace Tokens” task to replace tokens in the SetParams.xml file, and then drop an Azure WebDeploy task into the Release. This looks almost identical to the out-of-the-box “Azure Web App Deployment” task except that it will execute the WebDeploy command using the SetParams.xml file to override environment variables.
Using the Tasks
I tried the same hypothetical deployment scenario I used in my previous post – I have a website that needs to be deployed to IIS for Dev, to a staging deployment slot in Azure for staging, and to the production slot for Production. I wanted to use the same tokenized build that I produced last time, so I didn’t change the build at all. Using my two new tasks, however, made the Release a snap.
Dev Environment
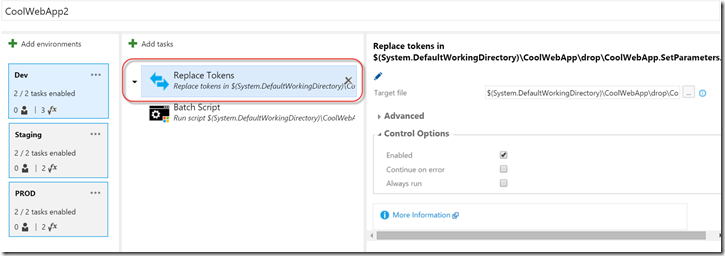
Here’s the definition in the Dev environment:
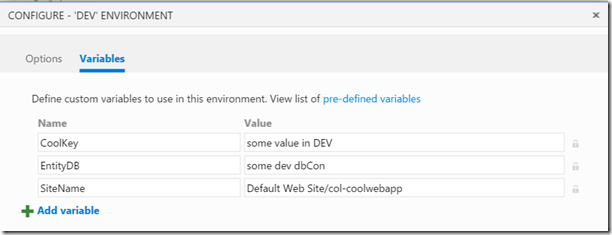
You can see the “Replace Tokens” task – I just specified the path to the SetParams.xml file as the “Target File”. The environment variables look like this:
Note how I define the app setting (CoolKey), the connection string (EntityDB) and the site name (the IIS virtual directory name of the website). The “Replace Tokens” path finds the corresponding tokens and replaces them with the values I’ve defined.
To publish to IIS, I can just use the “Batch Script” task:
I specify the path to the cmd file (produced by the build) and then add the arguments “/Y” to do the deployment (as opposed to a what-if) and use the “/M” argument to specify the IIS server I’m deploying to. Very clean!
Staging and Production Environments
For the staging environment, I use the same “Replace Tokens” task. The variables, however, look as follows:
The SiteName variable has been removed. This is because the “Azure WebDeploy” task will work out the site name internally before invoking WebDeploy.
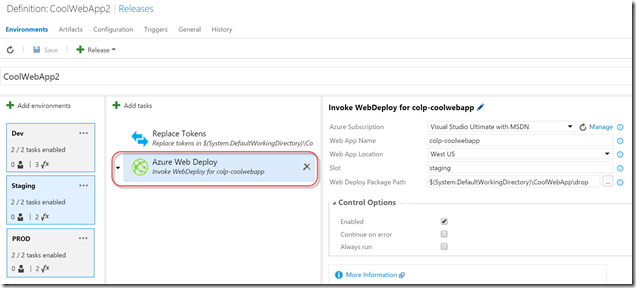
Here’s what the Azure WebDeploy task looks like in Staging:
The parameters are as follows:
- Azure Subscription – the Azure subscription Service Endpoint – this sets the context for the execution of this task
- Web App Name – the name of the Web App in Azure
- Web App Location – the Azure region that the site is in
- Slot – the deployment slot (leave empty for production slot)
- Web Deploy Package Path – the path to the webdeploy zip, SetParams.xml and cmd files
Internally, the task connects to the Azure subscription using the Endpoint credentials. It then gets the web app object (via the name) and extracts the publishing username/password and site name, taking the slot into account (the site name is different for each slot). It then replaces the SiteName variable in the SetParametes.xml file before calling WebDeploy via the cmd (which uses the zip and the SetParameters.xml file). Again, this looks really clean.
The production environment is the same, except that the Slot is empty, and the variables have production values.
IIS Web Application Deployment Task
After my last post, a reader tweeted me to ask why I don’t use the out-of-the-box IIS Web Application Deployment task. The biggest issue I have with this task is that it uses WinRM to remote to the target machine and then invokes WebDeploy “locally” in the WinRM session. That means you have to install and configure WinRM on the target machine before deploying. On the plus side, it does allow you to specify the SetParameters.xml file and even override values at deploy time. It can work against Azure Web Apps too. You can use it if you wish – just remember to use the “Replace Tokens” task before to get environment variables into your SetParameters.xml file!
Conclusion
Whichever method you prefer – config per environment or tokenization – Release Management makes your choice a purely philosophical debate. Due to its customizable architecture, there’s not too much technical difference between the methods when it comes to defining the Release Definition. That, to my mind, assures me that Release Management in VSTS is a fantastic tool.
So make your choice and happy releasing!


