WebDeploy, Configs and Web Release Management

It’s finally here – the new web-based Release Management (WebRM). At least, it’s here in preview on VSTS (formerly VSO) and should hopefully come to TFS 2015 in update 2.
I’ve blogged frequently about Release Management, the “old” WPF tool that Microsoft purchased from InCycle (it used to be called InRelease). The tool was good in some ways, and horrible in others – but it always felt like a bit of a stop-gap while Microsoft implemented something truly great – which is what WebRM is!
One of the most common deployment scenarios is deploying web apps – to IIS or to Azure. I blogged about using the old tool along with WebDeploy here. This post is a follow-on – how to use WebDeploy and WebRM correctly.
First I want to outline a problem with the out-of-the-box Tasks for deploying web apps. Then I’ll talk about how to tokenize the build package ready for multi-environment deployments, and finally I’ll show you how to create a Release Definition.
Azure Web App Deployment Task Limitations
If you create a new Release Definition, there is an “Azure Web App Deployment” Task. Why not just use that to deploy web apps? There are a couple of issues with this Task:
- You can’t use it to deploy to IIS
- You can’t manage different configurations for different environments (with the exception of connection strings)
The Task is great in that it uses a predefined Azure Service Endpoint, which abstracts credentials away from the deployment. However, the underlying implementation invokes an Azure PowerShell cmdlet Publish-AzureWebsiteProject. This cmdlet works – as long as you don’t intend to change any configuration except the connection strings. Have different app settings in different environments? You’re hosed. Here’s the Task UI in VSTS:
The good:
- You select the Azure subscription from the drop-down – no messing with passwords
- You can enter a deployment slot
The bad:
- You have to select the zip file for the packaged site – no place for handling configs
- Additional arguments – almost impossible to figure out what to put here. You can use this to set connection strings if you’re brave enough to figure it out
The ugly:
- Web App Name is a combo-box, but it’s never populated, so you have to type the name yourself (why is it a combo-box then?)
In short, this demo’s nicely, but you’re not really going to use it for any serious deployments – unless you’ve set the app settings on the slots in the Azure Portal itself. Perhaps this will work for you – but if you change a setting value (or add a new setting) you’re going to have to manually update the slot using the Portal. Not a great automation story.
Config Management
So besides not being able to use the Task for IIS deployments, your biggest challenge is config management. Which is ironic, since building a WebDeploy package actually handles the config well – it places config into a SetParameters.xml file. Unfortunately the Task (because it is calling Publish-AzureWebsiteProject under the hood) only looks for the zip file – it ignores the SetParameters file.
So I got to thinking – and I stole an idea from Octopus Deploy: what if the deployment would just automagically replace any config setting value with any correspondingly named variable defined in the Release Definition for the target Environment? That would mean you didn’t have to edit long lists of arguments at all. Want a new value? Just add it to the Environment variables and the deployment takes care of it for you.
The Solution
The solution turned out to be fairly simple:
For the VS Solution:
- Add a parameters.xml file to your Website project for any non-connecting string settings you want to manage, using tokens for values
- Create a publish profile that inserts tokens for the website name and any db connection strings
For the Build:
- Configure a Team Build to produce the WebDeploy package (and cmd and SetParameters files) using the publish profile
- Configure the Build to upload the zip and supporting files as the output
For the Release:
- Write a script to do the parameter value substitution (replacing tokens with actual values defined in the target Environment) into the SetParameters file
- Invoke the cmd to deploy the Website
Of course, the “parameter substituting script” has to be checked into the source repo and also included as a build output in order for you to use it in the Release.
Creating a Tokenized WebDeploy Package in a Team Build
Good releases start with good packages. Since the same package is going to be deployed to multiple environments, you cannot “hardcode” any config settings into the package. So you have to create the package in such a way that it has tokens for any config values that the Release pipeline will replace with Environment specific values at deployment time. In my previous WebDeploy and Release Management post, I explain how to add the parameters.xml file and how to create a publish profile to do exactly that. That technique stays exactly the same as far as the VS solution goes.
Here’s my sample parameters.xml file for this post:
<!--?xml version="1.0" encoding="utf-8" ?-->
<parameters>
  <parameter name="CoolKey" description="The CoolKey setting" defaultvalue=" __CoolKey__" tags="">
    <parameterentry kind="XmlFile" scope="\\web.config$" match="/configuration/appSettings/add[@key='CoolKey']/@value">
    </parameterentry>
  </parameter>
</parameters>
Note how I’m sticking with the double-underscore pre- and post-fix as the token, so the value (token) for CoolKey is __CoolKey__.
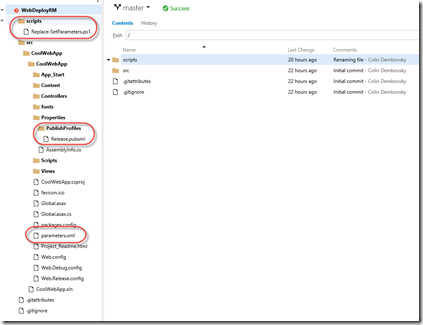
Once you’ve got a parameters.xml file and a publish profile committed into your source repo (Git or TFVC – either one works fine), you’re almost ready to create a Team Build (vNext Build). You will need the script that “hydrates” the parameters from the Environment variables. I’ll cover the contents of that script shortly – let’s assume for now that you have a script called “Replace-SetParameters.ps1” checked into your source repo along with your website. Here’s the structure I use:
Create a new Build Definition – select Visual Studio Build as the template to start from. You can then configure whatever you like in the build, but you have to do 3 things:
- Configure the MSBuild arguments as follows in the “Visual Studio Build” Task:
- /p:DeployOnBuild=true /p:PublishProfile=Release /p:PackageLocation=”$(build.StagingDirectory)”
- The name of the PublishProfile is the same name as the pubxml file in your solution
- The package location is set to the build staging directory

- Configure the “Copy and Publish Build Artifacts” Task to copy the staging directory to a server drop:

- Add a new “Publish Build Artifact” Task to copy the “Replace-SetParameters.ps1” script to a server drop called “scripts”:

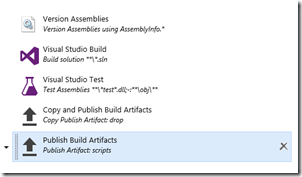
I like to version my assemblies so that my binary versions match my build number. I use a custom build Task to do just that. I also run unit tests as part of the build. Here’s my entire build definition:
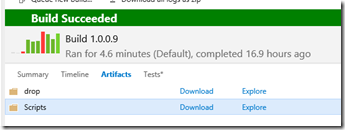
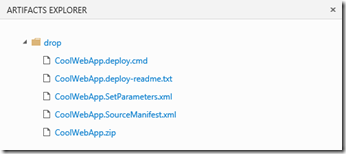
Once the build has completed, the Artifacts look like this:
Here’s what the SetParameters file looks like if you open it up:
<?xml version="1.0" encoding="utf-8"?>
<parameters>
  <setParameter name="IIS Web Application Name" value=" __SiteName__" />
  <setParameter name="CoolKey" value=" __CoolKey__" />
  <setParameter name="EntityDB-Web.config Connection String" value=" __EntityDB__" />
</parameters>
The tokens for SiteName and EntityDB both come from my publish profile – the token for CoolKey comes from my parameters.xml file.
Now we have a package that’s ready for Release!
Filling in Token Values
You can see how the SetParameters file contains tokens. We will eventually define values for each token for each Environment in the Release Definition. Let’s assume that’s been done already – then how does the release pipeline perform the substitution? Enter PowerShell!
When you execute PowerShell in a Release, any Environment variables you define in the Release Definition are created as environment variables that the script can access. So I wrote a simple script to read in the SetParameters file, use Regex to find any tokens and replace the tokens with the environment variable value. Of course I then overwrite the file. Here’s the script:
param(
    [string]$setParamsFilePath
)
Write-Verbose -Verbose "Entering script Replace-SetParameters.ps1"
Write-Verbose -Verbose ("Path to SetParametersFile: {0}" -f $setParamsFilePath)

# get the environment variables
$vars = gci -path env:*

# read in the setParameters file
$contents = gc -Path $setParamsFilePath

# perform a regex replacement
$newContents = "";
$contents | % {
    $line = $_
    if ($_ -match "__(\w+)__") {
        $setting = gci -path env:* | ? { $_.Name -eq $Matches[1] }
        if ($setting) {
            Write-Verbose -Verbose ("Replacing key {0} with value from environment" -f $setting.Name)
            $line = $_ -replace "__(\w+)__", $setting.Value
        }
    }
    $newContents += $line + [Environment]::NewLine
}

Write-Verbose -Verbose "Overwriting SetParameters file with new values"
sc $setParamsFilePath -Value $newContents

Write-Verbose -Verbose "Exiting script Replace-SetParameters.ps1"
Notes:
- Line 2: The only parameter required is the path to the SetParameters file
- Line 8: Read in all the environment variables – these are populated according to the Release Definition
- Line 11: Read in the SetParameters file
- Line 15: Loop through each line in the file
- Line 17: If the line contains a token, then:
- Line 18-22: Find the corresponding environment variable, and if there is one, replace the token with the value
- Line 27: Overwrite the SetParameters file
Caveats: note, this can be a little bit dangerous since the environment variables that are in scope include more than just the ones you define in the Release Definition. For example, the environment includes a “UserName” variable, which is set to the build agent user name. So if you need to define a username variable, make sure you name it “WebsiteUserName” or something else that’s going to be unique.
Creating the Release Definition
We now have all the pieces in place to create a Release Definition. Each Environment is going to execute (at least) 2 tasks:
- PowerShell – to call the Replace-SetParameters.ps1 script
- Batch Script – to invoke the cmd file to publish the website
The PowerShell task is always going to be exactly the same – however, the Batch Script arguments are going to change slightly depending on if you’re deploying to IIS or to Azure.
I wanted to make sure this technique worked for IIS as well as for Azure (both deployment slots and “real” sites). So in this example, I’m deploying to 3 environments: Dev, Staging and Production. I’m using IIS for dev, to a staging deployment slot in Azure for Staging and the “real” Azure site for Production.
Here are the steps to configure the Release Definition:
- Go to the Release hub in VSTS and create a new Release Definition. Select “Empty” to start with an empty template.
- Enter a name for the Release Definition and change “Default Environment” to Dev
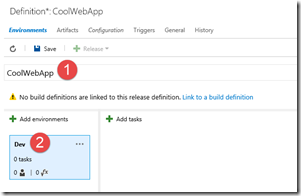
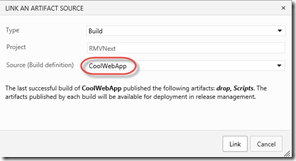
- Click “Link to a Build Definition” and select the build you created earlier:
- Click “+ Add Tasks” and add a PowerShell Task:
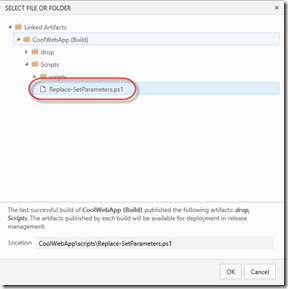
- For the “Script filename”, browse to the location of the Replace-SetParameters.ps1 file:
- For the “Arguments”, enter the following:
- -setParamsFilePath $(System.DefaultWorkingDirectory)\CoolWebApp\drop\CoolWebApp.SetParameters.xml
- Of course you’ll have to fix the path to set it to the correct SetParameters file – $(System.DefaultWorkingDirectory) is the root of the Release downloads. Then there is a folder with the name of the Build (e.g. CoolWebApp), then the artifact name (e.g. drop), then the path within the artifact source.
- Click “+ Add Tasks” and add a Batch Script Task:
- For the “Script filename”, browse to the location of the WebDeploy cmd file:
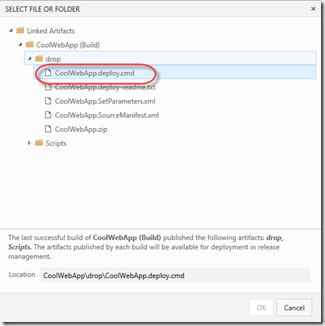
- Enter the correct arguments (discussed below).
- Configure variables for the Dev environment by clicking the ellipses button on the Environment tile and selecting “Configure variables”
- Here you add any variable values you require for your web app – these are the values that you tokenized in the build:
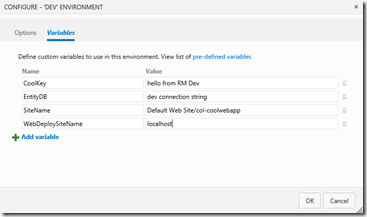
- Azure sites require a username and password – I’ll cover those shortly.
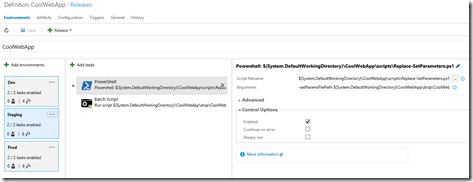
The Definition should now look something like this:
Cmd Arguments and Variables
For IIS, you don’t need username and password for the deployments. This means you’ll need to configure the build agent to run as an identity that has permissions to invoke WebDeploy. The SiteName variable is going to be the name of the website in IIS plus the name of your virtual application – something like “Default Web Site/cool-webapp”. Also, you’ll need to configure the Agent on the Dev environment to be an on-premise agent (so select an on-premise queue) since the hosted agent won’t be able to deploy to your internal IIS servers.
For Azure, you’ll need the website username and password (which you can get by downloading the Publish profile for the site from the Azure Portal). They’ll need to be added as variables in the environment, along with another variable called “WebDeploySiteName” (which is required only if you’re using deployment slots). The SiteName is going to be the name of the site in Azure. Of course you’re going to “lock” the password field to make it a secret. You can use the Hosted agent for Environments that deploy to Azure.
Here are the 2 batch commands – the first is for local deployment to IIS, the 2nd for deployment to Azure:
- /Y /M:http://$(WebDeploySiteName)/MsDeployAgentService
- /Y /M:https://$(WebDeploySiteName).scm.azurewebsites.net:443/msdeploy.axd /u:$(AzureUserName) /p:$(AzurePassword) /a:Basic
For IIS deployments, you can set WebDeploySiteName to be the name or IP of the target on-premises server. Note that you’ll have to have WebDeploy remote agent running on the machine, with the appropriate permissions for the build agent identity to perform the deployment.
For Azure, the WebDeploySiteName is of the form “siteName[-slot]”. So if you have a site called “MyWebApp”, and you just want to deploy to the site, then WebDeploySiteName will be “MyWebApp”. If you want to deploy to a slot (e.g. Staging), then WebDeploySiteName must be set to “MyWebApp-staging”. You’ll also need to set the SiteName to the name of the site in Azure (“MyWebApp” for the site, “MyWebApp__slot” for a slot – e.g. “MyWebApp__staging”). Finally, you’ll need “AzureUserName” and “AzurePassword” to be set (according to the publish settings for the site).
Cloning Staging and Production Environments
Once you’re happy with the Dev Environment, clone it to Staging and update the commands and variables. Then repeat for Production. You’ll now have 3 Environments in the Definition:
Also, if you click on “Configuration”, you can see all the Environment variables by clicking “Release variables” and selecting “Environment Variables”:
That will open a grid so you can see all the variables side-by-side:
Now you can ensure that you’ve set each Environment’s variables correctly. Remember to set approvals on each environment as appropriate!
2 More Tips
If you want to trigger the Release every time the linked Build produces a new package, then click on Triggers and enable “Continuous Deployment”.
You can get the Release number to reflect the Build package version. Click on General and change the Release Name format to: $(Build.BuildNumber)-$(rev:r)
Now when you release 1.0.0.8, say, your release will be “1.0.0.8-1”. If you trigger a new release with the same package, it will be numbered “1.0.0.8-2” and so on.
Conclusion
WebRM is a fantastic evolution of Release Management. It’s much easier to configure Release Definitions, to track logs to see what’s going on and to configure deployment Tasks – thanks to the fact that the Release agent is the same as the Build agent. As far as WebDeploy goes, I like this technique of managing configuration – I may write a custom Build Task that bundles the PowerShell and Batch Script into a single task – that will require less argument “fudging” and bundle the PowerShell script so you don’t have to have it in your source repo. However, the process is not too difficult to master even without a custom Task, and that’s pleasing indeed!
Happy releasing!

