A/B Testing with Azure Linux Web Apps for Containers

I love containers. I’ve said before that I think they’re the future. Just as hardly anyone installs on tin any more since we’re so comfortable with Virtualization, I think that in a few years time hardly anyone will deploy VMs - we’ll all be on containers. However, container orchestration is still a challenge. Do you choose Kubernetes or Swarm or DCOS? (For my money I think Kubernetes is the way to go). But that means managing a cluster of nodes (VMs). What if you just want to deploy a single container in a useful manner?
You can do that now using Azure Container Instances (ACI). You can also host a container in an Azure Web App for Containers. The Web App for Containers is what I’ll use for this post - mostly because I already know how to do A/B testing with Azure Web Apps, so once the container is running then you get all the same paradigms as you would for “conventional” web apps - like slots, app settings in the portal etc.
In this post I’ll cover publishing a .NET Core container to Azure Web Apps using VSTS with an ARM template. However, since the hosting technology is “container” you can host whatever application you want - could be Java/TomCat or node.js or python or whatever. The A/B Testing principles will still apply.
You can grab the code for this demo from this Github repo.
Overview of the Moving Parts
There are a couple of moving parts for this demo:
- The source code. This is just a File->New Project .NET Core 2.0 web app. I’ve added a couple lines of code and Application Insights for monitoring - but other than that there’s really nothing there. The focus of this post is about how to A/B test, not how to make an app!
- Application Insights - this is how you can monitor the web app to make sure
- An Azure Container Registry (ACR). This is a private container repository. You can use whatever repo you want, including DockerHub.
- A VSTS Build. I’ll show you how to set up a build in VSTS to build the container image and publish it to the ACR.
- An ARM template. This is the definition of the resources necessary for running the container in Azure Web App for Containers. It includes a staging slot and Application Insights.
- A VSTS Release. I’ll show you how to create a release that will spin up the web app and deploy the container. Then we’ll set up Traffic Manager to (invisibly) divert a percentage of traffic from the prod slot to the staging slot - this is the basis for A/B testing and the culmination of the all the other steps.
The Important Source Bits
Let’s take a look at some of the important code files. Firstly, the Startup.cs file:
public void Configure(IApplicationBuilder app, IHostingEnvironment env)
{
	var aiKey = Environment.GetEnvironmentVariable("AIKey");
	if (aiKey != null)
	{
		TelemetryConfiguration.Active.InstrumentationKey = aiKey;
	}
	...
Notes:
- Line 3: I read the environment variable “AIKey” to get the Application Insights key
- Lines 4 - 7: If there is a key, then I set the key for the Application Insights config
The point here is that for configuration, I want to get values from the environment. This would include database connection strings etc. Getting them from the environment lets me specify them in the Web App appSettings so that I don’t have to know the values at build time - only at release time.
Let’s look at the Dockerfile:
FROM microsoft/aspnetcore:2.0
ARG source
ENV AIKey="11111111-2222-3333-4444-555555555555"

WORKDIR /app
EXPOSE 80
COPY ${source:-obj/Docker/publish} .
ENTRYPOINT ["dotnet", "DockerWebApp.dll"]
Notes:
- Line 3 was the only thing I added to make the AIKey configurable as an environment variable
Finally, let’s look at the ARM template that defines the resources. The file is too large to paste here and it’s Json so it’s not easy to read. You can have a look at the file yourself. The key points are:
- a HostingPlan with kind = “linux” and properties.reserved = true. This creates a Linux app plan.
- a Site with properties.siteConfig.appSettings that specify the DOCKER_REGISTRY_SERVER_URL, DOCKER_REGISTRY_SERVER_USERNAME, DOCKER_REGISTRY_SERVER_PASSWORD (using the listCredentials function) and AIKey. We do not specify the DOCKER_CUSTOM_IMAGE_NAME for reasons that will be explained later. Any other environment variables (like connection strings) could be specified here.
- a staging slot (called blue) that has the same settings as the production slot
- a slotconfignames resource that locks the DOCKER_CUSTOM_IMAGE_NAME so that the value is slot-sticky
- an Application Insights resource - the key for this resource is referenced by the appSettings section for the site and the slot
Building (and Publishing) Your Container
At this point we can look at the build. The build needs to compile, test and publish the .NET Core app and build a container. It then needs to publish the container to the ACR (or whatever registry you created).
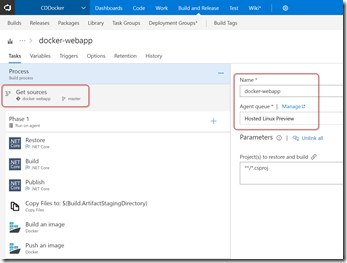
Create a new build using the ASP.NET Core Web App template and then edit the steps to look as follows:
Make sure you point the Source settings to the repo (you can create a new one and import mine from the Github URL if you want to try this yourself). I then changed the queue to Hosted Linux Preview and changed the name to something appropriate.
On the Options page I set the build number format to 1.0$(rev:.r) which gives a 1.0.0, 1.0.1, 1.0.2 etc. format for my build number.
Click on the Build task and set the arguments to –configuration $(BuildConfiguration) /p:Version=$(Build.BuildNumber). This versions the assemblies to match the build number.
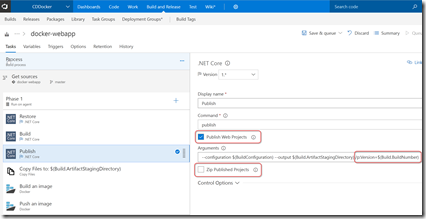
Click on the Publish task and set Publish Web Apps, change the arguments to –configuration $(BuildConfiguration) –output $(Build.ArtifactStagingDirectory) /p:Version=$(Build.BuildNumber) and unselect Zip files. This puts the output files into the artifact staging directory and doesn’t zip them. It also publishes with a version number matching the build number:
I deleted the Test task since I don’t have tests in this simple project - but you can of course add testing in before publishing.
I then deleted the Publish build artifact tasks since this build won’t be publishing an artifact - it will be pushing a container image to my ACR.
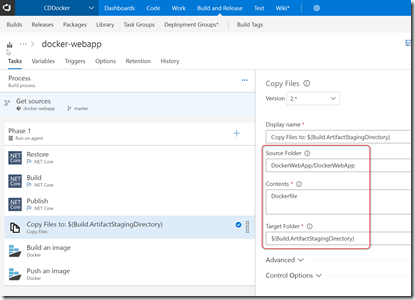
In order to build the docker container image, I first need to put the Dockerfile at the correct location relative to the output. So I add a Copy Files task in and configure it to copy the Dockerfile to the artifact staging directory:
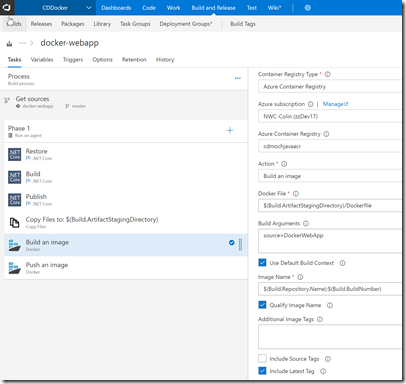
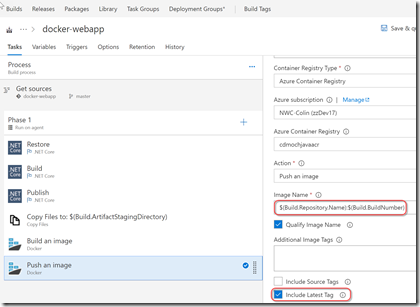
Now I add a 2 Docker tasks: the has a Build an image Action. I set the ACR by selecting the settings from the dropdowns. I set the path to the Dockerfile and specify “DockerWebApp” as the source build argument (the Publish task will have places the compiled site and content into this folder in the artifact staging directory). I set Qualify the Image name to correctly tag the container with the ACR prefix and I include the Latest tag in the build (so the current build is always the Latest).
The 2nd Docker task has Action set to Publish an Image. I set the ACR like the Docker Build task. I also change the image name to $(Build.Repository.Name):$(Build.BuildNumber) instead of $(Build.Repository.Name):$(Build.BuildId) and I set the Latest tag.
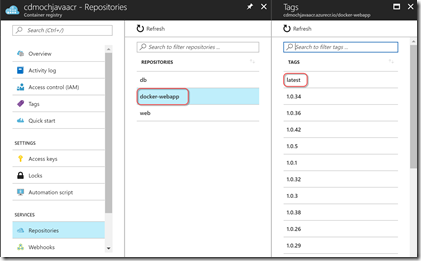
Now I can run the build. Lots of green! I can also see the image in my ACR in the Azure portal:
Woot! We now have a container image that we can host somewhere.
Releasing the Container
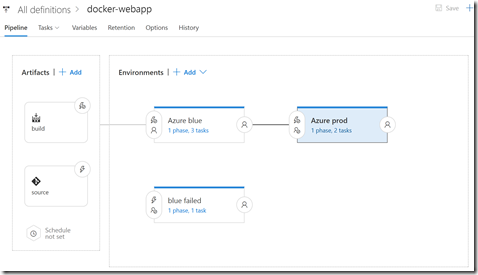
Now that we have a container and an infrastructure template, we can define a release. Here’s what the release looks like:
There are 2 incoming artifacts: the build and the Git repo. The build doesn’t actually have any artifacts itself - I just set the build as the trigger mechanism. I specify a “master” artifact filter so that only master builds trigger this release. The Git repo is referenced for the deployment scripts (in this case just the ARM template). I started with an empty template and then changed the Release number format to $(Build.BuildNumber)-$(rev:r) in the Options page.
There are 3 environments: Azure blue, Azure prod and blue failed. These are all “production” environments - you could have Dev and Staging environments prior to these environments. However, I want to A/B test in production, so I’m just showing the “production environment” here.
Let’s look at the Azure blue environment:
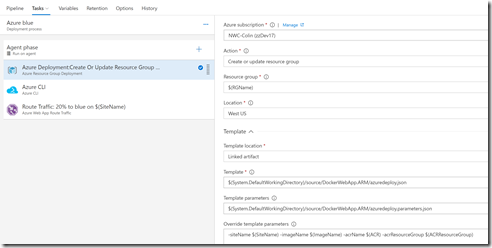
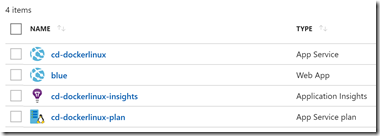
There are 3 tasks: Azure Resource Group Deployment (to deploy the ARM template), an Azure CLI command to deploy the correct container, and a Traffic Manager Route Traffic task. The Azure Resource Group Deployment task specifies the path to the ARM template and parameters files as well as the Azure endpoint for the subscription I want to deploy to. I specify a variable called $(RGName) for the resource group name and then override the parameters for the template using $(SiteName) for the name of the web app in Azure, $(ImageName) for the name of the container image, $(ACR) for the name of my ACR and $(ACRResourceGroup) for the name of the resource group that contains my ACR. Once this task has run, I will have the following resources in the resource group:
Let’s take a quick look at the app settings for the site:
At this point the site (and slot) are provisioned, but they still won’t have a container running. For that, we need to specify which container (and tag) to deploy. The reason I can’t do this in the ARM template is because I want to update the staging slot and leave the prod slot on whatever container tag it is on currently. Let’s imagine I specified “latest” for the prod slot - then when we run the template, the prod slot will update, which I don’t want. Let’s say we specify latest for the blue slot - then the blue slot will update - but what version do we specify in the template for the prod slot? We don’t know that ahead of time. So to work around these issues, I don’t specify the container tag in the template - I use an Azure CLI command to update it after the template has deployed (or updated) all the other infrastructure and settings.
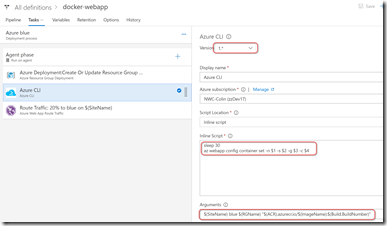
To deploy a container, we add an Azure CLI task and specify a simple inline script:
Here I select version 1.* of the task (version 0.* doesn’t let you specify an inline script). I set the script to sleep for 30 seconds - if I don’t do this, then the site is still updating or something and the operation succeeds, but doesn’t work - it doesn’t actually update the image tag. I suspect that the update is async and so if you don’t wait for it to complete, then issuing another tag change succeeds but is ignored. It’s not pretty, but that’s the only workaround I’ve found. After pausing for a bit, we invoke the “az webapp config container set” command, specifying the site name, slot name, resource group name and image name. (If you’re running this phase on a Linux agent, use $1, $2 etc. for the args - if you’re running this on a Windows agent then specify the args using %1, %2 etc. in the script). Then I pass the arguments in - using $(SiteName), blue, $(RGName) and $(ImageName):$(Build.BuildNumber) for the respective arguments.
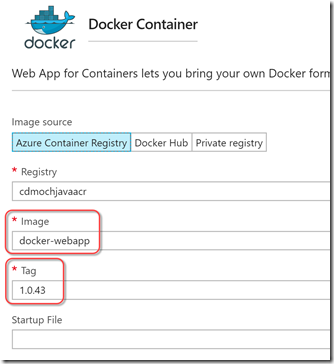
If you now navigate to the site in the Azure portal and click on the Docker Container tab on the slot, you’ll see the container settings:
You can see that the image name and version are specified.
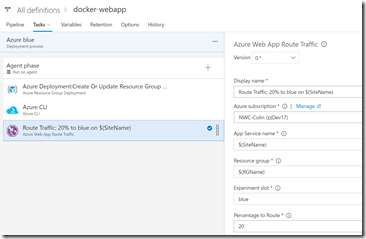
The final task in this environment (a Route Traffic task from my Build and Release extension pack) adds a traffic manager rule - we divert 20% of traffic to the blue slot (unobtrusively to the client):
There’s a snag to this method: the first time you deploy, there’s nothing (yet) in the prod slot. This is just a first time condition - so after you run this environment for the very first time, navigate to the Azure portal and click on the site. Then swap the blue and prod slots. Now the prod slot is running the container and the blue slot is empty. Repeat the deployment and now both slots have the latest version of the container.
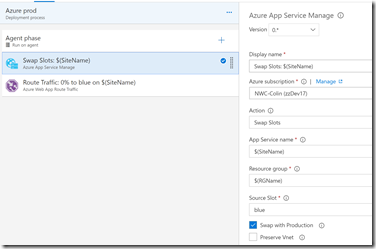
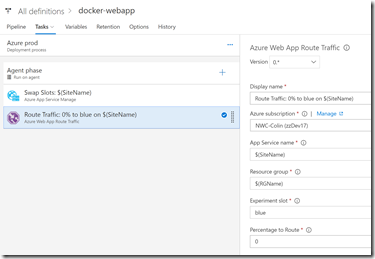
Let’s go back to the release and look at the Azure prod environment. This has a pre-approval set so that someone has to approve the deployment to this environment. The Azure blue has a post-deployment approver so that someone can sign off on the release - approved if the experiment works, rejected if it’s not. The Azure prod environment triggers when the Azure blue environment is successful - all it has to do is swap the slots and reset the traffic router to reroute 100% of traffic to the prod slot:
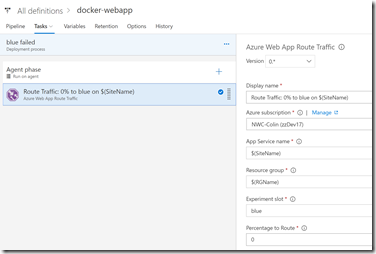
So what do we do if the experiment fails? We can reject the Azure blue environment (so that the Azure prod environment doesn’t run). We then manually run the blue fail environment - this just resets the traffic to route 100% back to prod. It does not swap the slots:
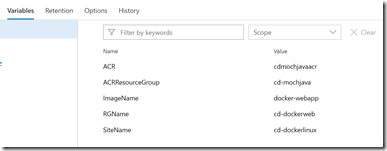
Don’t forget to specify values for the variables we used:
Running a Test
So imagine I have container version 1.0.43 in both slots. Now I make a change and commit and push - this triggers a build (I enabled CI) and we get version 1.0.45 (1.0.44 had an intermittent build failure). This triggers the release (I enabled CD) and now the blue slot has version 1.0.45 and 20% of traffic from the prod slot is going to the blue slot.
Let’s navigate to the blue and prod slots and see them side-by-side:
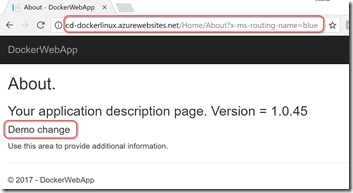
The traffic routing is “sticky” to the user - so if a user navigates to the prod slot and gets diverted to the blue slot, then all requests to the site from the user go to the blue slot. Try opening some incognito windows and hitting the prod site - you’ll get the blue content 20% of the time! You can also force the routing using a query parameter - just tack “?x-ms-routing-name=blue” onto the end of any request and you’ll end up on the blue slot:
Now you wait for users to generate traffic (or in my case, I totally fake client traffic - BWAHAHA!). So how do we know if the experiment is successful? We use Application Insights.
Application Insights Analytics
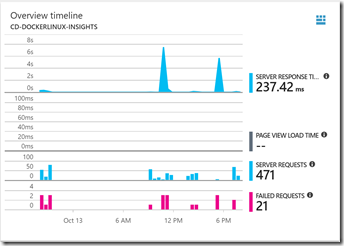
Let’s click on the Azure portal and go to the App Insights resource for our web app. We can see some telemetry, showing traffic to the site:
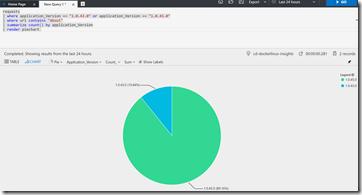
But how do we know which requests went to the blue slot and how many went to the prod slot? It turns out that’s actually pretty simple. Click the Analytics button to launch App Insights Analytics. We enter a simple query:
We can clearly see that there is more usage of the 1.0.45 contact page. Yes, this metric is bogus - the point is to show you that you can slice by “Application_Version” and so you actually have metrics to determine if your new version (1.0.45) is better or worse that 1.0.43. Maybe it’s more traffic to a page. Maybe it’s more sales. Maybe it’s less exceptions or better response time - all of these metrics can be sliced by Application_Version.
Conclusion
Deploying containers to Azure Web Apps for Containers is a great experience. Once you have the container running, you can use any Web App paradigm - such as Traffic Routing or appSettings - so it’s easy if you’ve ever done any Web App deployments before.
There are a couple of key practices that are critical to A/B testing: telemetry and unobtrusive routing.
Telemetry is absolutely critical to A/B testing: if you can’t decide if A is better (or worse) than B, then there’s no point deploying both versions. Application Insights is a great tool for telemetry in general - but especially with A/B testing, since you can put some data and science behind your hypotheses. You don’t have to use AppInsights - but you do have to have some monitoring tool or framework in order to even contemplate A/B testing.
The other key is how you release the A and B sites or apps. Having traffic manager seamlessly divert customer traffic is an excellent way to do this since the customer is none the wiser about which version they are seeing - so they don’t have to change their URLs or anything obscure. You could also use LaunchDarkly or some other feature flag mechanism - as long as your users don’t have to change their usual way of accessing your app. This will give you “real” data. If users have to go to a beta site, they could change their behavior subconsciously. Maybe that isn’t a big deal - but at least prefer “seamless” routing between A and B sites before you explicitly tell users to navigate to a new site altogether.
Happy testing!
