Real Config Handling for DSC in RM
In my previous post I showed you how to use PowerShell DSC and Release Management to configure machines and deploy an application. There was one part of the solution that I wasn’t satisfied with, and in the comments section you’ll see that @BigFan picks it up: the configuration is hard-coded.
cScriptWithParams Resource
The primary reason I’ve had to hard-code the configuration is that I use the Script resource heavily. Unfortunately the Script resource cannot utilize configuration (or parameters)! I do explain this in my previous post (see the section headed “A Note on Script Resource Parameters”). For a while I tried to write my own custom resource, but eventually abandoned that project. However, after completing my previous post, I decided to have another stab at the problem. And voila! I created a custom Script resource that (elegantly, I think) can be parameterized. You can get it from GitHub.
Let’s first look at how to utilize the new resource – I’ll discuss how I created the resource after that.
Parameterized Scripts
In my previous solution, the Script resource that executed the Webdeploy command (which deploys my web application) looks like this:
Script SetConStringDeployParam
{
    GetScript = { @{ Name = "SetDeployParams" } }
    TestScript = { $false }
    SetScript = {
        $paramFilePath = "c:\temp\Site\FabrikamFiber.Web.SetParameters.xml"

        $paramsToReplace = @{
            " __FabFiberExpressConStr__" = "data source=fabfiberdb;database=FabrikamFiber-Express;User Id=lab;Password=P2ssw0rd"
            " __SiteName__" = "Default Web Site\FabrikamFiber"
        }

        $content = gc $paramFilePath
        $paramsToReplace.GetEnumerator() | % {
            $content = $content.Replace($_.Key, $_.Value)
        }
        sc -Path $paramFilePath -Value $content
    }
    DependsOn = "[File]CopyWebDeployFiles"
}
You can see how lines 9 and 10 are hard-coded. Ideally these values should be read from a configuration somewhere.
Here’s what the script looks like when you use the cScriptWithParams resource:
cScriptWithParams SetConStringDeployParam
{
    GetScript = { @{ Name = "SetDeployParams" } }
    TestScript = { $false }
    SetScript = {
        $paramFilePath = "c:\temp\Site\FabrikamFiber.Web.SetParameters.xml"

        $paramsToReplace = @{
            " __FabFiberExpressConStr__" = $conStr
            " __SiteName__" = $siteName
        }

        $content = gc $paramFilePath
        $paramsToReplace.GetEnumerator() | % {
            $content = $content.Replace($_.Key, $_.Value)
        }
        sc -Path $paramFilePath -Value $content
    }
    cParams =
    @{
        conStr = $conStr;
        siteName = $siteName;
    }
    DependsOn = "[File]CopyWebDeployFiles"
}
Some notes:
- Line 1: The name of the resource is “cScriptWithParams” – the custom Script resource I created. In order to use this custom resource, you need the line “Import-DscResource -Name cScriptWithParams” at the top of your Configuration script (above the first Node element).
- Lines 9/10: The values for the connection string and site name are now variables instead of hard-coded
- Lines 19-23: This is the property that allows you to “pass in” values for the variables. It’s a hash-table of string key-value pairs, where the key is the name of the variable used in any of the Get, Set or Test scripts and the value is the value you want to set the variable to. We could get the values from anywhere – a DSC config file (where we would have $Node.ConStr for example) – in this case it’s from 2 global variables called $conStr and $siteName (we’ll see later where these get specified).
Removing Config Files Altogether
Now that we can (neatly) parameterize the custom scripts we want to run, we can use the new config variable options in RM to completely remove the need for a config file. Of course you could still use the config file if you wanted to. Here’s the final script for deploying my web application:
Configuration FabFibWeb_Site
{
    Import-DscResource -Name cScriptWithParams

    Node $ServerName
    {
        Log WebServerLog
        {
            Message = "Starting Site Deployment. AppPath = $applicationPath."
        }

        #
        # Deploy a website using WebDeploy
        #
        File CopyWebDeployFiles
        {
            Ensure = "Present"
            SourcePath = "$applicationPath\_PublishedWebsites\FabrikamFiber.Web_Package"
            DestinationPath = "c:\temp\Site"
            Recurse = $true
            Force = $true
            Type = "Directory"
        }

        cScriptWithParams SetConStringDeployParam
        {
            GetScript = { @{ Name = "SetDeployParams" } }
            TestScript = { $false }
            SetScript = {
                $paramFilePath = "c:\temp\Site\FabrikamFiber.Web.SetParameters.xml"

                $paramsToReplace = @{
                    " __FabFiberExpressConStr__" = $conStr
                    " __SiteName__" = $siteName
                }

                $content = gc $paramFilePath
                $paramsToReplace.GetEnumerator() | % {
                    $content = $content.Replace($_.Key, $_.Value)
                }
                sc -Path $paramFilePath -Value $content
            }
            cParams =
            @{
                conStr = $ConStr;
                siteName = $SiteName;
            }
            DependsOn = "[File]CopyWebDeployFiles"
        }

        Script DeploySite
        {
            GetScript = { @{ Name = "DeploySite" } }
            TestScript = { $false }
            SetScript = {
                & "c:\temp\Site\FabrikamFiber.Web.deploy.cmd" /Y
            }
            DependsOn = "[cScriptWithParams]SetConStringDeployParam"
        }
    }
}

# command for RM
FabFibWeb_Site

<#
#test from command line
$ServerName = "fabfiberserver"
$applicationPath = "\\rmserver\builddrops\ __ReleaseSite\__ ReleaseSite_1.0.0.3"
$conStr = "testing"
$siteName = "site Test"
FabFibWeb
Start-DscConfiguration -Path .\FabFibWeb -Verbose -Wait
#>
Notes:
- Line 3: Importing the custom resource (presumes the custom resource is “installed” locally – see next section for how to do this)
- Line 5: I leverage the $ServerName variable that RM sets – I don’t have to hard-code the node name
- Lines 15-23: Copy the Webdeploy files from the build drop location to a local folder (again I use an RM parameter, $applicationPath, which is the drop folder)
- Lines 25-49: Almost the same Script resource we had before, but subtly changed to handle variables by changing it to a cScriptWithParams resource.
- Lines 33/34: The hard-coded values have been replaced with variables.
- Lines 43-47: We need to supply a hash-table of key/value pairs for our parameterized scripts. In this case, we need to supply conStr and siteName. For the values, we pass in $conStr and $siteName, which RM will feed in for us (we’ll specify these on the Release Template itself)
- Line 64: “Compile” the configuration (into a .mof file) for RM to push to the target server
- Lines 66-74: If you test this script from the command line, you just create the variables required and execute it. This is exactly what RM does under the hood when executing this script.
Using the Script in a Release Template
Now that we have the script, let’s see how we consume it. (Of course it’s checked into source control, along with the Custom Resource, and part of a build so that it ends up in the build drop folder with our application. Of course – goes without saying!)
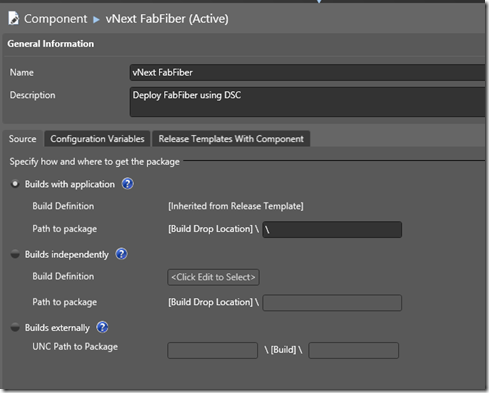
We define the vNext Component the same way we did last time:
Nothing magical here – this really just defines the root folder of the build drop for use in the deployment.
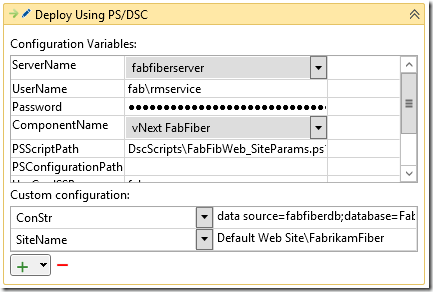
Next we create the vNext template using our desired vNext release path. On the designer, you’ll see the major difference: we’re defining the variables on the surface itself:
Our script uses $ServerName (which you can see is set to fabfiberserver). It also uses ConStr and SiteName (these are the parameter values we specified in lines 44/45 of the above script – $ConStr and $SiteName). Of course if we deploy to another server (say in our production environment) we would simply specify other values for that server.
Deploying a Custom Resource
The final trick is how you deploy the custom resource. To import it using Import-DSCResource, you need to have it in ProgramFiles\WindowsPowerShell\Modules. If you’re testing the script from you workstation, you’ll need to copy it to this path on your workstation. You’ll also need to copy it to that folder on the target server. Sounds like a job for a DSC script with a File resource! Unfortunately it can’t be part of the web application script we created above since it needs to be on the server before you run the Import-DscResource command. No problem – we’ll run 2 scripts on the template. Here’s the script to deploy the custom resource:
Configuration CopyCustomResource
{
    Node $ServerName
    {
        File CopyCustomResource
        {
            Ensure = "Present"
            SourcePath = "$applicationPath\$modSubFolder\$modName"
            DestinationPath = "$env:ProgramFiles\WindowsPowershell\Modules\$modName"
            Recurse = $true
            Force = $true
            Type = "Directory"
        }
    }
}

<#
# test from command line
$ServerName = "fabfiberserver"
$applicationPath = "\\rmserver\builddrops\ __ReleaseSite\__ ReleaseSite_1.0.0.3"
$modSubfolder = "CustomResources"
$modName = "DSC_ColinsALMCorner.com"
#>

# copy the resource locally
#cp "$applicationPath\$modSubFolder\$modName" $env:ProgramFiles\WindowsPowerShell\Modules -Force -Recurse

# command for RM
CopyCustomResource

<#
# test from command line
CopyCustomResource
Start-DscConfiguration -Path .\CopyCustomResource -Verbose -Wait
#>
This is very straight-forward:
- Line 3: Again we’re using RM’s variable so that don’t have to hard-code the node name
- Lines 5-13: Copy the resource files to the PowerShell modules folder
- Line 26: Use this to copy the resource locally to your workstation for testing it
- Line 29: This “compiles” this config file before RM deploys it (and executes it) on the target server
- Lines 17-23 and 31-35: Uncomment these to run this from the command line for testing
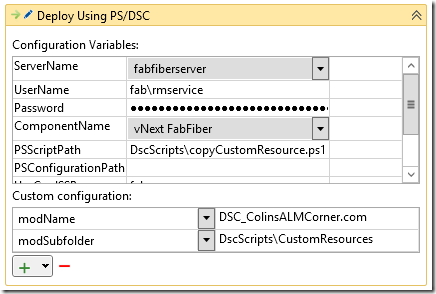
Here’s how to use the script in a release template:
By now you should be able to see how this designer is feeding values to the script!
cScriptWithParams: A Look Inside
To make the cScriptWithParams custom resource, I copied the out-of-the-box script and added the cParams hash-table parameter to the Get/Set/Test TargetResource functions. I had some issues with type conversions, so I eventually changed the HashTable to an array of Microsoft.Management.Infrastructure.CimInstance. I then make sure this gets passed to the common function that actually invokes the script (ScriptExecutionHelper). Here’s a snippet from the Get-TargetResource function:
function Get-TargetResource
{
    [CmdletBinding()]
     param
     (
       [parameter(Mandatory = $true)]
       [ValidateNotNullOrEmpty()]
       [string]
       $GetScript,

       [parameter(Mandatory = $true)]
       [ValidateNotNullOrEmpty()]
       [string]$SetScript,

       [parameter(Mandatory = $true)]
       [ValidateNotNullOrEmpty()]
       [string]
       $TestScript,

       [Parameter(Mandatory=$false)]
       [System.Management.Automation.PSCredential]
       $Credential,

       [Parameter(Mandatory=$false)]
       [Microsoft.Management.Infrastructure.CimInstance[]]
       $cParams
     )

    $getTargetResourceResult = $null;

    Write-Debug -Message "Begin executing Get Script."

    $script = [ScriptBlock]::Create($GetScript);
    $parameters = $psboundparameters.Remove("GetScript");
    $psboundparameters.Add("ScriptBlock", $script);
    $psboundparameters.Add("customParams", $cParams);

    $parameters = $psboundparameters.Remove("SetScript");
    $parameters = $psboundparameters.Remove("TestScript");

    $scriptResult = ScriptExecutionHelper @psboundparameters;
Notes:
- Lines 24-26: the extra parameter I added
- Line 36: I add the $cParams to the $psboundparameters that will be passed to the ScriptExecutionHelper function
- Line 41: this is the original call to the ScriptExecutionHelper function
Finally, I customized the ScriptExecutionHelper function to utilize the parameters:
function ScriptExecutionHelper
{
    param
    (
        [ScriptBlock]
        $ScriptBlock,

        [System.Management.Automation.PSCredential]
        $Credential,

        [Microsoft.Management.Infrastructure.CimInstance[]]
        $customParams
    )

    $scriptExecutionResult = $null;

    try
    {
        $executingScriptMessage = "Executing script: {0}" -f ${ScriptBlock} ;
        Write-Debug -Message $executingScriptMessage;

        $executingScriptArgsMessage = "Script params: {0}" -f $customParams ;
        Write-Debug -Message $executingScriptArgsMessage;

        # bring the cParams into memory
        foreach($cVar in $customParams.GetEnumerator())
        {
            Write-Debug -Message "Creating value $($cVar.Key) with value $($cVar.Value)"
            New-Variable -Name $cVar.Key -Value $cVar.Value
        }

        if($null -ne $Credential)
        {
           $scriptExecutionResult = Invoke-Command -ScriptBlock $ScriptBlock -ComputerName . -Credential $Credential
        }
        else
        {
           $scriptExecutionResult = &$ScriptBlock;
        }
        Write-Debug -Message "Completed script execution"
        $scriptExecutionResult;
    }
    catch
    {
        # Surfacing the error thrown by the execution of Get/Set/Test script.
        $_;
    }
}
Notes:
- Lines 11/12: The new “hashtable” of variables
- Lines 25-30: I use New-Variable to create global variables for each key/value pair in $customParams
- The remainder of the script is unmodified
The only limitation I hit was the the values must be strings – I am sure this has to do with the way the values are serialized when a DSC configuration script is “compiled” into a .mof file.
As usual, happy deploying!


