Using WebDeploy in vNext Releases
A few months ago Release Management (RM) Update 3 preview was released. One of the big features in that release was the ability to deploy without agents using PowerShell DSC. Once I saw this feature, I started a journey to see how far I could take deployments using this amazing technology. I had to learn how DSC worked, and from there I had to figure out how to use DSC with RM! The ride was a bit rocky at first, but I feel comfortable with what I am able to do using RM with PowerShell DSC.
Readying Environments for Deployment
In my mind there were two distinct steps that I wanted to be able to manage using RM/DSC:
- Configure an environment (set of machines) to make them ready to run my application
- Deploy my application to these servers
The RM/DSC posts I’ve blogged so far deal with readying the environment:
- Using PowerShell DSC in Release Management: The Hidden Manual
- More DSC Release Management Goodness: Readying a Webserver for Deployment
- Install and Configure SQL Server using PowerShell DSC
- New vNext Config Variable Options in RM Update 4 RC
So we’re now at a point where we can ensure that the machines that we want to deploy our application to are ready for our application – in the case of a SQL server SQL is installed and configured correctly. In the case of a webserver, IIS is installed and configured, additional runtimes are present (like MVC) and Webdeploy is installed and ports opened so that I can deploy using Webdeploy. So how then do I deploy my application?
Good Packages
Good deployment always beings with good packages. To get a good package, you’ll need an automated build that ties into source control (and hopefully work items) and performs automated unit testing with coverage. This gives you some metrics as to the quality of your builds. The next critical piece that you’ll need is to make sure that you can manage multiple configurations – after all, you’ll be wanting to deploy the same package to Production that you deployed and testing in UAT, so the package shouldn’t have configuration hard-coded in. In my agent-based Webdeploy/RM post, I show how you can create a team build that puts placeholders into the SetParameters.xml file, so that you can put in environment-specific values when you deploy. The package I created for that deployment process can be used for deployment via DSC as well – just showing that if you create a good package during build, you have more release options available to you.
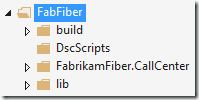
Besides the package, you’ll want to source control your DSC scripts. This way you can track changes that you make to your scripts over time. Also, having the scripts “travel” with your binaries means you only have to look in one location to find both deployment packages (or binaries) and the scripts you need to deploy them. Here’s how I organized my website and scripts in TF Version Control:
The actual solution (with my websites, libraries and database schema project) is in the FabrikamFiber.CallCenter folder. I have some 3rd party libraries that are checked into the lib folder. The build folder has some utilities for running the build (like the xunit test adapter). And you can also see the DscScripts folder where I keep the scripts for deploying this application.
By default on a team build, only compiled output is placed into the drop folder – you don’t typically get any source code. I haven’t included the scripts in my solution or projects, so I used a post-build script to copy the scripts from the source folder to the bin folder during the build – the build then copies everything in the bin folder to the drop folder. You could use this technique if you wanted to share scripts with multiple solutions – in that case you’d have the scripts in a higher level folder in SC. Here’s the script:
Param(
  [string]$srcPath = $env:TF_BUILD_SOURCESDIRECTORY,
  [string]$binPath = $env:TF_BUILD_BINARIESDIRECTORY,
  [string]$pathToCopy
)

try
{
    $sourcePath = "$srcPath\$pathToCopy"
    $targetPath = "$binPath\$pathToCopy"

    if (-not(Test-Path($targetPath))) {
        mkdir $targetPath
    }

    xcopy /y /e $sourcePath $targetPath

    Write-Host "Done!"
}
catch {
    Write-Host $_
    exit 1
}
- Lines 2-3: you can use the $env parameters that get set when team build executes a custom script. Here I am using the sources and binaries directory settings.
- Line 4: the subfolder to copy from the $srcPath to the $binPath.
- Line 12-14: ensure that the target path exists.
- Line 16: xcopy the files to the target folder.
Calling the script with $pathToCopy set to DscScripts will result in my DSC scripts being copied to the drop folder along with my build binaries. Using the TFVC 2013 default template, here’s what my advanced build parameters look like:
- The MSBuild arguments build a Webdeploy package for me. The profile (specified when you right-click the project and select “Publish”) also inserts RM placeholders into environment specific settings (like connection strings, for example). I don’t hard-code the values since this same package can be deployed to multiple environments. Later we’ll see how the actual values replace the tokens at deploy time.
- The post-build script is the script above, and I pass “-pathToCopy DscScripts” to the script in order to copy the scripts to the bin (and ultimately the drop) folder.
- I also use a pre-build script to version my assemblies so that I can match the binary file versions with the build.
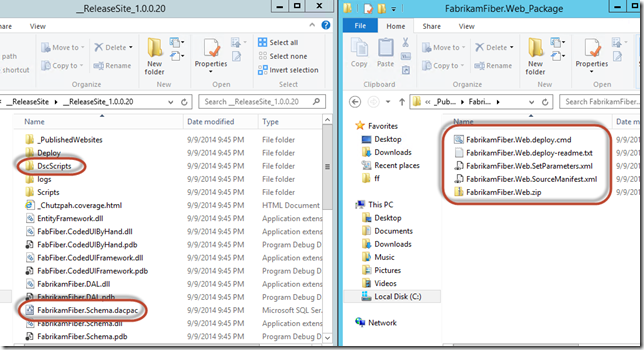
Here’s what my build output folders look like:
There are 3 “bits” that I really care about here:
- The DscScripts folder has all the scripts I need to deploy this application.
- The FabrikamFiber.Schema.dacpac is the binary of my database schema project.
- The _PublishedWebsites folder contains 2 folders: the “xcopyable” site (which I ignore) and the FabrikamFiber.Web_package folder which is shown on the right in the figure above, containing the cmd file to execute WebDeploy, the SetParameters.xml file for configuration and the zip file containing the compiled site.
Here’s what my SetParameters file looks like:
<?xml version="1.0" encoding="utf-8"?>
<parameters>
  <setParameter name="IIS Web Application Name" value=" __SiteName__" />
  <setParameter name="FabrikamFiber-Express-Web.config Connection String" value=" __FabFiberExpressConStr__" />
</parameters>
Note the “__” (double underscore) pre- and post-fix, making SiteName and FabFiberExpressConStr parameters that I can use in both agent-based and agent-less deployments.
Now that all the binaries and scripts are together, we can look at how to do the deployment.
Deploying a DacPac
To deploy the database component of my application, I want to use the DacPac (the compiled output of my SSDT project). The DacPac is a “compiled model” of how I want the database to look. To deploy a DacPac, you invoke sqlpackage.exe (installed with SQL Server Tools when you install and configure SQL Server). SqlPackage then reverse engineers the target database (the database you’re deploying the model to) into another model, does a compare and produces a diff script. You can also make SqlPackage run the script (which will make the target database look exactly like the DacPac model you compiled your project into).
To do this inside a DSC script, I implement a “Script” resource. The Script resource has 3 parts: a Get-Script, a Set-Script and a Test-Script. The Get-Script is executed when you run DSC in interrogative mode – it won’t change the state of the target node at all. The Test-Script is used to determine if any action must be taken – if it return $true, then no action is taken (the target is already in the desired state). If the Test-Script returns $false, then the target node is not in the desired state and the Set-Script is invoked. The Set-Script is executed in order to bring the target node into the desired state.
A Note on Script Resource Parameters
A caveat here though: the Script resource can be a bit confusing in terms of parameters. The DSC script actually has 2 “phases” – first, the PowerShell script is “compiled” into a mof file. This file is then pushed to the target server and executed during the “deploy” phase. The parameters that you use in the configuration script are available on the RM server at “compile” time, while parameters in the Script resources are only available on the target node during “deploy” time. That means that you can’t pass a parameter from the config file “into” the Script resource – all parameters in the Script resource need to be hard-coded or calculated on the target node at execution time.
For example, let’s look at this example script:
Configuration Test
{
    params (
        [string]$logLocation
    )

    Node myNode
    {
        Log LogLocation
        {
            Message = "The log location is [$logLocation]"
        }

        Script DoSomething
        {
            Get-Script { @{ "DoSomething" = "Yes" } }
            Test-Script { $false }
            Set-Script
            {
                Write-Host "Log location is [$logLocation]"
                $localParam = "Hello there"
                Write-Host "LocalParam is [$localParam]"
            }
        }
    }
}
Here the intent is to have a parameter called $logLocation that we pass into the config script. When you see this script, it seems to make perfect sense – however, while the log will show the message “The log location is [c:\temp]”, for example (line 11), when the Set-Script of the Script resource runs on the target node, you’ll see the message “Log location is []” (Line 20). Why? Because the $logLocation parameter does not exist when this script is run at deploy time on the target node. The parameter is available to the Log resource (or other resources like File) but won’t be to the Script resource. You will be able to create other parameters “at deploy time” (like $localParam on Line 21). This is frustrating, but kind of understandable. The Script resource script blocks are not evaluated for parameters. I found a string manipulation hack that allows you to fudge config parameters into the script blocks, but decided against using it.
ConfigData
Before we look at the DSC script used to deploy the database, I need to show you my configData script:
#@{
$configData = @{
    AllNodes = @(
        @{
            NodeName = "*"
            PSDscAllowPlainTextPassword = $true
         },

        @{
            NodeName = "fabfiberserver"
            Role = "WebServer"
         },

        @{
            NodeName = "fabfiberdb"
            Role = "SqlServer"
         }
    );
}

# Note: different 1st line for RM or command line
# use $configData = @{ for RM
# use @{ for running from command line
- Line 1: When running from the command line, you just specify a hash-table. DSC requires this hash-table to be put into a variable. I have both in the script (though I default to the format RM requires) just so that I can test the script outside of RM.
- Line 3: AllNodes is a hash-table of all the nodes I want to affect with my configuration scripts.
- Lines 5/6 – common properties for all nodes (the name is “*” so DSC applies these properties to all nodes).
- Line 10/11 and 15/16: I specify the nodes I have as well as a Role property. This is so that I can deploy the same configuration to multiple servers that have the same role (like a web farm for example).
- You can specify other parameters, each with another value for each server.
Here’s the DSC script I use to deploy a DacPac to a target server:
Configuration FabFibWeb_Db
{
    param (
        [Parameter(Mandatory=$true)]
        [ValidateNotNullOrEmpty()]
        [String]
        $PackagePath
    )

    Node fabfiberdb #$AllNodes.where{ $_.NodeName -ne "*" -and $_.Role.Contains("SqlServer") }.NodeName
    {
        Log DeployAppLog
        {
            Message = "Starting SqlServer node configuration. PackagePath = $PackagePath"
        }

        #
        # Update the application database
        #
        File CopyDBSchema
        {
            Ensure = "Present"
            SourcePath = "$PackagePath\FabrikamFiber.Schema.dacpac"
            DestinationPath = "c:\temp\dbFiles\FabrikamFiber.Schema.dacpac"
            Type = "File"
        }

        Script DeployDacPac
        {
            GetScript = { @{ Name = "DeployDacPac" } }
            TestScript = { $false }
            SetScript =
            {
                $cmd = "& 'C:\Program Files (x86)\Microsoft SQL Server\110\DAC\bin\sqlpackage.exe' /a:Publish /sf:c:\temp\dbFiles\FabrikamFiber.Schema.dacpac /tcs:'server=localhost; initial catalog=FabrikamFiber-Express'"
                Invoke-Expression $cmd | Write-Verbose
            }
            DependsOn = "[File]CopyDBSchema"
        }

        Script CreateLabUser
        {
            GetScript = { @{ Name = "CreateLabUser" } }
            TestScript = { $false }
            SetScript =
            {
                $sql = @"
                    USE [master]
                    GO

                    IF (NOT EXISTS(SELECT name from master..syslogins WHERE name = 'Lab'))
                    BEGIN
                        CREATE LOGIN [lab] WITH PASSWORD=N'P2ssw0rd', DEFAULT_DATABASE=[master], CHECK_EXPIRATION=OFF, CHECK_POLICY=OFF

                        BEGIN
                            USE [FabrikamFiberExpress]
                        END

                        CREATE USER [lab] FOR LOGIN [lab]
                        ALTER ROLE [db_owner] ADD MEMBER [lab]
                    END
"@

                $cmdPath = "c:\temp\dbFiles\createLogin.sql"
                sc -Path $cmdPath -Value ($sql -replace '\n', "`r`n")

                & "C:\Program Files\Microsoft SQL Server\110\Tools\Binn\sqlcmd.exe" -S localhost -U sa -P P2ssw0rd -i $cmdPath
            }
        }
    }
}

# command for RM
FabFibWeb_Db -ConfigurationData $configData -PackagePath $applicationPath

# test from command line
#FabFibWeb -ConfigurationData configData.psd1 -PackagePath "\\rmserver\builddrops\ __ReleaseSite\__ ReleaseSite_1.0.0.3"
#Start-DscConfiguration -Path .\FabFibWeb -Verbose -Wait
Let’s take a look at what is going on:
- Line 7: I need a parameter to tell me where the DacPac is – this will be my build drops folder.
- Line 10: I specify the node I want to bring into the desired state. I wanted to apply this config to all nodes that have the role “SqlServer” and this worked from the command line – for some reason I couldn’t get it to work with RM, so I hardcode the node-name here. I think this is particular to my environment, since this should work.
- Lines 12-15: Log a message.
- Lines 20-26: Use the File resource to copy the DacPac from a subfolder in the $PackagePath to a known folder on the local machine. I did this because I couldn’t pass the drop-folder path in to the Script resource – so I copied using the File Resource to a known location and can just “hard code” that location in my Script resources.
- Line 28: This is the start of the script Resource for invoking sqlpackage.exe.
- Line 30: Just return the name of the resource.
- Line 31: Always return false – meaning that the Set-Script will always be run. You could have some check here if you didn’t want the script to execute for some specific condition.
- Lines 32-36: This is the script that actually does the work – I create the command and then Invoke it, piping output to the verbose log for logging. I use “/a:Publish” to tell SqlPackage to execute the incremental changes on the database, using the DacPac as the source file (/sf) and targeting the database specified in the target connection string (/tcs).
- Line 37: Invoking the DacPac is dependent on the DacPac being present, so I express the dependency.
- The final resource in this script is also a Script resource – the Get- and Test-Scripts are self-explanatory. The Set-Script takes the SQL string I have in the script, writes it to a file (using sc – Set-Content) and then executes the file using sqlcmd.exe. This is specific to my environment, but shows that you can execute arbitrary SQL against a server fairly easily using the Script resource.
- Line 73: When using DSC with RM, you need to compile the configuration (do this by invoking the Configuration) into mof files. Don’t call Start-DscConfiguration (which pushes the mof files to the target nodes for running the configuration) since RM will do this step. You can see how I use $applicationPath – this is the path that you specify when you create the vNext component (relative to a drop folder) – we’ll see later how to set this up. RM sets this parameter when before it calls the script. Also, you need to specify the parameter that contains the configuration hash-table. In my case this is $configData, which you’ll see at the top of the configData script above. RM “executes” this script so the parameter is in memory by the time the DSC script is executed.
When working with DSC, you have to think about idempotency. In other words, the script must produce the same result every time you run it – no matter what the starting state is. Since deploying a DacPac to a database is already idempotent, I don’t have too much to worry about in this case, so that’s why the Test-Script for the DeployDacPac Script resource always returns false.
Deploying a Website using WebDeploy
You could be publishing your website out of Visual Studio. But don’t – seriously, don’t EVER do this. So you’re smart: you’ve got an automated build to compile your website. Well done! Now you could be deploying this site using xcopy. Don’t – primarily because managing configuration is hard to do using this method, and you usually end up deploying all sorts of files that you don’t actually require (like web.debug.config etc.). You should be using WebDeploy!
I’ve got a post about how to use WebDeploy with agent-based templates. What follows is how to deploy sites using WebDeploy in vNext templates (using PowerShell DSC). In a previous post I show how you can use DSC to ready a webserver for your application. Now we can look at what we need to do to actually deploy a site using WebDeploy. Here’s the script I use:
Configuration FabFibWeb_Site
{
    param (
        [Parameter(Mandatory=$true)]
        [ValidateNotNullOrEmpty()]
        [String]
        $PackagePath
    )

    Node fabfiberserver #$AllNodes.where{ $_.NodeName -ne "*" -and $_.Role.Contains("WebServer") }.NodeName
    {
        Log WebServerLog
        {
            Message = "Starting WebServer node configuration. PackagePath = $PackagePath"
        }

        #
        # Deploy a website using WebDeploy
        #
        File CopyWebDeployFiles
        {
            Ensure = "Present"
            SourcePath = "$PackagePath\_PublishedWebsites\FabrikamFiber.Web_Package"
            DestinationPath = "c:\temp\Site"
            Recurse = $true
            Force = $true
            Type = "Directory"
        }

        Script SetConStringDeployParam
        {
            GetScript = { @{ Name = "SetDeployParams" } }
            TestScript = { $false }
            SetScript = {
                $paramFilePath = "c:\temp\Site\FabrikamFiber.Web.SetParameters.xml"

                $paramsToReplace = @{
                    " __FabFiberExpressConStr__" = "data source=fabfiberdb;database=FabrikamFiber-Express;User Id=lab;Password=P2ssw0rd"
                    " __SiteName__" = "Default Web Site\FabrikamFiber"
                }

                $content = gc $paramFilePath
                $paramsToReplace.GetEnumerator() | % {
                    $content = $content.Replace($_.Key, $_.Value)
                }
                sc -Path $paramFilePath -Value $content
            }
            DependsOn = "[File]CopyWebDeployFiles"
        }

        Script DeploySite
        {
            GetScript = { @{ Name = "DeploySite" } }
            TestScript = { $false }
            SetScript = {
                & "c:\temp\Site\FabrikamFiber.Web.deploy.cmd" /Y
            }
            DependsOn = "[Script]SetConStringDeployParam"
        }

        #
        # Ensure App Insights cloud monitoring for the site is enabled
        #
        Script AppInsightsCloudMonitoring
        {
            DependsOn = "[Script]DeploySite"
            GetScript =
            {
                @{
                    WebApplication = 'Default Web Site/FabrikamFiber';
                }
            }
            TestScript =
            {
                $false
            }
            SetScript =
            {
                # import module - requires change to PSModulePath for this session
                $mod = Get-Module -Name Microsoft.MonitoringAgent.PowerShell
                if ($mod -eq $null)
                {
                    $env:PSModulePath = $env:PSModulePath + ";C:\Program Files\Microsoft Monitoring Agent\Agent\PowerShell\"
                    Import-Module Microsoft.MonitoringAgent.PowerShell -DisableNameChecking
                }

                Write-Verbose "Starting cloud monitoring on FabFiber site"
                Start-WebApplicationMonitoring -Cloud -Name 'Default Web Site/FabrikamFiber'
            }
        }
    }
}

# command for RM
FabFibWeb_Site -ConfigurationData $configData -PackagePath $applicationPath

# test from command line
#FabFibWeb -ConfigurationData configData.psd1 -PackagePath "\\rmserver\builddrops\ __ReleaseSite\__ ReleaseSite_1.0.0.3"
#Start-DscConfiguration -Path .\FabFibWeb -Verbose -Wait
You’ll see some similarities to the database DSC script – getting nodes by role (“WebServer” this time instead of “SqlServer”), Log resources to log messages and the “compilation” command which passes in the $configData and $applicationPath.
- Lines 20-28: I copy the entire FabrikamFiber.Web_package folder (containing the cmd, SetParameters and zip file) to a temp folder on the node.
- Line 30: I use a Script Resource to do config replacement.
- Lines 32-33: Always execute the Set-Script, and return the name of the resource when interrogating the target system.
- Lines 34-47: The “guts” of this script – replacing the tokens in the SetParameters file with real values and then invoking WebDeploy.
- Line 35: Set a parameter to the known local location of the SetParameters file.
- Lines 37-40: Create a hash-table of key/value pairs that will be replaced in the SetParameters file. I have 2: the site name and the database connection string. You can see the familiar __ pre- and post-fix for the placeholders names – I can use this same package in agent-based deployments if I want to.
- Line 42: read in the contents of the SetParameters file.
- Lines 43-45: Replace the token placeholders with the actual values from the hash-table.
- Line 46: overwrite the SetParameters file – it now has actual values instead of just placeholder values.
- Lines 51-59: I use another Script resource to execute the cmd file (invoking WebDeploy).
- Lines 64-90: This is optional – I include it here as a reference of how to ensure that the site is being monitored using Application Insights once it’s deployed.
The Release
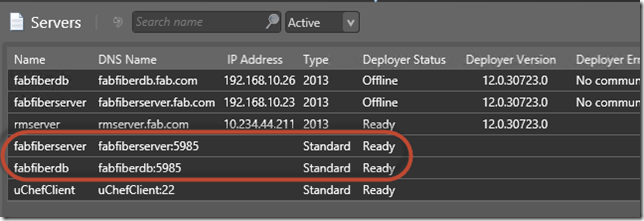
In order to run vNext (a.k.a. agent-less a.k.a DSC) deployments, you need to import your target nodes. Since vNext servers are agent-less, you don’t need to install anything on the target node. You just need to make sure you can run remote PowerShell commands against the node and have the username/password for doing so. When adding a new server, just type in the name of the machine and specify the remote port, which is 5985 by default. This adds the server into RM as a “Standard” server. These servers always show their status as “Ready”, but this can be misleading since there is no agent. You can then compose your servers into “Standard Environments”. Next you’ll want to create a vNext Release Path (which specifies the environments you’re deploying to as well as who is responsible for approvals).
You can specify other configuration variables and defaults in RM Update 4 RC.
vNext Components
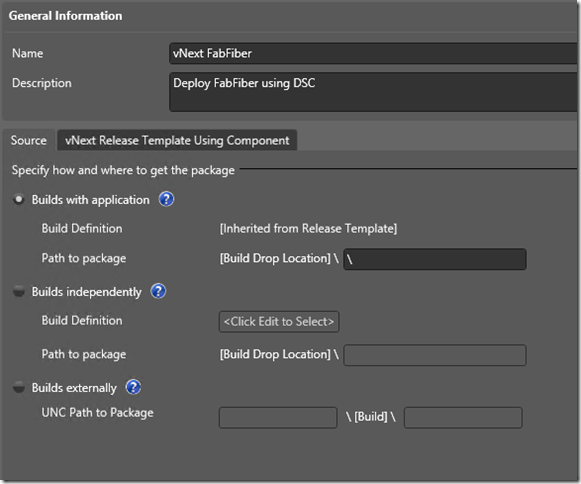
In order to use the binaries and scripts we’ve created, we need to specify a vNext component in RM. Here’s how I specify the component:
All this is really doing is setting the value of the $packagePath (which I set to the root of the drop folder here). Also note how I only need a single component even though I have several scripts to invoke (as we’ll see next).
The vNext Template
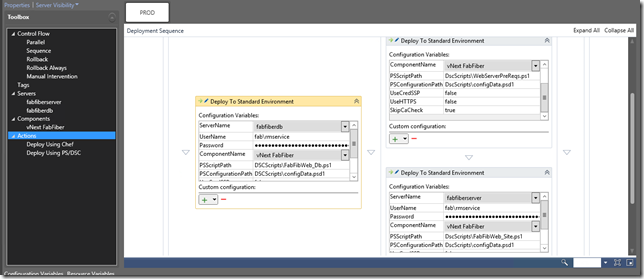
I create a new vNext template. I select a vNext release path. I right-click the “Components” node in the toolbox and add in the vNext component I just created. Since I am deploying to (at least) 2 machines, I drag a “Parallel” activity onto the design surface. On the left of the parallel, I want scripts for my SQL servers. On the right, I want scripts for my webservers. Since I’ve already installed SQL on my SQL server, I am not going to use that script – I’ll just deploy my database model. On the webserver, I want to run the prerequisites script (to make sure IIS, Webdeploy, MVC runtime and the MMA agent are all installed and correctly configured. Then I want to deploy my website using Webdeploy. So I drag on 3 “Deploy using PS/DSC” activities. I select the appropriate server and component from the “Server” and “Component” drop-downs respectively. I set the username/password for the identity that RM will use to remote onto the target nodes. Then I set the path to the scripts (relative to the root of the drop folder, which is the “Path to Package” in the component I sepcified (which becomes $applicationPath inside the DSC script). I also set the path to the PsConifgurationPath to my configData.psd1 script. Finally I set UseCredSSP and UseHTTPS both to false and SkipCaCheck to true (you can vary these according to your environment).
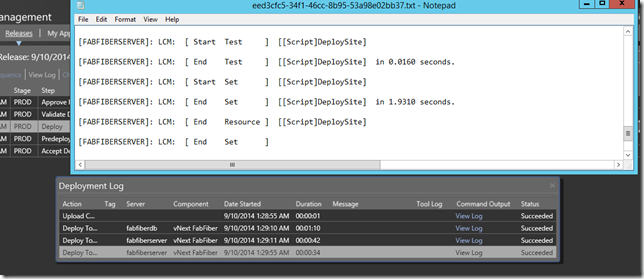
Now I can trigger the release (either through the build or manually). Here’s what a successful run looks like and a snippet of one of the logs:
To Agent or Not To Agent?
Looking at the features and improvements to Release Management Update 3 and Update 4, it seems that the TFS product team are not really investing in agent-based deployments and templates any more. If you’re using agent-based deployments, it’s a good idea to start investing in DSC (or at the very least just plain ol’ PowerShell) so that you can use agent-less (vNext) deployments. As soon as I saw DSC capabilities in Update 3, I guessed this was the direction the product team would pursue, and Update 4 seems to confirm that guess. While there is a bit of a learning curve, this technology is very powerful and will ultimately lead to better deployments – which means better quality for your business and customers.
Happy deploying!
