Using VSTS to Test Python Code (with Code Coverage)
I recently worked with a customer that had some containers running Python code. The code was written by data scientists and recently a dev had been hired to help the team get some real process in place. As I was helping them with their CI/CD pipeline (which used a Dockerfile to build their image, publish to Azure Container Registry and then spun up the containers in Azure Container Instances), I noted that there were no unit tests. Fortunately the team was receptive to adding tests and I didn’t have to have a long discussion proving that they absolutely need to be unit testing.
Python Testing with PyTest
I’ve done a bit of Python programming, but am by no means an expert. However, after a few minutes of searching I realized there are a ton of good Python frameworks out there. One I came across is PyTest (which is cool since it’s very pythonic). This great post (Python Testing 101: PyTest) from Andy Knight even had a Github repo with some code and tests. So when I got back to the hotel, I forked the repo and was able to quickly spin up a build definition in VSTS that runs the tests - with code coverage!
Continuous Testing with VSTS
At a high level, here are the steps that your build has to perform:
- Clone the repo
- Install PyTest and other packages required
- Run PyTest, instructing it to output the results to (JUnit) XML and produce (Cobertura) coverage reports
- Publish the test results
- (Optional) Fix the styling of the HTML coverage reports
- Publish the coverage reports
Why the “fix styles” step? When we create the HTML coverage reports (so that you can see which lines of code are covered and which are not) we publish them to VSTS. However, for security reasons VSTS blocks the css styling when viewing these reports in the Build Summary page. Fortunately if you inline the styles, you get much prettier reports - so we use a node.js package to do this for us.
Fortunately I’ve already done this and published the VSTS build definition JSON file in my forked repo. Here’s how you can import the code, import the CI definition and run it so you can see this in action yourself.
Import the Repo from Github
The source code is in a Github repo - no problem! We’ll import into VSTS and then we can mess with it. We can even fork the Github repo, then import it - that way we can sumbit pull requests on Github for changes we make. In this case, I’ll just import the repo directly without forking.
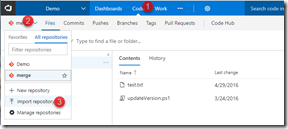
Log in to VSTS and navigate to the Code hub. Then click on the repo button in the toolbar and click Import repository.
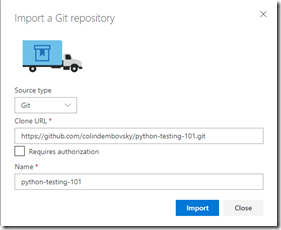
Enter the URL and click Import.
Now we have the code in VSTS! Remember, this is just Git, so this is just another remote (that happens to be in VSTS).
Import the Build Definition
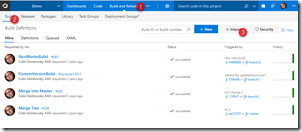
Now we can import the build definition. First, navigate to the Github repo and clone it or download the PythonTesting-CI.json file. Then open VSTS and navigate to a team project and click on Build and Release (in the Blue toolbar at the top) to navigate to the build and release hub. Click on Builds (in the grey secondary toolbar) and click the “+Import” button.
In the import dialog, browse to the json file you downloaded previously and click Import.
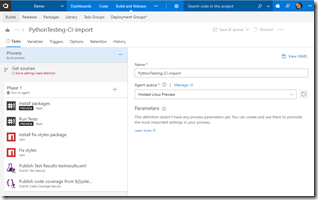
You’ll then see the build definition - there are a couple things that need to be fixed, but the steps are all there.
Note how the Agent queue is specifying “Hosted Linux Preview” - yep, this is running on a Linux VM. Now you don’t have to do this, since Python will run on Windows, but I like the Linux agent - and it’s fast too! Rename the definition if you want to.
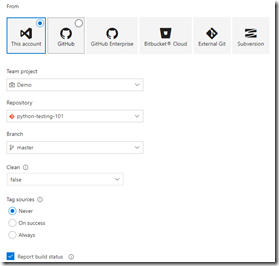
Now we’ll fix the “Get sources” section. Click on “Get sources” to tell the build where to get the sources from. Make sure the “This account” tile is selected and then set the repository to “python-testing-101” or whatever you named your repo when you imported. You can optionally set Tag sources and other settings.
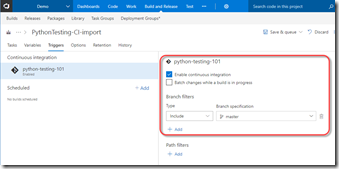
One more addition: click on the Triggers tab and enable the CI trigger:
Now you can click Save and queue to queue a new build! While it’s running, let’s look at the tasks.
- Install Packages: this Bash task uses curl to get the pip install script, then install pip and finally install pytest and pytest-cov packages. If you’re using a private agent you may not have to install pip, but pip doesn’t come out of the box on the Hosted Linux agent so that’s why I install it.
- Run Tests: invoke python -m pytest (which will run any tests in the current folder or subfolders), passing –junitxml=testresults.xml and the pycov args to create both an XML and HTML report
- Install fix-styles package: this just runs “npm install” in the root directory to install this node.js package (you can see this if you look at the package.json file)
- Fix styles: we run the “fix” script from the package.json file, which just invokes the fix-styles.js file to inline the styling into the HTML coverage reports
- Publish Test Results: we publish the XML file, which is just a JUnit test result XML file. Note how under Control Options, this task is set to run “Even if a previous task has failed, unless the build was cancelled”. This ensures that the publish step works even when tests fail (otherwise we won’t get test results when tests fail).
- Publish Code Coverage: This task published the XML (Cobertura) coverage report as well as the (now style-inlined) HTML reports
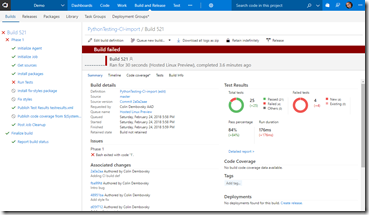
Really simple! Let’s navigate to the build run (click on the build number that you just queued) and - oh dear, the tests failed!
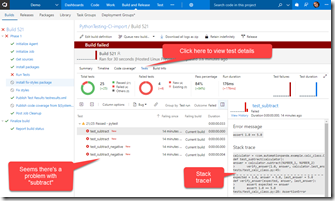
Seems there is a bug in the code. Take a moment to see how great the test result section is - even though there are failing tests. Then click on Tests to see the failing tests:
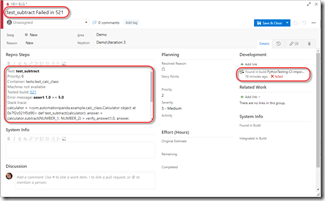
All 4 failing tests have “subtract” in them - easy to guess that we have a problem in the subtract method! If we click on a test we can also see the stack trace and the failed assertions from the test failure. Click on the “Bug” button above the test to log a bug with tons of detail!
Just look at that bug: with a single button click we have exception details, stack traces and links to the failing build. Sweet!
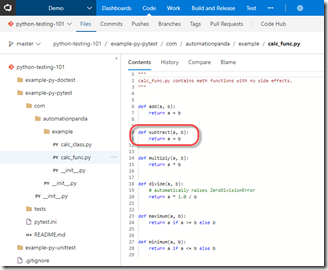
Now let’s fix the bug: click on the Code hub and navigate to example-py-pytest/com/automationpanda/example and click on the calc_func.py file. Yep, there’s a problem in the subtract method:
Click on the Edit button and change that pesky + to a much better -. Note, this isn’t what you’d usually do - you’d normally create a branch from the Bug, pull the repo, fix the bug and push. Then you’d submit a PR. For the sake of this blog, I’m just fixing the code in the code editor.
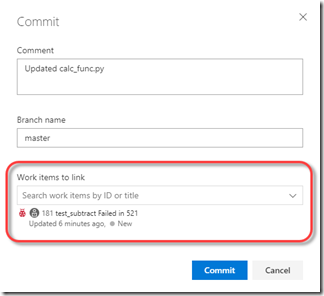
Click the Commit button to save the change. In “Work items to link” find the Bug that we created earlier and select it. Then click Commit.
The commit will trigger a new build! Click on Build and you’ll see a build is already running. Click on the build number to open the build.
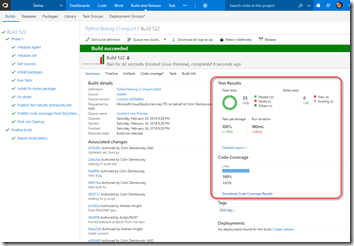
This time it’s a success! Click on the build number to see the report - this time, we see all the tests are passing and we have 100% coverage - nice!
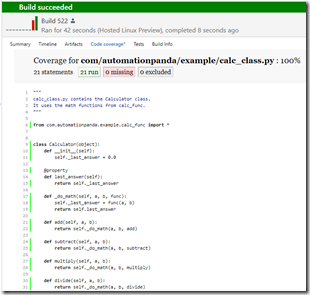
If you click on “Code Coverage*” just below the header, you’ll see the (prettified) HTML reports. Normally you won’t have 100% coverage and you’ll want to see which methods have coverage and which don’t - you would do so by browsing your files here and noting which lines are covered or not by the color highlighting:
Also note that we can see that this build is related to the Bug (under Associated work items). It’s almost like we’re professional developers…
Conclusion
Just because there is “Visual Studio” in the name, it doesn’t mean that VSTS can’t do Python - and do it really, really well! You get detailed test logging, continuous integration, code coverage reports and details - and for very little effort. If you’re not testing your Python code - just do it ™ with VSTS!
