Terraform all the Things with VSTS

I’ve done a fair amount of ARM template authoring. It’s not as bad as XML, but the JSON can get laborious. A number of my colleagues use Terraform templates and I was recently on a project that was using these templates. I quickly did a couple PluralSight Terraform classes to get up to speed and then started hacking away. In this post I’ll jot down a couple thoughts about how we structure Terraform projects and how to deploy them using VSTS. The source code for this post is on Github.
Stacks
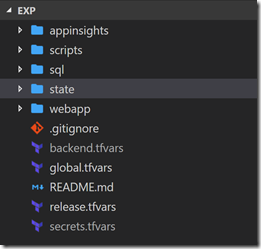
When we create Terraform projects, we divide them into “stacks”. These are somewhat independent, loosely-coupled components of the full infrastructure we’re deploying. Let’s take the example of an Azure App Service with deployment slots that connects to an Azure SQL database and has Application Insights configured. In this scenario, we have three “stacks”: SQL, WebApp and AppInsights. We then have an additional “stack” for the Terraform remote state (an Azure blob) and finally a folder for scripts. Here’s what our final folder structure looks like:
Follow the instructions in the README.md file for initializing the backend using the state folder. Note that backend.tfvars and secrets.tfvars are ignored by the .gitignore file so should not be committed to the repo.
Workspace = Environment
Thinking ahead, we may want to create different environments. This is where Terraform workspaces come in handy - we use them to represent different environments. That way we can have a single template and can re-use it in multiple environments. So if you look at webapp/variables.tf, you’ll see this snippet:
variable "stack_config" {
  type = "map"

  default = {
    dev = {
      name = "webapp"
      rg_name_prefix = "cd-terra"
      plan_name_prefix = "cdterra"
      app_name_prefix = "cdterraweb"
    }

    uat = {
      name = "webapp"
      rg_name_prefix = "cd-terra"
      plan_name_prefix = "cdterra"
      app_name_prefix = "cdterraweb"
    }
  }
}
You can see how we have different maps for different workspaces. To consume the environment (or workspace) specific variables, we use the locals resource in our main.tf scripts. The common format is something like this:
locals {
  env = "${var.environment[terraform.workspace]}"
  secrets = "${var.secrets[terraform.workspace]}"
  stack = "${var.stack_config[terraform.workspace]}"
  created_by = "${var.created_by}"
  stack_name = "${local.stack["name"]}"

  env_name = "${terraform.workspace}"
  release = "${var.release}"
  ...
  app_name = "${local.stack["app_name_prefix"]}-${local.env_name}"
}
We create local variables for env, secrets and stack by dereferencing the appropriate workspace’s map values. Now we can use “${local.app_name}” and the value will be an environment-specific value. Also note how we have a variable called “release” - we add this as a tag to all the Azure resources being created so that we can tie the resource to the release that created/updated it.
Releases in VSTS
Now we get to the really interesting bit: how we run the templates in a release pipeline in VSTS. I tried a couple of marketplace Terraform extensions, but wasn’t happy with the results. The most promising one was Peter Groenewegen’s extension, but it was not workspace aware and while it did download Terraform so that I could run Terraform using the hosted agents, it didn’t preserve Terraform on the path. I eventually ditched it for a plain ol’ bash script. To perform Terraform operations, we have to:
- Replace tokens in the release.tfvars file
- Download the Terraform executable
- Run the Terraform apply bash script for each stack in order
I ended up using the Hosted Ubuntu 1604 hosted agent for the agent phase - I don’t know for sure, but I suspect this is running in a container - in any case, it’s super fast to start up and execute. Because I’m running the build on Linux, I wrote the scripts I used in bash - but you can easily create equivalent PowerShell scripts if you really want to - though VSTS will run bash scripts on Windows agents just fine - although the paths are different.
Artifact
For the release to work, it needs access to the terraform templates. I create a new release and use the source repo as the incoming artifact with an alias “infra”. You can add multiple artifacts, so if you’re going to deploy code after deploying infrastructure, then you can add in the build as another artifact.
Variables
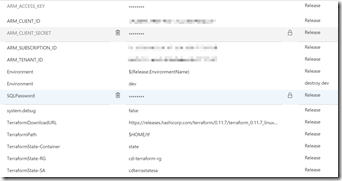
In the release, I define a number of variables:
I tried to use the environment variable format for ARM_ACCESS_KEY, ARM_CLIENT_ID etc. but found I had to supply these explicitly - which I do via the release.tfvars file. The release.tfvars file has tokens that are replaces with the environment values at deploy time. If you add more environment-specific variables, then you need to add their tokens in the tfvars file and add the variable into the variables section of the release. One last note: I use $(Release.EnvironmentName) as the value for the Environment variable - but this needs a different value for the “destroy” environment (each environment I have in the pipeline has a corresponding “destroy” environment for destroying the resources). You can see how I specify “dev” as the Environment name for the “destroy dev” environment.
Download Terraform
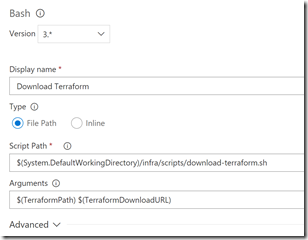
This is only required if you’re using the hosted agents - if you’re using a private agent, then you’re better off downloading terraform and adding it to the PATH. However, in the scripts folder I have a bash script (download-terraform.sh) that downloads Terraform using curl (from a URL specified in a variable) and untars it to the path specified in the TerraformPath variable. From that point on, you can use $(TerraformPath)\terraform for any Terraform operations.
Applying a Stack
The scripts folder contains the script for applying a stack (run-terraform.sh). Let’s dig into the script:
#!/bin/bash -e

echo " *********** Initialize backend"
echo "access_key = \"${1}\"" > ../backend.tfvars
$2/terraform init -backend-config=../backend.tfvars -no-color

echo ""
echo " *********** Create or select workspace"
if [$($2/terraform workspace list | grep $3 | wc -l) -eq 0]; then
  echo "Create new workspace $3"
  $2/terraform workspace new $3 -no-color
else
  echo "Switch to workspace $3"
  $2/terraform workspace select $3 -no-color
fi

echo ""
echo " *********** Run 'plan'"
$2/terraform plan --var-file=../global.tfvars --var-file=../release.tfvars -var="release=$4" --out=./tf.plan -no-color -input=false

echo ""
echo " *********** Run 'apply'"
$2/terraform apply -no-color -input=false -auto-approve ./tf.plan
Notes:
- Lines 3 - 5: Initialize the backend. Output the access_key to the root backend.tfvars file (remember this won’t exist in the repo since this file is ignored in .gitignore)
- Lines 7-15: Create or select the workspace (environment)
- Lines 17-19: Run terraform plan passing in global variables from global.tfvars, environment-specific variables now encapsulated in release.tfvars and pass in the release number (for tagging)
- Lines 21-23: Run terraform apply using the plan generated in the previous command
Destroying a Stack
Destroying a stack is almost the same as applying one - the script (run-terraform-destroy.sh) just does a “plan -destroy” to preview the operations before calling terraform destroy.
The Release Steps
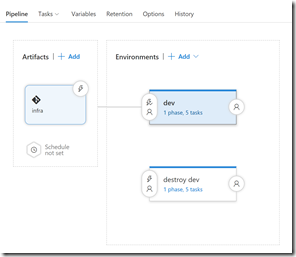
Now we can see what these blocks look like in the pipeline. Here’s a pipeline with a dev and a “destroy dev” environment:
The dev environment triggers immediately after the release is created, while the “destroy dev” environment is a manual-only trigger.
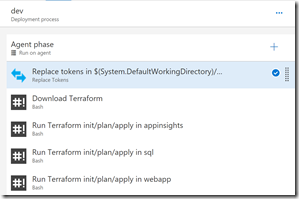
Let’s see what’s in the dev environment:
There you can see 5 tasks: replace variables, download Terraform and then an apply for each stack (in this case we have 3 stacks). The order here is important only because the WebApp stack reads output variables from the state data of the SQL and AppInsights deployments (to get the AppInsights key and SQL connection strings). Let’s take a closer look at each task:
Replace Variables
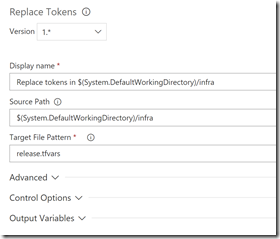
For this I use my trusty ReplaceTokens task from my build and release extension pack. Specify the folder (the root) that contains the release.tfvars file and the file search format, which is just release.tfvars:
Next we use a Shell task to run the download Terraform script, which expects the path to install to as well as the URL for the Terraform binary to download:
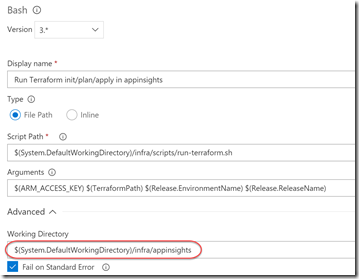
Finally we use a Shell task for each stack - the only change is the working folder (under Advanced) needs to be the stack folder - otherwise everything else stays the same:
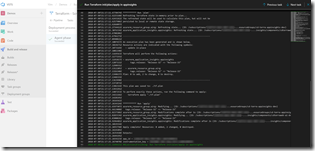
Success! Here you can see a run where nothing was changed except the release tag - the templates are idempotent, so we let Terraform figure out what changes (if any) are necessary.
Conclusion
Terraform feels to me to be a more “enterprise” method of creating infrastructure as code than using pure ARM templates. It’s almost like what TypeScript is to JavaScript - Terraform has better sharing and state awareness and allows for more maintainable and better structured code. Once I had iterated a bit on how to execute the Terraform templates in a release, I got it down to a couple really simple scripts. These could even be wrapped into custom tasks.
Happy deploying!
