Implement an Azure DevOps Release Gate to ServiceNow

- Finding the ServiceNow REST API
- Creating a Custom Release Gate Extension
- Putting It All Together
- Conclusion
I’m currently doing some work with a customer that is integrating between ServiceNow and Azure DevOps (the artist formerly known as VSTS). I quickly spun up a development ServiceNow instance to play around a bit. One of the use-cases I could foresee was a release gate that only allows a release to continue if a Change Request (CR) is in the Implement state. So I had to do some investigation: I know there are a few out-of-the-box Azure DevOps release gates, including a REST API call - but I knew that you could also create a custom gate. I decided to see if I could create the gate without expecting the release author having to know the REST API call to ServiceNow or how to parse the JSON response!
Follow along to see the whole process - or just grab the code in the Github repo.
Finding the ServiceNow REST API
Part One of my quest was to figure out the REST API call to make to ServiceNow. The ServiceNow documentation is ok - perhaps if you understand ServiceNow concepts (and I don’t have deep experience with them) then they’re fine. But I quickly felt like I was getting lost in the weeds. Add to that many, many versions of the product - which all seem to have different APIs. After a couple hours I did discover that the ServiceNow instance has a REST API explorer - but I’m almost glad I didn’t start there as you do need some knowledge of the product in order to really use the explorer effectively. For example, I was able to query the state of the CR if I had its internal sys_id, but I didn’t expect the user to have that. I wanted to get the state of the CR by its number - and how to do that wasn’t obvious from the REST API explorer.
Anyway, I was able to find the REST API to query the state of a Change Request: https://<instance>.servicenow.com/api/now/table/change_request?sysparm_query=number=<number>&sysparm_fields=state&sysparm_display_value=true
A couple notes on the query strings:
- sysparm_query lets me specify that I want to query the change_request table for the expression “number=<number>”, which lets me get the CR via its number instead of its sys_id
- sysparm_fields lets me specify which fields I want returned - in this case, just the state field
- sysparm_value=true expands the enums from ints to strings, so I get the “display value” of the state instead of the state ID
The next problem is authentication - turns out if you have a username and password for your ServiceNow instance, you can include a standard auth header using BasicAuth (this is over HTTPS, so that’s ok). I tested this with curl and was able to get a response that looks something like this: {"result":[{"state":"Implement"}]}
Creating a Custom Release Gate Extension
Now that I know the REST API call to ServiceNow, I turned to how to Part Two of my quest: create a custom Release Gate extension. Fortunately, I had Microsoft DevLabs’ great Azure DevOps Extension extension as a reference (this was originally from Jesse Houwing) - and I use this all the time to package and publish my own Azure DevOps Build and Release extension pack.
It turns out that the release gate “task” itself is pretty simple, since the entire task is just a JSON file which specifies its UI and the expression to evaluate on the response packet. The full file is here but let’s examine the two most important parts of this task: the “inputs” element and the “execution” element. First the inputs:
"inputs": [
  {
    "name": "connectedServiceName",
    "type": "connectedService:ServiceNow",
    "label": "Service Now endpoint",
    "required": true,
    "helpMarkDown": "Service Now endpoint connection."
  },
  {
    "name": "crNumber",
    "type": "string",
    "label": "Change Request number",
    "defaultValue": "",
    "required": true,
    "helpMarkDown": "Change Request number to check."
  },
  {
    "name": "validState",
    "type": "string",
    "label": "State",
    "defaultValue": "Implement",
    "helpMarkDown": "State that the CR should be in to pass the gate.",
    "required": true
  }
]
Notes:
- connectedServiceName is of type “connectedService:ServiceNow”. This is the endpoint used to call the REST API and should handle authentication.
- crNumber is a string and is the CR number we’re going to search on
- validState is a string and is the state the CR should be in to pass the gate
Given those inputs, we can look at the execute element:
"execution": {
  "HttpRequest": {
    "Execute": {
      "EndpointId": "$(connectedServiceName)",
      "EndpointUrl": "$(endpoint.url)/api/now/table/change_request?sysparm_query=number=$(crNumber)&sysparm_fields=state&sysparm_display_value=true",
      "Method": "GET",
      "Body": "",
      "Headers": "{\"Content-Type\":\"application/json\"}",
      "WaitForCompletion": "false",
      "Expression": "eq(jsonpath('$.result[0].state')[0], '$(validState)')"
    }
  }
}
Notes:
- The execution is an HttpRequest
- Endpoint is set to the connectedService input
- EndpointUrl is the full URL to use to hit the REST API
- The REST method is a GET
- The body is empty
- We’re adding a Content-Type header of “application/json” - notice that we don’t need to specify auth headers since the Endpoint will take care of that for us
- The expression to evaluate is checking that the state field of the first result is set to the value of the validState variable
And that’s it! Let’s take a look at the connected service endpoint, which is defined in the extension manifest (not in the task definition):
{
  "id": "colinsalmcorner-snow-endpoint-type",
  "type": "ms.vss-endpoint.service-endpoint-type",
  "targets": [
    "ms.vss-endpoint.endpoint-types"
  ],
  "properties": {
    "name": "ServiceNow",
    "displayName": "Service Now",
    "helpMarkDown": "Create an authenticated endpoint to a Service Now instance.",
    "url": {
      "displayName": "Service Now URL",
         "description": "The Service Now instance Url, e.g. `https://instance.service-now.com`."
    },
    "authenticationSchemes": [
    {
      "type": "ms.vss-endpoint.endpoint-auth-scheme-basic",
      "inputDescriptors": [
        {
          "id": "username",
          "name": "Username",
          "description": "Username",
          "inputMode": "textbox",
          "isConfidential": false,
          "validation": {
            "isRequired": true,
            "dataType": "string",
            "maxLength": 300
          }
        },
        {
          "id": "password",
          "name": "Password",
          "description": "Password for the user account.",
          "inputMode": "passwordbox",
          "isConfidential": true,
          "validation": {
            "isRequired": true,
            "dataType": "string",
            "maxLength": 300
          }
        }
      ]
    }
  ]
}
Notes:
- Lines 2-6: specify that this contribution is of type Service Endpoint
- Line 8: name of the endpoint type - this is referenced by the gate in the endpoint input
- Lines 9-10: description and help text
- Line 11-14: specify a URL input for this endpoint
- The rest: specify the authentication scheme for the endpoint
By default the ms.vss-endpoint.endpoint-auth-scheme-basic
authentication scheme adds an Authorization header to any request made to the URL of the service endpoint. The value of the header is a base64 encoded munge of user:password. It’s great that you don’t have to mess with this yourself!
Putting It All Together
Now we have the service endpoint and the gate, we’re ready to publish and install the extension! The readme.md in the repo has some detail on this if you want to try your own (or make changes to the code from mine), or you can just install the extension that I’ve published if you want to use the gate as-is. If you do publish it yourself, you’ll need to change the publisher and the GUIDs before you publish.
For the release to work, you’ll need to make the CR a variable. I did this by adding the variable and making it settable at queue time:
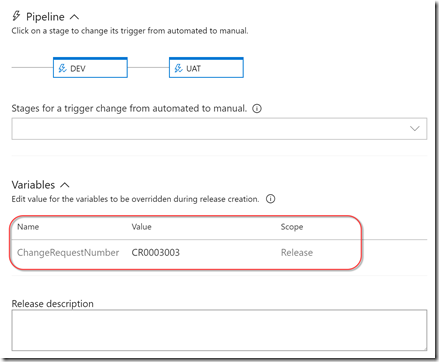
Now when I queue the release, I have to add the CR. Of course you could imagine a release being queued off from an automated process, and that can pass the CR as part of the body of the REST API call to queue the release. For now, I’m entering it manually:
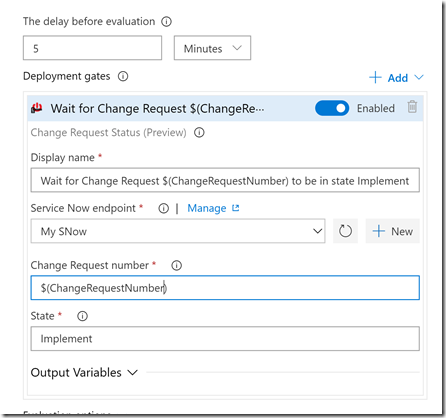
So how do we specify the gate? Edit the release and click on the pre- or post-approval icon for the environment and open the Gates section. Click the + to add a new gate and select the “Change Request Status” gate. We can then configure the endpoint, the CR number and the State we want to pass on:
To create an endpoint, just click on “+ New” next to the Service Now endpoint drop-down - this will open a new tab to the Service Endpoints page where you can add a new ServiceNow endpoint.
Note how we set the Change Request number to the variable $(ChangeRequestNumber)
. That way this field is dynamic.
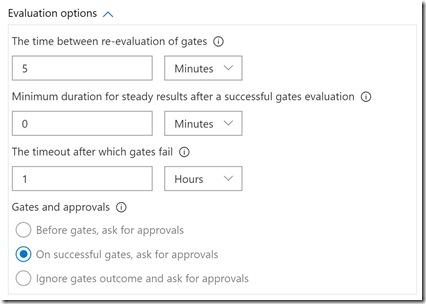
Finally, set the “Evaluation options” to configure the frequency, timeout and other gate settings:
Once the release runs, we can see the Gate invocations and results:
Note that the Gate has to pass twice in a row before it’s successful and moves the pipeline on.
Conclusion
Creating release gates as extensions is not too hard once you have some of the bits in place. And it’s a far better authoring experience than the out of the box REST API call - which leaves you trying to mess with auth headers and parsing JSON responses. If you want to get release authors to really fully utilize the power of gates, do them a solid and wrap the gate in an extension!
Happy gating!


