Developing a Custom Build vNext Task: Part 2
In part 1 I showed you how to scaffold a task using tfx-cli, how to customize the manifest and how to implement the PowerShell script for my VersionAssemblies task. In this post I’ll show you how I went about developing the Node version of the task and how I uploaded the completed task to my TFS server.
VS Code
I chose to use VS Code as the editor for my tasks. Partly because I wanted to become more comfortable using VS Code, and partly because the task doesn’t have a project file – it’s just some files in a folder – perfect for VS Code. If you’re unfamiliar with VS Code, then I highly recommend this great intro video by Chris Dias.
Restructure and Initialize a Git Repo
It was time to get serious. I wanted to publish the task to a Git repo, so I decided to reorganize a little. I wanted the root of my repo to have a README.md file and then have a folder per task. Each task should also have a markdown file. So I created a folder called cols-agent-tasks and moved the VersionAssemblies task into a subfolder called Tasks. Then I initialized the Git repo.
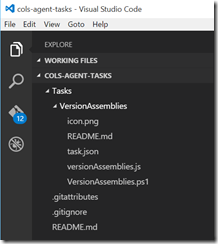
Next I right clicked on my cols-agent-tasks folder and selected “Open with Code” to open the folder. Here’s how it looked:
See the Git icon on the left? Clicking on it allows you to enter a commit message and commit. You can also diff files and undo changes. Sweet.
Installing Node Packages
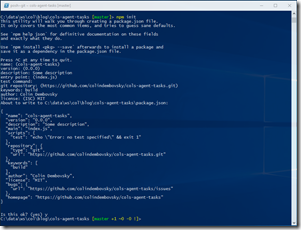
I knew that the VSO agent has a client library (vso-task-lib) from looking at the out of the box tasks in the vso-agent-tasks repo. I wanted to utilize that in my node task. The task lib is a node package, and so I needed to pull the package down from npm. So I opened up a PowerShell prompt and did an “npm init” to initialize a package.json file (required for npm) and walked through the wizard:
Since I chose MIT for the license, I added a license file too.
Now that the package.json file was initialized, I could run “npm install vso-task-lib –-save-dev” to install the vso-task-lib and save it as a dev dependency (since it’s not meant to be bundled with the completed task):
The command also installed the q and shelljs libraries (which are dependencies for the vso-task-lib). I also noticed that a node_modules folder had popped up (where the packages are installed) and double checked that my .gitignore was in fact ignoring this folder (since I don’t want these packages committed into my repo).
TypeScript Definitions Using tsd
I was almost ready to start diving into the code – but I wanted to make sure that VS Code gave me intellisense for the task library (and other libs). So I decided to play with tsd, a node TypeScript definition manager utility. I installed it by running “npm install tsd –g” (the –g is for global, since its a system-wide util). Once its installed, you can run “tsd” to see what you can do with the tool.
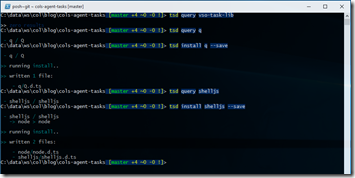
I first ran “tsd query vso-task-lib” to see if there is a TypeScript definition for vso-agent-lib. The font color was a bit hard to see, but I saw “zero results”. Bummer – the definition isn’t on DefinitelyTyped yet. So what about q and shelljs? Both of them returned results, so I installed them (using the –-save option to save the definitions I’m using to a json file):
On disk I could see a couple new files:
- The “typings” folder with the definitions as well as a “global” definition file, tsd.d.ts, including q and shelljs (and node, which is installed when you install the type definition for shelljs)
- A tsd.json file in the root (which aggregates all the definitions)
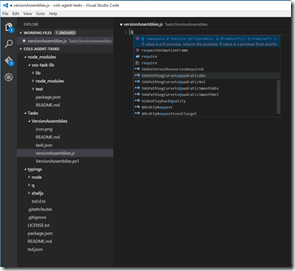
Opening the versionAssemblies.js file, I was able to see intellisense for q, shelljs and node:
So what about the vso-task-lib? Since there was no definition on definitely typed, I had to import it manually. I copied the vso-task-lib.d.ts from the Microsoft repo into a folder called vso-task-lib in the typings folder and then updated the tsd.d.ts file adding another reference to this definition file. I also ended up declaring the vso-task-lib (since it doesn’t actaully declare an export) so that the imports worked correctly. Here’s the tsd.d.ts file:
/// <reference path="q/Q.d.ts" />
/// <reference path="node/node.d.ts" />
/// <reference path="vso-task-lib/vso-task-lib.d.ts" />
/// <reference path="shelljs/shelljs.d.ts" />

declare module "vso-task-lib" {
    export = VsoTaskLib;
}
Coverting versionAssemblies.js to TypeScript
Things were looking good! Now I wanted to convert the versionAssemblies.js file to TypeScript. I simply changed the extension from js to ts, and I was ready to start coding in TypeScript. But of course TypeScript files need to be transpiled to Javascript, so I hit “Ctrl-Shift-B” (muscle memory). To my surprise, VS Code informed me that there was “No task runner configured”.
So I clicked on “Configure Task Runner” and VS Code created a .settings folder with a tasks.json file. There were some boilerplate examples of how to configure the task runner. After playing around a bit, I settled on the second example – which supposedly runs TypeScript using a tfconfig.json in the root folder:
{
    "version": "0.1.0",

    // The command is tsc. Assumes that tsc has been installed using npm install -g typescript
    "command": "tsc",

    // The command is a shell script
    "isShellCommand": true,

    // Show the output window only if unrecognized errors occur.
    "showOutput": "silent",

    // Tell the tsc compiler to use the tsconfig.json from the open folder.
    "args": ["-p", "."],

    // use the standard tsc problem matcher to find compile problems
    // in the output.
    "problemMatcher": "$tsc"
}
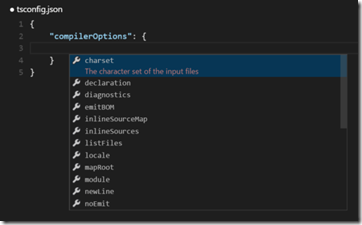
Now I had to create a tsconfig.json file in the root, which I did. VS Code knows what to do with json files, so I just opened a { and was pleasantly surprised with schema intellisense for this file!
I configured the “compilerOptions” and set the module to “commonjs”. Now pressing “Ctrl-Shift-B” invokes the task runner which transpiles my TypeScript file to Javascript – I saw the .js file appear on disk. Excellent! Setting sourceMaps to true will provide source mapping so that I can later debug.
One caveat – the build doesn’t automatically happen when you save a TypeScript file. You can configure gulp and then enable a watch so that when you change a TypeScript file the build kicks in – but I decided that was too complicated for this project. I just configured the keyboard shortcut “Ctrl-s” to invoke “workbench.action.tasks.build” in addition to saving the file (you can configure keyboard shortcuts by clicking File->Preferences->Keyboard Shortcuts. Surprise surprise it’s a json file…)
Implementing the Build Task
Everything I’d done so far was just setup stuff. Now I was ready to actually code the task!
Here’s the complete script:
import * as tl from 'vso-task-lib';
import * as sh from 'shelljs';

tl.debug("Starting Version Assemblies step");

// get the task vars
var sourcePath = tl.getPathInput("sourcePath", true, true);
var filePattern = tl.getInput("filePattern", true);
var buildRegex = tl.getInput("buildRegex", true);
var replaceRegex = tl.getInput("replaceRegex", false);

// get the build number from the env vars
var buildNumber = tl.getVariable("Build.BuildNumber");

tl.debug(`sourcePath :${sourcePath}`);
tl.debug(`filePattern : ${filePattern}`);
tl.debug(`buildRegex : ${buildRegex}`);
tl.debug(`replaceRegex : ${replaceRegex}`);
tl.debug(`buildNumber : ${buildNumber}`);

if (replaceRegex === undefined || replaceRegex.length === 0){
    replaceRegex = buildRegex;
}
tl.debug(`Using ${replaceRegex} as the replacement regex`);

var buildRegexObj = new RegExp(buildRegex);
if (buildRegexObj.test(buildNumber)) {
    var versionNum = buildRegexObj.exec(buildNumber)[0];
    console.info(`Using version ${versionNum} in folder ${sourcePath}`);

    // get a list of all files under this root
    var allFiles = tl.find(sourcePath);

    // Now matching the pattern against all files
    var filesToReplace = tl.match(allFiles, filePattern, { matchBase: true });

    if (filesToReplace === undefined || filesToReplace.length === 0) {
        tl.warning("No files found");
    } else {
        for(var i = 0; i < filesToReplace.length; i++){
            var file = filesToReplace[i];
            console.info(` -> Changing version in ${file}`);

            // replace all occurrences by adding g to the pattern
            sh.sed("-i", new RegExp(replaceRegex, "g"), versionNum, file);
        }
        console.info(`Replaced version in ${filesToReplace.length} files`);
    }
} else {
    tl.warning(`Could not extract a version from [${buildNumber}] using pattern [${buildRegex}]`);
}

tl.debug("Leaving Version Assemblies step");
Notes:
- Lines 1-2: import the library references
- Line 4: using the task library to log to the console
- Lines 6-13: using the task library to get the inputs (matching names from the task.json file) as well as getting the build number from the environment
- Lines 15-19: more debug logging
- Lines 21-23: default the replace regex to the build regex if the value is empty
- Line 26: compile the regex pattern into a regex object
- Line 27: test the build number to see if we can extract a version number using the regex pattern
- Lines 28-29: extract the version number from the build number and write the value to the console
- Line 32: get a list of all files in the sourcePath (recursively) using the task library method
- Line 35: filter the files to match the filePattern input, again using a task library method
- Lines 37-38: check if there are files that match – warn if there aren’t any
- Line 40: for each file that matches,
- Lines 41-45: use shelljs’s sed() method to do the regex replacement inline
- Line 45: I use the “g” option when compiling the regex to indicate that all matches should be replaced (as opposed to just the 1st match)
- Line 47: log to the console how many files were updated
- The remainder is just logging
Using the task library really made developing the task straightforward. The setup involved in getting intellisense to work was worth the effort!
Debugging from VS Code
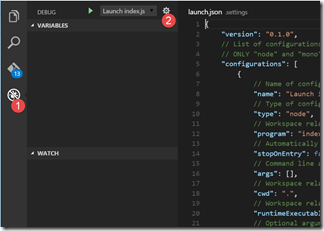
Now that I had the code written, I wanted to test it. VS Code to the rescue again! Click on the “debug” icon on the left, and then click the gear icon at the top of the debug pane:
That creates a new file called launch.json in the .settings folder. What – a json file? Who would have guessed! Here’s my final file:
{
    "version": "0.1.0",
    // List of configurations. Add new configurations or edit existing ones.
    // ONLY "node" and "mono" are supported, change "type" to switch.
    "configurations": [
        {
            // Name of configuration; appears in the launch configuration drop down menu.
            "name": "Launch versionAssemblies.js",
            // Type of configuration. Possible values: "node", "mono".
            "type": "node",
            // Workspace relative or absolute path to the program.
            "program": "Tasks/VersionAssemblies/versionAssemblies.ts",
            // Automatically stop program after launch.
            "stopOnEntry": false,
            // Command line arguments passed to the program.
            "args": [],
            // Workspace relative or absolute path to the working directory of the program being debugged. Default is the current workspace.
            "cwd": ".",
            // Workspace relative or absolute path to the runtime executable to be used. Default is the runtime executable on the PATH.
            "runtimeExecutable": null,
            // Optional arguments passed to the runtime executable.
            "runtimeArgs": ["--nolazy"],
            // Environment variables passed to the program.
            "env": {
                "BUILD_BUILDNUMBER": "1.0.0.5",
                "INPUT_SOURCEPATH": "C:\\data\\ws\\col\\ColinsALMCornerCheckinPolicies",
                "INPUT_FILEPATTERN": "AssemblyInfo.*",
                "INPUT_BUILDREGEX": "\\d+\\.\\d+\\.\\d+\\.\\d+",
                "INPUT_REPLACEREGEX": ""
            },
            // Use JavaScript source maps (if they exist).
            "sourceMaps": true,
            // If JavaScript source maps are enabled, the generated code is expected in this directory.
            "outDir": "."
        },
        {
            "name": "Attach",
            "type": "node",
            // TCP/IP address. Default is "localhost".
            "address": "localhost",
            // Port to attach to.
            "port": 5858,
            "sourceMaps": false
        }
    ]
}
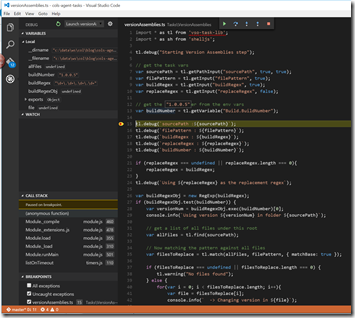
The changes I made have been highlighted. I changed the name and program settings. I also added some environment variables to simulate the values that the build agent is going to pass into the task. Finally, I changed “sourceMaps” to true and the output dir to “.” so that I could debug my TypeScript files. Now I just press F5:
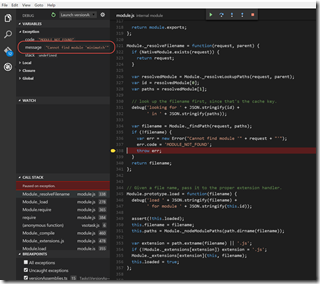
The debugger is working – but my code isn’t! Looks like I’m missing a node module – minimatch. No problem – just run “npm install minimatch -–save-dev” to add the module in and run again. Another module not found – this time shelljs. Run “npm install shelljs –-save-dev” and start again. Success! I can see watches in the left window, hover over variables to see their values, and start stepping through my code.
My code ended up being perfect. Just kidding – I had to sort out some errors, but at least debugging made it a snap.
Uploading the Task
In part 1 I introduced tfx-cli. I now returned to the command line in order to test uploading the task. I changed to the cols-agent-tasks\Tasks directory and ran tfx-cli build tasks upload .\VersionAssemblies
I got a success, and so now I could test it in a build!
Testing a Windows Build
Testing the windows build was fairly simple. I opened up an existing hosted build and replaced the PowerShell task that called my original PowerShell version assemblies task, and added in a brand new shiny “VersionAssemblies” task: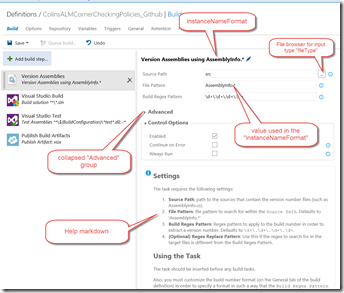
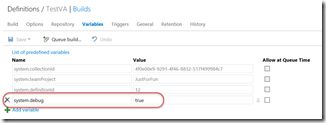
The run worked perfectly too – I was able to see the version change in the build output. Just a tip – setting “system.debug” to “true” in the build variables caused the task to log verbose.
Testing a Linux build using Docker
Now I wanted to test the task in a Linux build. I’ve installed a couple of Ubuntu vms before, so I was prepared to spin one up when I came across an excellent post by my friend and fellow ALM MVP Rene van Osnabrugge. Rene shows how you can quickly spin up a cross-platform build agent in a docker container – and even provides the Dockerfile to be able to do it in 1 line! The timing was perfect – I downloaded Docker Toolbox and installed a docker host (I couldn’t get the Hyper-V provider to work, so I had to resort to VirtualBox), then grabbed Rene’s Dockerfile and in no time at all I had a build agent on Ubuntu ready to test!
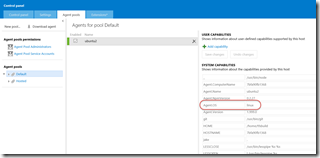
Here’s my x-plat agent in the default pool:
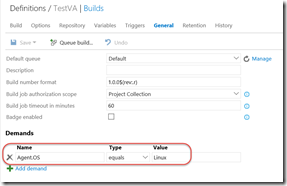
Note the Agent.OS “capability”. In order to target this agent, I’m going to add it as a demand for the build:
Here’s the successful run: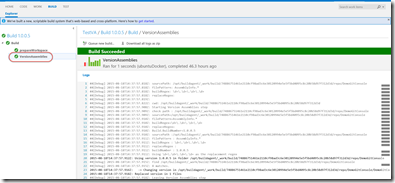
I committed, pushed to Github and now I can rest my weary brain!
Conclusion
Creating a custom task is, if not simple, at least easy. The agent architecture has been well thought out and overall custom task creation is a satisfying process, both for PowerShell and for Node. I look forward to seeing what custom tasks start creeping out of the woodwork. Hopefully task designers will follow Microsoft’s lead and make them open source.
Happy building!
