Developing a Custom Build vNext Task: Part 1
I love the new build engine in VSO / TFS 2015. You can get pretty far with the out of the box tasks, but there are cases where a custom task improves the user experience. The “Microsoft” version of this is SonarQube integration – you can run the SonarQube MSBuild Runner by using a “Command Line” task and calling the exe. However, there are two tasks on the Microsoft Task Github repo that clean up the experience a little – SonarQube PreBuild and SonarQube PostTest. A big benefit of the tasks is that they actually “wrap” the exe within the task, so you don’t need to install the runner on the build machine yourself.
One customization I almost always make in my customers’ build processes is to match binary versions to the build number. In TFS 2012, this required a custom windows workflow task – a real pain to create and maintain. In 2013, you could enable it much more easily by invoking a PowerShell script. The same script can be invoked in Build vNext by using a PowerShell task.
The only down side to this is that the script has to be in source control somewhere. If you’re using TFVC, then this isn’t a problem, since all your builds (within a Team Project Collection) can use the same script. However, for Git repos it’s not so simple – you’re left with dropping the script into a known location on all build servers or committing the script to each Git repo you’re building. Neither option is particularly appealing. However, if we put the script “into” a custom build task for Build vNext, then we don’t have to keep the script anywhere else!
TL;DR
I want to discuss creating a task in some detail, so I’m splitting this into two posts. This post will look at scaffolding a task and then customizing the manifest and PowerShell implementation. In the next post I’m going to show the node implementation (along with some info on developing in TypeScript and VS Code) and how to upload the task.
If you just want the task, you can get the source at this repo.
Create a Custom Task
In order to create a new task, you need to supply a few things: a (JSON) manifest file, an icon and either a PowerShell or Node script (or both). You can, of course, create these by hand – but there’s an easier way to scaffold the task: tfx-cli. tfx-cli is a cross-platform command line utility that you can use to manage build tasks (including creating, deleting, uploading and listing). You’ll need to install both node and npm before you can install tfx-cli.
tfx login
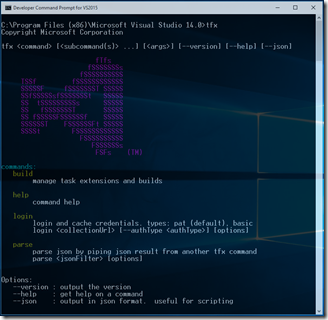
Once tfx-cli is installed, you should be able to run “tfx” and see the help screen.
You could authenticate each time you want to perform a command, but it will soon get tedious. It’s far better to cache your credentials.
For VSO, it’s simple. Log in to VSO and get a Personal Access Token (pat). When you type “tfx login” you’ll be prompted for your VSO url and your pat. Easy as pie.
For TFS 2015, it’s a little more complicated. You need to first enable basic authentication on your TFS app tier’s IIS. Then you can log in using your windows account (note: the tfx-cli team is working on ntfs authentication, so this is just a temporary hack).
Here are the steps to enable basic auth on IIS:
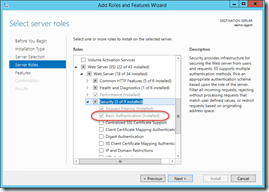
- Open Server Manager and make sure that the Basic Auth feature is installed (under the Security node)

- If you have to install it, then you must reboot the machine before continuing
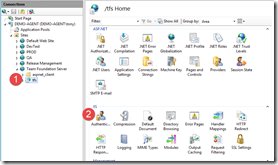
- Open IIS and find the “Team Foundation Server” site and expand the node. Then click on the “tfs” app in the tree and double-click the “Authentication” icon in the “Features” view to open the authentication settings for the app.

- Enable “Basic Authentication” (note the warning!)

- Restart IIS
DANGER WILL ROBINSON, DANGER! This is insecure since the passwords are sent in plaintext. You may want to enable https so that the channel is secure.
tfx build tasks create
Once login is successful, you can run “tfx build tasks create” – you’ll be prompted for some basic information, like the name, description and author of the task. >> tfx build tasks create
Copyright Microsoft Corporation
Enter short name > VersionAssemblies
Enter friendly name > Version Assemblies
Enter description > Match version assemblies to build number
Enter author > Colin Dembovsky
That creates a folder (with the same name as the “short name”) that contains four files:
- task.json – the json manifest file
- VersionAssemblies.ps1 – the PowerShell implementation of the task
- VersionAssemblies.js – the node implementation of the task
- icon.png – the generic icon for the task
Customizing the Task Manifest
The first thing you’ll want to do after getting the skeleton task is edit the manifest file. Here you’ll set things like:
- demands – a list of demands that must be present on the agent in order to run the task
- visibility – should be “Build” or “Release” or both, if the task can be used in both builds and releases
- version – the version number of your task
- minimumAgentVersion – the minimum agent version this task requires
- instanceNameFormat – this is the string that appears in the build tasks list once you add it to a build. It can be formatted to use any of the arguments that the task uses
- inputs – input variables
- groups – used to group input variables together
- execution – used to specify the entry points for either Node or PowerShell (or both)
- helpMarkDown – the markdown that is displayed below the task when added to a build definition
Inputs and Groups
The inputs all have the following properties:
- name – reference name of the input. This is the name of the input that is passed to the implementation scripts, so choose wisely
- type – type of input. Types include “pickList”, “filePath” (which makes the control into a source folder picker) and “string”
- label – the input label that is displayed to the user
- defaultValue – a default value (if any)
- required – true or false depending on whether the input is mandatory or not
- helpMarkDown – the markdown that is displayed when the user clicks the info icon next to the input
- groupName – specify the name of the group (do not specify if you want the input to be outside a group)
The groups have the following format:
- name – the group reference name
- displayName – the name displayed on the UI
- isExpanded – set to true for an open group, false for a closed group
Another note: the markdown needs to be on a single line (since JSON doesn’t allow multi-line values) – so if your help markdown is multi-line, you’ll have to replace line breaks with ‘\n’.
Of course, browsing the tasks on the Microsoft vso-agent-tasks repo lets you see what types are available, how to structure the files and so on.
VersionAssembly Manifest
For the version assembly task I require a couple of inputs:
- The path to the root folder where we start searching for files
- The file pattern to match – any file in the directory matching the pattern should have the build version replaced
- The regex to use to extract a version number from the build number (so if the build number is MyBuild_1.0.0.3, then we need regex to get 1.0.0.3)
- The regex to use for the replacement in the files – I want this under advanced, since most of the time this is the same as the regex specified previously
I also need the build number – but that’s an environment variable that I will get within the task scripts (as we’ll see later).
Here’s the manifest file:
{
  "id": "5b4d14d0-3868-11e4-a31d-3f0a2d8202f4",
  "name": "VersionAssemblies",
  "friendlyName": "Version Assemblies",
  "description": "Updates the version number of the assemblies to match the build number",
  "author": "Colin Dembovsky (colinsalmcorner.com)",
  "helpMarkDown": "## Settings\nThe task requires the following settings:\n\n1. **Source Path** : path to the sources that contain the version number files (such as AssemblyInfo.cs).\n2. **File Pattern** : file pattern to search for within the `Source Path`. Defaults to 'AssemblyInfo.*'\n3. **Build Regex Pattern** : Regex pattern to apply to the build number in order to extract a version number. Defaults to `\\d+\\.\\d+\\.\\d+\\.\\d+`.\n4. **(Optional) Regex Replace Pattern**: Use this if the regex to search for in the target files is different from the Build Regex Pattern.\n\n## Using the Task\nThe task should be inserted before any build tasks.\n\nAlso, you must customize the build number format (on the General tab of the build definition) in order to specify a format in such a way that the `Build Regex Pattern` can extract a build number from it. For example, if the build number is `1.0.0$(rev:.r)`, then you can use the regex `\\d+\\.\\d+\\.\\d\\.\\d+` to extract the version number.\n",
  "category": "Build",
  "visibility": [
    "Build"
  ],
  "demands": [],
  "version": {
    "Major": "0",
    "Minor": "1",
    "Patch": "1"
  },
  "minimumAgentVersion": "1.83.0",
  "instanceNameFormat": "Version Assemblies using $(filePattern)",
  "groups": [
    {
      "name": "advanced",
      "displayName": "Advanced",
      "isExpanded": false
    }
  ],
  "inputs": [
    {
      "name": "sourcePath",
      "type": "filePath",
      "label": "Source Path",
      "defaultValue": "",
      "required": true,
      "helpMarkDown": "Path in which to search for version files (like AssemblyInfo.* files)."
    },
    {
      "name": "filePattern",
      "type": "string",
      "label": "File Pattern",
      "defaultValue": "AssemblyInfo.*",
      "required": true,
      "helpMarkDown": "File filter to replace version info. The version number pattern should exist somewhere in the file."
    },
    {
      "name": "buildRegex",
      "type": "string",
      "label": "Build Regex Pattern",
      "defaultValue": "\\d+\\.\\d+\\.\\d+\\.\\d+",
      "required": true,
      "helpMarkDown": "Regular Expression to extract version from build number. This is also the default replace regex (unless otherwise specified in Advanced settings)."
    },
    {
      "name": "replaceRegex",
      "type": "string",
      "label": "Regex Replace Pattern",
      "defaultValue": "",
      "required": false,
      "helpMarkDown": "Regular Expression to replace with in files. Leave blank to use the Build Regex Pattern.",
      "groupName": "advanced"
    }
  ],
  "execution": {
    "Node": {
      "target": "versionAssemblies.js",
      "argumentFormat": ""
    },
    "PowerShell": {
      "target": "$(currentDirectory)\\VersionAssemblies.ps1",
      "argumentFormat": "",
      "workingDirectory": "$(currentDirectory)"
    }
  }
}
The PowerShell Script
Since I am more proficient in PowerShell that in Node, I decided to tackle the PowerShell script first. Also, I have a script that does this already! You can see the full script in my Github repo – but here’s the important bit – the parameters declaration:
[CmdletBinding(DefaultParameterSetName = 'None')]
param(
    [string][Parameter(Mandatory=$true)][ValidateNotNullOrEmpty()] $sourcePath,
    [string][Parameter(Mandatory=$true)][ValidateNotNullOrEmpty()] $filePattern,
    [string][Parameter(Mandatory=$true)][ValidateNotNullOrEmpty()] $buildRegex,
    [string]$replaceRegex,
    [string]$buildNumber = $env:BUILD_BUILDNUMBER
)
Notes:
- Line 3-5: these are the mandatory inputs. The name of the argument is the same as the name property of the inputs from the manifest file
- Line 6: the optional input (again with the name matching the input name in the manifest)
- Line 7: the build number is passed into the execution context as a predefined variable which is set in the environment, which I read here
While any of the predefined variables can be read anywhere in the script, I like to put the value as the default for a parameter. This makes debugging the script (executing it outside of the build environment) so much easier, since I can invoke the script and pass in the value I want to test with (as opposed to first setting an environment variable before I call the script).
Once I had the inputs (and the build number) I just pasted the existing script. I’ve included lots of “Write-Verbose –Verbose” calls so that if you set “system.debug” to “true” in your build variables, the task spits out some diagnostics. Write-Host calls end up in the console when the build is running.
Wrap up
In this post I covered how to use tfx-cli to scaffold a task, then customize the manifest and implement a PowerShell script.
In the next post I’ll show you how to write the node implementation of the task, using TypeScript and VS Code. I’ll also show you how to upload the task and use it in a build.
Happy customizing!

