Why You Should Switch to Build VNext
Now that VNext builds are in Preview, you should be moving your build definitions over from the “old” XAML definitions to the new VNext definitions. Besides the fact that I suspect at some point that XAML builds will be deprecated, the VNext builds are just much better, in almost every respect.
Why Switch?
There are several great reasons to switch to (or start using) the new VNext builds. Here’s a (non-exhaustive) list of some of my favorites:
- Build is now an orchestrator, not another build engine. This is important – VNext build is significantly different in architecture from the old XAML engine. Build VNext is basically just an orchestrator. That means you can orchestrate whatever build engine (or mechanism) you already have – no need to lose current investments in engines like Ant, CMake, Gradle, Gulp, Grunt, Maven, MSBuild, Visual Studio, Xamarin, XCode or any other existing engine. “Extra” stuff – like integrating with work items, publishing drops and test results and other “plumbing” is handled by Build.VNext.
- Edit build definitions in the Web. You no longer have to download, edit or – goodness – learn a new DSL. You can stitch together fairly complex builds right in Web Access.
- Improved Build Reports. The build reports are much improved – especially Test Results, which are now visible on the Web (with nary a Visual Studio in sight).
- Improved logging. Logging in VNext builds is significantly better – the logs are presented in a console window, and not hidden somewhere obscure.
- Improved Triggers. The triggers have been improved – you can have multiple triggers for the same build, including CI triggers (where a checkin/commit triggers the build) and scheduled triggers.
- Improved Retention Policies. Besides being able to specify multiple rules, you can now also use “days” to keep builds, rather than “number” of builds. This is great when a build is being troublesome and produces a number of builds – if you were using “number of builds” you’d start getting drop-offs that you don’t really want.
- Composability. Composing builds from the Tasks is as easy as drag and drop. Setting properties is a snap, and properties such as “Always Run” make the workflow easy to master.
- Simple Customization. Have scripts that you want to invoke? No problem – drag on a “PowerShell” or “Bat” Task. Got a one-liner that needs to execute? No problem – use the “Command Line” task and you’re done. No mess, no fuss.
- Deep Customization. If the Tasks aren’t for you, or there isn’t a Task to do what you need, then you can easily create your own.
- Open Source Toolbox. Don’t like the way an out-of-the-box Task works? Simply download its source code from the vso-agent-tasks Github repo, and fix it! Of course you can share your awesome Tasks once you’ve created them so that the community benefits from your genius (or madness, depending on who you ask!)
- Cross Platform. The cross-platform agent will run on Mac or Linux. There’s obviously a windows agent too. That means you can build on whatever platform you need to.
- Git Policies. Want to make sure that a build passes before accepting merges into a branch? No problem – set up a VNext build, and then add a Policy to your branch that forces the build to run (and pass) before merges are accepted into the branch (via Pull Requests). Very cool.
- Auditing. Build definitions are now stored as JSON objects. Every change to the build (including changing properties) is kept in a history. Not only can you see who changed what when, but you can do side-by-side comparisons of the changes. You can even enter comments as you change the build to help browse history.
- Templating. Have a brilliant build definition that you want to use as a template for other builds? No problem – just save your build definition as a template. When you create a new build next time, you can start from the template.
- Deployment. You can now easily deploy your assets. This is fantastic for Continuous Delivery – not only can you launch a build when someone checks in (or commits) but you can now also include deployment (to your test rigs, obviously!). Most of the deployment love is for Azure – but since you can create your own Tasks, you can create any deployment-type Task you want.
- Auto-updating agents. Agents will auto-update themselves – no need to update every agent in your infrastructure.
- Build Pools and Queues. No more limitations on “1 TPC per Build Controller and 1 Controller per build machine”. Agents are xcopyable, and live in a folder. That means you can have as many agents (available to as many pools, queues and TPCs as you want) on any machine. The security and administration of the pools, queues and agents is also better in build vNext.
- Capabilities and Demands. Agents will report their “capabilities” to TFS (or VSO). When you create builds, the sum of the capabilities required for each Task is the list of “demands” that the build requires. When a build is queued, TFS/VSO will find an agent that has capabilities that match the demands. A ton of capabilities are auto-discovered, but you can also add your own. For example, I added “gulp = 0.1.3” to my build agent so that any build with a “Gulp” task would know it could run on my agent. This is a far better mechanism of matching agents to builds than the old “Agent Tags”.
Hopefully you can see that there are several benefits to switching. Just do it! It’s worth noting that there are also Hosted VNext agents, so you can run your VNext builds on the “Hosted” queue too. Be aware though that the image for the agent is “stock”, so it may not work for every build. For example, we’re using TypeScript 1.5 beta, and the hosted agent build only has TypeScript extensions 1.4, so our builds don’t work on the Hosted agents.
Environment Variables Name Change
When you use a PowerShell script Task, the script is invoked in a context that includes a number of predefined environment variables. Need access to the build number? No problem – just look up $env.BUILD_BUILDNUMBER. It’s way easier to use the environment variables that to remember how to pass parameters to the scripts. Note – the prefix “TF_” has been dropped – so if you have PowerShell scripts that you were invoking as pre- or post-build or test scripts in older XAML builds, you’ll have to update the names.
Just a quick tip: if you directly access $env.BUILD_BUILDNUMBER in your script, then you have to set the variable yourself before testing the script in a PowerShell console. I prefer to use the value as a default for a parameter – that way you can easily invoke the script outside of Team Build to test it. Here’s an example:
Param(
  [string]$pathToSearch = $env:BUILD_SOURCESDIRECTORY,
  [string]$buildNumber = $env:BUILD_BUILDNUMBER,
  [string]$searchFilter = "VersionInfo.",
  [regex]$pattern = "\d+\.\d+\.\d+\.\d+"
)

if ($buildNumber -match $pattern -ne $true) {
    . . .
}
See how I default the $pathToSearch and $buildNumber parameters using the $env variable? Invoking the script myself when testing is then easy – just supply values for the variables explicitly.
Node Packages – Path too Long
I have become a fan of node package manager – npm. Doing some web development recently, I have used it a log. The one thing I have against it (admittedly this is peculiar only to npm on Windows), is that the node_modules path can get very deep – way longer than good ol’ 260 character limit.
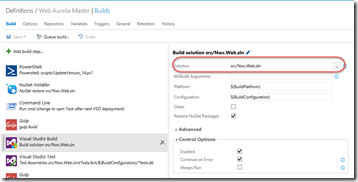
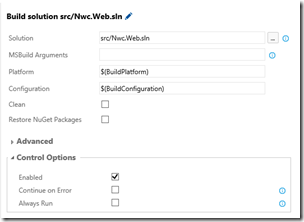
This means that any Task that does a wild-char search on folders is going to error when there’s a node_modules folder in the workspace. So you have to explicitly specify the paths to files like sln or test (for the VSBuild and VSTest Tasks) respectively – you can’t use the “**/*.sln” path wildcard (**) because it will try to search in the node_modules folder, and will error out when the path gets too long. No big deal – I just specify the path using the repo browser dialog. I was also forced to check “Continue on Error” on the VSBuild Task – the build actually succeeds (after writing a “Path too long” error in the log), but because the Task outputs the “Path too long” error to stderr, the Task fails.
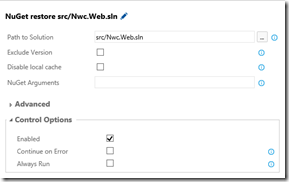
EDIT: If you are using npm and run into this problem, you can uncheck “Restore NuGet Packages” (the VSBuild Task internally does a wild-card search for package.config, and this is what is throwing the path too long error as it searches the node_modules folder). You’ll then need to add a “Nuget installer” Task before the VSBuild task and explicitly specify the path to your sln file.
Migrating from XAML Builds
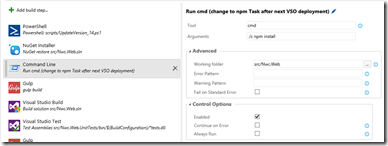
Migrating may be too generous – you have to re-create your builds. Fortunately, trying to move our build from XAML to VNext didn’t take all that long, even with the relatively large customizations we had – but I was faced with Task failures due to the path limit, and so I had to change the defaults and explicitly specify paths wherever there was a “**/” folder. Also, the npm Task itself has a bug that will soon be fixed – for now I’m getting around that by invoking “npm install” as part of a “Command Line” Task (don’t forget to set the working directory):
No PreGet Tasks
At first I had npm install before my “UpdateVersion” script – however, the UpdateVersion script searches for files with a matching pattern using Get-ChildItem. Unfortunately, this errors out with “path too long” when it goes into the node_modules directory. No problem, I thought to myself – I’ll just run UpdateVersion before npm install. That worked – but the build still failed on the VSBuild Task. So I set “Continue on Error” on the VSBuild Task – and I got a passing build!
I then queued a new build – and the build failed. The build agent couldn’t even get the sources because – well, “Path too long”. Our XAML build actually had a “pre-Pull” script hook so that we could delete the node_modules folder (using RoboCopy which can handle too long paths). However, VNext builds cannot execute Tasks before getting sources. Fortunately Chris Patterson, the build PM, suggested that I run the delete at the end of the build.
Initially I thought this was a good idea – but then I thought, “What if the build genuinely fails – like failed tests? Then the ‘delete’ task won’t be run, and I won’t be able to build again until I manually delete the agent’s working folder”. However, when I looked at the Tasks, I saw that there is a “Run Always” checkbox on the Task! So I dropped a PowerShell Task at the end of my build that invokes the “CleanNodeDirs.ps1” script, and check “Always Run” so that even if something else in the build fails, the CleanNodeDirs script always runs. Sweet!
CleanNodeDirs.ps1
To clean the node_modules directory, I initially tried “rm –rf node_modules”. But it fails – guess why? “Path too long”. After searching around a bit, I came across a way to use RoboCopy to delete folders. Here’s the script:
Param(
  [string]$srcDir = $env:BUILD_SOURCESDIRECTORY
)

try {
    if (Test-Path(".\empty")) {
        del .\empty -Recurse -Force
    }
    mkdir empty

    robocopy .\empty "$srcDir\src\Nwc.Web\node_modules" /MIR > robo.log
    del .\empty -Recurse -Force
    del robo.log -Force

    Write-Host "Successfully deleted node_modules folder"
    exit 0
} catch {
    Write-Error $_
    exit 1
}
Build.VNext Missing Tasks
There are a couple of critical Tasks that are still missing:
- No “Associate Work Items” Task
- No “Create Work Item on Build Failure” Task
- No “Label sources” Tasks
These will no doubt be coming soon. It’s worth working on converting your builds over anyway – when the Tasks ship, you can just drop them into your minty-fresh builds!
Conclusion
You really need to be switching over to BuildVNext – even though it’s still in preview, it’s still pretty powerful. The authoring experience is vastly improved, and the Task library is going to grow rapidly – especially since it’s open source. I’m looking forward to what the community is going to come up with.
Happy building!


