Continuous Deployment with Docker and Build vNext
I really like the idea of Docker. If you’re unfamiliar with Docker, then I highly recommend Nigel Poulton’s Docker Deep Dive course on Pluralsight. Containers have been around for quite a while in the Linux world, but Microsoft is jumping on the bandwagon with Windows Server Containers too. This means that getting to grips with containers is a good idea – I think it’s the way of the future.
tl;dr
If you’re just after the task, then go to my Github repo. You can get some brief details in the section below titled “Challenge 2: Publishing to Docker (a.k.a The Publish Build Task)”. If you want the full story read on!
Deploying Apps to Containers
After hacking around a bit with containers, I decided to see if I could deploy some apps into a container manually. Turns out it’s not too hard. You need to have (at least) the Docker client, some code and a Dockerfile. Then you can just call a “docker build” (which creates an image) and then “docker run” to deploy an instance of the image.
Once I had that working, I wanted to see if I could bundle everything up into a build in Build vNext. That was a little harder to do.
Environment and Tools
You can run a Docker host in Azure but I wanted to be able to work locally too. So here is how I set up my local environment (on my Surface Pro 3):
- I enabled Hyper-V (you can also use VirtualBox) so that I can run VMs
- I installed Docker Toolbox (note: Docker Toolbox bundles VirtualBox – so you can use that if you don’t have or want Hyper-V, but otherwise, don’t install it)
- I then created a Docker host using “docker-machine create”. I used the hyper-v driver. This creates a Tiny Core Linux Docker host running the boot2docker image.
- I set my environment variables to default to my docker host settings
- I could now execute “docker” commands – a good command to sanity check your environment is “docker info”
Aside: PowerShell to Set Docker Environment
I love using PowerShell. If you run “docker env” you get some settings that you could just “cat” to your profile (if you’re in Unix). However, the commands won’t work in PowerShell. So I created a small function that I put into my $PROFILE that I can run whenever I need to do any Docker stuff. Here it is:
function Set-DockerEnv {
    Write-Host "Getting docker environment settings" -ForegroundColor Yellow
    docker-machine env docker | ? { $_.Contains('export') } | % { $_.Replace('export ', '') } | `
        ConvertFrom-Csv -Delimiter "=" -Header "Key","Value" | % {
            [Environment]::SetEnvironmentVariable($_.Key, $_.Value)
            Write-Host "$($_.Key) = $($_.Value)" -ForegroundColor Gray
        }
    Write-Host "Done!" -ForegroundColor Green
}
Now I can just run “Set-DockerEnv” whenever I need to set the environment.
VS Tools for Docker
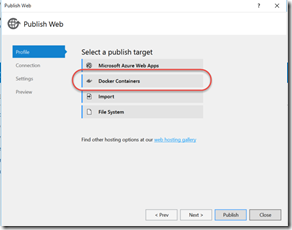
So I have a Docker environment locally – great. Now I need to be able to deploy something into a container! Since I (mostly) use Visual Studio 2015, I installed the VS Tools for Docker extension. Make sure you follow the install instructions carefully – the preview toolset is a bit picky. I wanted to play with Windows containers, but for starters I was working with Unix containers, so I needed some code that could run on Unix. Fortunately, ASP.NET 5 can! So I did a File –> New Project and created an ASP.NET 5 Web application (this is a boilerplate MVC 6 application). Once I had the project created, I right-clicked the project and selected “Publish” to see the publish page. You’ll see the “Docker Containers” target:
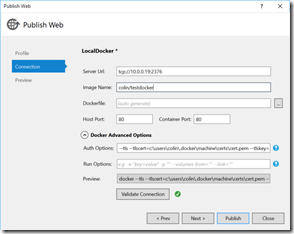
You can select an Azure Docker VM if you have one – in my case I wanted to deploy locally, so I checked “Custom Docker Host” and clicked OK. I entered in the server url for my local docker host (tcp://10.0.0.19:2376) and left all the rest as default. Clicking “Validate Connection” however, failed. After some trial and error, I realized that the default directory for certificates for the “docker-machine” command I used is different to the default directory the VS Tools for Docker expects. So I just supplied additional settings for “Auth Options” and voila – I could now validate the connection:
Here are the settings for “Auth Options” in full:
--tls --tlscert=c:\users\colin\.docker\machine\certs\cert.pem --tlskey=c:\users\colin\.docker\machine\certs\key.pem
I specifically left the Dockerfile setting to (auto generate) to see what I would get. Here’s what VS generated:
FROM microsoft/aspnet:1.0.0-beta6

ADD . /app

WORKDIR /app

ENTRYPOINT ["./kestrel"]
Notes:
- The FROM tells Docker which image to base this container on – it’s defaulting to the official image for ASP.NET 5 from Docker hub (the public Docker image repository)
- ADD is copying all the files in the current directory (.) to a folder on the container called “/app”
- WORKDIR is changing directory into “/app”
- ENTRYPOINT tells Docker to run this command every time a container based on this image is fired up
Aside: Retargeting OS
Once you’ve generated the Dockerfile, you need to be careful if you want to deploy to a different OS (specifically Windows vs non-Windows). Rename the Dockerfile (in the root project directory) to “Docker.linux” or something and then clear the Dockerfile setting. VS will then auto generate a Dockerfile for deploying to Windows containers. Here’s the Windows flavored Dockerfile, just for contrast:
FROM windowsservercore

ADD . /app

WORKDIR /app

ENTRYPOINT ["cmd.exe", "/k", "web.cmd"]
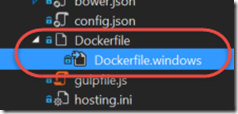
VS is even smart enough to nest your Dockerfiles in your solution!
So I could now publishing successfully from VS. Next up: deploying from Team Build!
Docker Publish from Team Build vNext
(Just to make things a little simple, I going to use “build” interchangeably with “build vNext” or even “team build”. I’ve switched over completely from the old XAML builds – so should you).
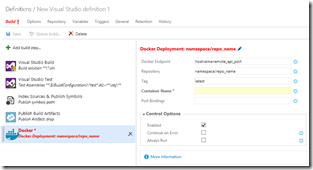
If you’ve looked at the build tasks on VSO, you’ll notice that there is a “Docker” task:
It’s a little unsatisfying, to be blunt. You can (supposedly) deploy a docker image – but there’s no way to get your code into the image (“docker build” the image) in the first place. Secondly, there doesn’t appear to be any security or advanced settings anywhere. Clicking “More Information” takes you to a placeholder markdown file – so no help there. Admittedly the team are still working on the “official” Docker tasks – but I didn’t want to wait!
Prep: PowerShell Docker Publishing from the console
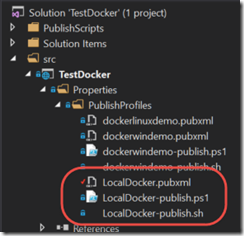
Taking a step back and delving into the files and scripts that VS Tools for Docker generated for me, I decided to take a stab at deploying using the PowerShell script in the PublishProfiles folder of my solution. I created a publish profile called “LocalDocker”, and sure enough VS had generated 3 files: the pubxml file (settings), a PowerShell publish file and a shell script publish file.
To invoke the script, you need 3 things:
- The path to the files that are going to be published
- The path to the pubxml file (contains the settings for the publish profile)
- (Optional) A hashtable of overrides for your settings
I played around with the PowerShell script in my console – the first major flaw in the script is that it assumes you have already “packed” the project. So you first have to invoke msbuild with some obscure parameters. Only then can you invoke the Publish script. Also, the publish script does some hocus pocus with assuming that the script name and the pubxml file name are the same and working out the Dockerfile location is also a bit voodoo. It works nicely when you’re publishing from VS – but I found it not to be very “build friendly”.
I tried it in build vNext anyway. I managed to invoke the “LocalDocker-publish.ps1” file, but could not figure out how to pass a hashtable to a PowerShell task (to override settings)! Besides, even if it worked, there’d be a lot of typing and you have to know what the keys are for each setting. Enter the custom build task!
The way I saw it, I had to:
- Compile the solution in such a way that it can be deployed into a Docker container
- Create a custom task that could invoke the PowerShell publish script, either from a pubxml file or some settings (or a combination)
Challenge 1: Building ASP.NET 5 Apps in Build vNext
Building ASP.NET 5 applications in build vNext isn’t as simple as you would think. I managed to find part of my answer in this post. You have to ensure that the dnvm is installed and that you have the correct runtimes. Then you have to invoke “dnu restore” on all the projects (to install all the dependencies). That doesn’t get you all the way though – you need to also “dnu pack” the project.
Fortunately, you can invoke a simple script to get the dnvm and install the correct runtime. Then you can fight with supply some parameters to msbuild that tell it to pack the project for you. This took me dozens of iterations to get right – and even when I got it right, the “kestrel” command in my containers was broken. For a long time I thought that my docker publish task was broken – turns out I could fix it with a pesky msbuild argument. Be that as it may, my pain is your gain – hence this post!
You need to add this script to your source repo and invoke it in your build using a PowerShell task (note this is modified from the original in this post):
param (
    [string]$srcDir = $env.BUILD_SOURCESDIRECTORY
)

# bootstrap DNVM into this session.
&{$Branch='dev';iex ((new-object net.webclient).DownloadString('https://raw.githubusercontent.com/aspnet/Home/dev/dnvminstall.ps1'))}

# load up the global.json so we can find the DNX version
$globalJsonFile = (Get-ChildItem -Path $srcDir -Filter "global.json" -Recurse | Select -First 1).FullName
$globalJson = Get-Content -Path $globalJsonFile -Raw -ErrorAction Ignore | ConvertFrom-Json -ErrorAction Ignore

if($globalJson)
{
    $dnxVersion = $globalJson.sdk.version
}
else
{
    Write-Warning "Unable to locate global.json to determine using 'latest'"
    $dnxVersion = "latest"
}

# install DNX
# only installs the default (x86, clr) runtime of the framework.
# If you need additional architectures or runtimes you should add additional calls
& $env:USERPROFILE\.dnx\bin\dnvm install $dnxVersion -r coreclr
& $env:USERPROFILE\.dnx\bin\dnvm install $dnxVersion -Persistent

 # run DNU restore on all project.json files in the src folder including 2>1 to redirect stderr to stdout for badly behaved tools
Get-ChildItem -Path $srcDir -Filter project.json -Recurse | ForEach-Object {
    Write-Host "Running dnu restore on $($_.FullName)"
    & dnu restore $_.FullName 2>1
}
Notes:
- Lines 9,10: I had to change the way that the script searched for the “global.json” (where the runtime is specified). So I’m using BUILD_SOURCESDIRECTORY which the build engine passes in.
- Line 25: I added the coreclr (since I wanted to deploy to Linux)
- Lines 29-32: Again I changed the search path for the “dnu” commands
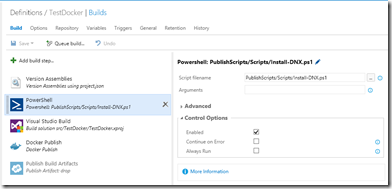
Just add a PowerShell task into your build (before the VS Build task) and browse your repo to the location of the script:
Now you’re ready to call msbuild. In the VS Build task, set the solution to the xproj file (the project file for the ASP.NET project you want to publish). Then add the following msbuild arguments:
/t:Build,FileSystemPublish /p:IgnoreDNXRuntime=true /p:PublishConfiguration=$(BuildConfiguration) /p:PublishOutputPathNoTrailingSlash=$(Build.StagingDirectory)
You’re telling msbuild:
- Run the build and FileSystemPublish targets
- Ignore the DXN runtime (this fixed my broken kestrel command)
- Use the $(BuildConfiguration) setting as the configuration (Debug, Release etc.)
- Publish (dnu pack) the site to the staging directory
That now gets you ready to publish to Docker – hooray!
Challenge 2: Publishing to Docker (a.k.a The Publish Build Task)
A note on the build agent machine: the agent must have access to the docker client, as well as your certificate files. You can supply the paths to the certificate files in the Auth options for the task, but you’ll need to make sure the docker client is installed on the build machine.
Now that we have some deployable code, we can finally turn our attention to publishing to Docker. I wanted to be able to specify a pubxml file, but then override any of the settings. I also wanted to be able to publish without a pubxml file. So I created a custom build task. The task has 3 internal components:
- The task.json – this specifies all the parameters (including the pubxml path, the path to the “packed” solution, and all the overrides)
- A modified version of the publish PowerShell script that VS Tools for Docker generated when I created a Docker publish profile
- A PowerShell script that takes the supplied parameters, creates a hashtable, and invokes the publish PowerShell script
The source code for the task is on Github. I’m not going to go through all the details here. To get the task, you’ll need to do the following:
- Clone the repo (git clone https://github.com/colindembovsky/cols-agent-tasks.git)
- Install node and npm
- Install tfx-cli (npm install –g tfx-cli)
- Login (tfx login)
- Upload (tfx build tasks upload pathToDockerPublish)
The pathToDockerPublish is the path to Tasks/DockerPublish in the repo.
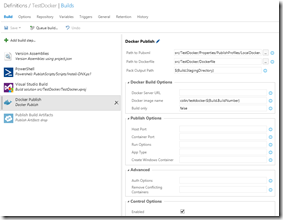
Once you’ve done that, you can then add a Docker Publish task. Set the path to your pubxml (if you have one), the path to the Dockerfile you want to use and set the Pack Output Path to $(Build.StagingDirectory) (or wherever the code you want to deploy to the container is). If you don’t have a pubxml file, leave “Path to Pubxml” empty – you’ll have to supply all the other details. If you have a pubxml, but want to overwrite some settings, just enter the settings in accordingly. The script will take the pubxml setting unless you supply a value in an override.
In this example, I’m overriding the docker image name (using the build number as the tag) and specifying “Build only” as false. That means the image will be built (using “docker build”) and a container will be spun up. Set this value to “true” if you just want to build the image without deploying a container. Here are all the settings:
- Docker Server Url – url of your docker host
- Docker image name – name of the image to build
- Build Only – true to just run “docker build” – false if you want to execute “docker run” after building
- Host port – the port to open on the host
- Container port – the port to open on the container
- Run options – additional arguments passed to the “docker run” command
- App Type – can be empty or “Web”. Only required for ASP.NET applications (sets the server.urls setting)
- Create Windows Container – set to “true” if you’re targeting a Windows docker host
- Auth Options – additional arguments to supply to docker commands (for example –tlscert)
- Remove Conflicting Containers – removes containers currently running on the same port when set to “true”
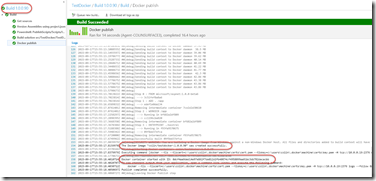
Success
Once the build completes, you’ll be able to see the image in “docker images”.
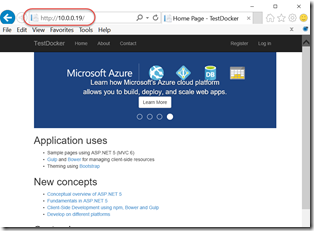
If you’ve set “build only” to false you’ll be able to access your application!
Happy publishing!
