WebDeploy and Release Management – The Proper Way
I’ve just completed recording a Release Management webcast (more on Imaginet’s Visual Studio webcasts here). While doing the webcast, I wanted to show how you can use tokens which Release Management can substitute during the Release Workflow. Brian Keller suggests a .token file (basically an exact copy of your web.config file except that you use tokens instead of values) in his Release Management hands on lab, but I hate having to keep 2 copies of the same file around.
Of course, being a huge fan of Web Deploy, I could use config transforms. The problem with mixing config transforms and Release Management is that you’d have to have a configuration per environment in your solution, and you’d end up having to create n number of web deploy packages where n is the number of Release Management stages you have. So if you had Dev, QA and Prod stages, you’d have to add at least one configuration to your solution so that you’d have Debug (for Dev), QA (for the QA environment) and Release (for Prod). Technically you wouldn’t be deploying the same package to each environment, even though they could be built at the same time from the same source files.
I bingled a bit and found two posts that looked useful. The first was about tokenization, and had the downside is that you’re still doing an xcopy deployment rather than a web deploy package deployment, and you have to do some rather nasty gymnastics with the build parameters in order get it to work. The second was a lot cleaner, except for the fact that you have to know the folder on the server where the website ends up after the web deploy command, since the token replacement is done after the invocation of the web deploy Tool.
I was convinced there was a cleaner solution, and I managed to come up with one. Basically, we use Web Deploy Parameters to tokenize the web.config file, and then do the token replacement before invoking Web Deploy.
Parameters.xml
Web Deploy lets you define parameters in a file called Parameters.xml. If there isn’t one in your project (alongside the web.config) then it creates a default one during publishing, so normally you don’t see it at all.
Let’s imagine that you have the following web.config snippet:
<connectionstrings>
  <add name="FabrikamFiber-Express" connectionstring="somestring" providername="System.Data.SqlClient">
</add></connectionstrings>
<appsettings>
  <add key="webpages:Version" value="2.0.0.0">
  <add key="PreserveLoginUrl" value="true">
  <add key="ClientValidationEnabled" value="true">
  <add key="UnobtrusiveJavaScriptEnabled" value="true">
  <add key="DemoEnv" value="Development">
</add></add></add></add></add></appsettings>
There’s a connection string and an appSetting key that we want to tokenize. Right click the project and add a new xml file called “Parameters.xml”. Right click the file, select Properties and set the “Build Action” to None to make sure this file doesn’t end up deployed to your website. Now we add the following xml:
<!--?xml version="1.0" encoding="utf-8" ?-->
<parameters>
  <parameter name="DemoEnv" description="Please enter the name of the Environment" defaultvalue=" __EnvironmentName__" tags="">
    <parameterentry kind="XmlFile" scope="\\web.config$" match="/configuration/appSettings/add[@key='DemoEnv']/@value">
  </parameterentry></parameter>
</parameters>
We create a parameter with a name, description and default value. The format of the default value is important – it needs to be pre- and post-fixed with double underscore “__” since this is the token format for Release Management. We then specify a “kind” of XmlFile, set web.config as the scope and specify an XPath to find the parameter in the web.config file.
(You’ll notice that we don’t need to specify any parameter for the connection string, since that will be tokenized in the publish profile)
Publish Profile
Right-click your web project and select “Publish” to create (or edit) a publish profile. Expand the dropdown and select to create a new profile. I named mine “Release”. Click Next.
On the Connection page, select “Web Deploy Package” as the publish method and enter a name for the package location. Typically this is (name of your project).zip. For Site name, enter “__SiteName__” to create a Release Management token for your site name. Click Next.
On the Settings page, select your configuration (I selected Release, which applies and config transforms in the Web.Release.config file in my solution, such as removing the Debug attribute from the element). For each connection string you have, instead of entering in a real connection, again enter a Release Management token – I entered “__FabrikamFiber-Express-Connection__”.
Click Close and save the profile. The profile appears under the Properties\PublishProfiles folder of your web project.
Now check your solution into source control.
If you do actually publish, you’ll see a SetParameters.xml file alongside the web deploy zip file. The contents of the file should be something like this:
<!--?xml version="1.0" encoding="utf-8"?-->
<parameters>
  <setparameter name="IIS Web Application Name" value=" __SiteName__">
  <setparameter name="DemoEnv" value=" __EnvironmentName__">
  <setparameter name="FabrikamFiber-Express-Web.config Connection String" value=" __FabrikamFiber-Express-Connection__">
  <setparameter name="FabrikamFiber.DAL.Data.FabrikamFiberWebContext-Web.config Connection String" value="FabrikamFiber.DAL.Data.FabrikamFiberWebContext_ConnectionString">
</setparameter></setparameter></setparameter></setparameter></parameters>
You can see that there are 3 Release Management tokens – SiteName, EnvironmentName and FabrikamFiber-Express-Connection. These are the tokens we’ll replace when creating a release component for this website.
Building the Package
You can now create a build – make sure you use the ReleaseDefaultTemplate11.1.xaml (from the Release Management bin folder). Specify any arguments you want to as usual, but make sure you have this in the MSBuild arguments: /p:DeployOnBuild=true;PublishProfile=Release
That will instruct web deploy to create the package when we build using the settings of the Release profile. I recommend that you set “Release to Build” to false just to make sure your build is producing the correct artifacts.
After running the build, you should see the following in the _PublishedWebSites folder of your drop:
If you open the SetParameters.xml file (the one highlighted above) then you should see your Release Management tokens.
Create a Web Deploy Tool in Release Management
Download the InRelease MS Deploy wrapper from here. This is a simple exe that wraps the call to Web deploy so that any errors are reported in a way that Release Management understands. Let’s then go to Release Management->Inventory->Tools and click on New to create a new Tool:
Enter the following parameters:
You can see that I made a new parameter called “WebAppName” to make this a generic tool.
At the bottom under Resources, click the “Add” button and import the irmsdeploy.exe that you downloaded.
Update: 2013-12-02 When running through this “demo” again on my VM checkpoint, the WebDeploy custom tool kept failing with an “Unable to find file” exception. After trying this several times and tearing my hair out in chunks, I thought I would make sure this wasn’t a security issue – turns out, it was exactly that. Once you’ve downloaded the irmsdeploy.exe file, make sure you right-click it, select properties and “Unblock” it (see the below screenshot).
Create a Component
Once you’ve set up your Release Path, you’ll be able to define the release workflow for each stage. You’re going to need to create a component for your website in order to deploy it. Navigate to “Configure Apps->Components” and click New. Enter a name (and optional description) and then enter the following on the Source tab:
The “Path to Package” is the path that contains the web deploy package.
Now click on the “Deployment” tab:.
Select WebDeploy from the Tool dropdown – that will automatically create the WebAppName parameter for this component.
Finally, move to the “Configuration Variables” tab:
Change the “Variable Replacement Mode” to “Before Installation” and set the “File Extension Filter” to “*.SetParameters.xml”. Now add all of your parameters (these are the tokens that are in your SetParameters.xml file after the build). You can type descriptions too.
Specifying Values in a Release Template
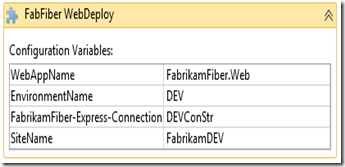
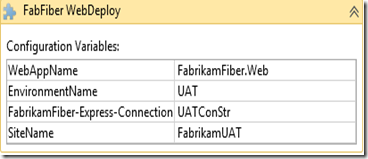
We’re finally ready to use the component inside a Release Template. Create a new template for a release path, and inside a Server activity drop your component. When you expand it, you’ll see that you can specify values for the parameters. Here are screenshots of my Dev and QA components:
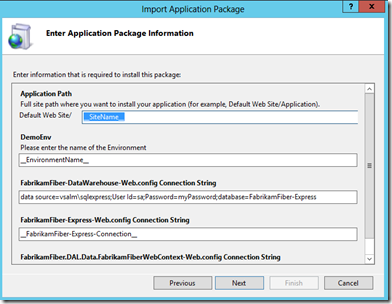
The best part is, not only can you use these parameters in Release Management, but if you import this web deploy package directly in IIS, you get prompted to supply values for the parameters too:
Happy Releasing!


