Using OIDC with Terraform in GitHub Actions

I’ve posted before about how to authenticate to Azure in GitHub Actions using OIDC. It should follow that Terraform templates would be easy to use - but there are some gotchas.
Image by olieman.eth on Unsplash
In a previous post I covered how to use OIDC to connect to Azure in Actions securely without secrets. I recently wanted to use some Terraform templates to deploy some infrastructure and I found that it wasn’t as easy as I thought. I figured that if I had already logged in via OIDC, then I could just start running terraform commands using the run step. However, the challenge comes into how Terraform itself authenticates when you have a backend stored in an Azure storage account. In this post I’ll walk through how you can use OIDC with GitHub Actions and Terraform.
tl;dr
If you don’t want to stick around for the full post, you can see the code in this repo. The key is to make sure that you set ARM_USE_OIDC to true when running any terraform commands.
The Plan
To make this work, we’re going to need perform the following actions:
- Bootstrap the Terraform backend storage account and container
- Configure authentication in Azure for the OIDC connection
- Set the repo “secrets” for the workflow
- Configure Environments in the repo
- Configure Azure Login and Terraform commands in the workflow
Bootstrapping the Terraform Backend
When you run terraform init you’re initializing the providers as well as connecting to any saved state for the infrastructure. Typically if you’re deploying to Azure, your backend state is stored in an Azure storage account.
I created this simple script to bootstrap the backend:
# file: 'bootstrap-backend.sh'
#!/bin/bash

# names must match the names in providers.tf
RG_NAME="cd-teroidc-shared"
SA_NAME="teroidc"
CONTAINER_NAME="tfstate"

# create a resource group
az group create -n $RG_NAME -l southcentralus

# create a storage account for storing terraform state
az storage account create -n $SA_NAME -g $RG_NAME -l southcentralus --sku Standard_LRS

KEY=$(az storage account keys list -g $RG_NAME -n $SA_NAME --query "[0].value" -o tsv)

az storage container create -n $CONTAINER_NAME --account-name $SA_NAME --account-key $KEY
A simple boostrap shell script to create the storage account and container.
Note: The names for the resource group, storage account and container must match your provider configuration.
Of course you need to log in to the correct Azure susbscription before you run this. I use a CodeSpace for development, and so I run az login --use-device-code to initiate the device login flow.
We can then edit the provider.tf file to point to the container:
# file: 'infra/providers.tf'
terraform {

  required_version = ">=1.2"

  required_providers {
    azurerm = {
      source  = "hashicorp/azurerm"
      version = "~>3.7.0"
    }
  }
  backend "azurerm" {
    resource_group_name  = "cd-teroidc-shared"
    storage_account_name = "teroidc"
    container_name       = "tfstate"
    key                  = "dev.teroidc.tfstate"
  }
}

provider "azurerm" {
  features {}
}
Configuring the AzureRM backend provider.
You should now be able to run terraform init in your local environment.
Adding Environments to the Service Principle
Now that we have configured the backend, we’re going to need to configure any workflow that is going to use this terraform configuration to authenticate to the container. When you’re developing, you run az login and then terraform uses that authentication context when you run terraform init. In a workflow, it’s a bit trickier.
We could just use the azuer/login task with a full service principle credential - but then we’d have to manage the secret somewhere. Instead, we’ll use OIDC.
To set up OIDC, we have to navigate to https://portal.azure.com and browse to the service priniciple we want to use (and that has permissions to manage any of the terraform resources in our terraform scripts). Once you’ve navigated to “Active Directory” and found the service principle (App Registration), you can click on “Certificates and Secrets”. Then click on the “Federated credentials” tab and click “+ Add credential”. Select “GitHub Actions deploying Azure resources” as the scenario and then fill in the owner, repo, environment, name and description:
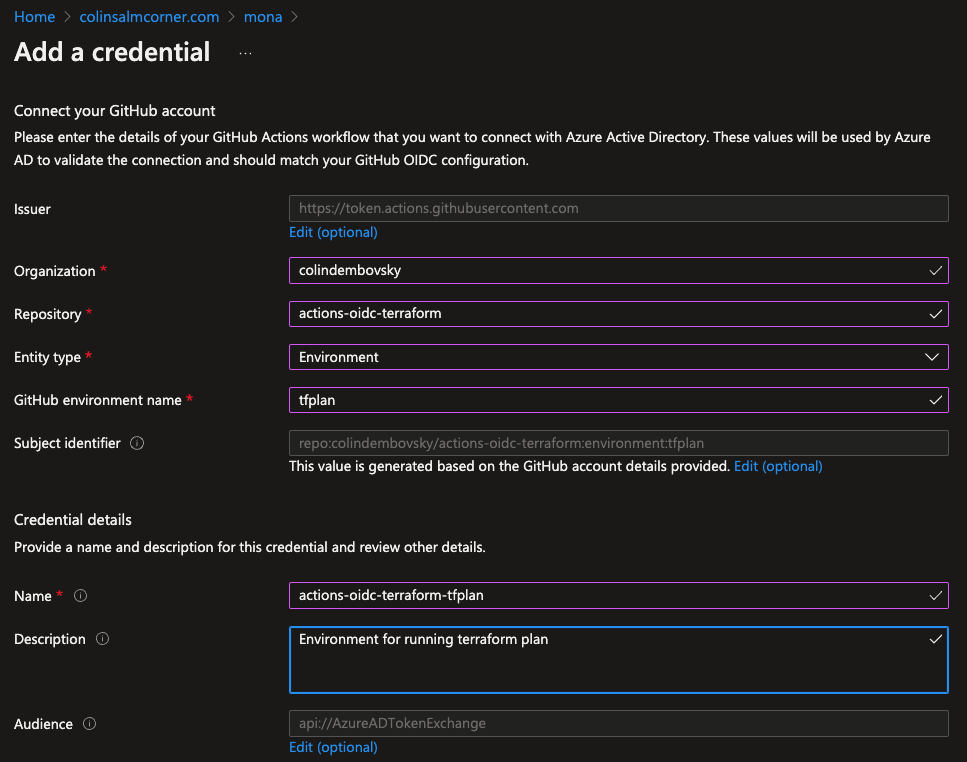
Adding a tfplan environment credential.
Why are we calling the environment tfplan? We want to be able to authenticate without using a secret - so we’re creating a federated credential. We could just have environment:dev or environment:prod but we are later going to put an approval in the workflow before the terraform apply step. If we configure an approval on the environment and use it for both plan and apply, then we’ll have to approve the plan and the apply! By creating a “dummy” environment called tfplan, we can ensure that any plan jobs don’t require approvals, while any apply jobs do.
The other option would be to tie the federated credential to a branch, or only allow for PRs or for a tag. None of these are going to work nicely, so I think the “dummy” environment is the most practical.
Repeat the process for additional environments (in this case I’m only creating dev). Typically you’d have a completely separate service principle for prod, so you’d go and configure a new federated credential on that service principle:
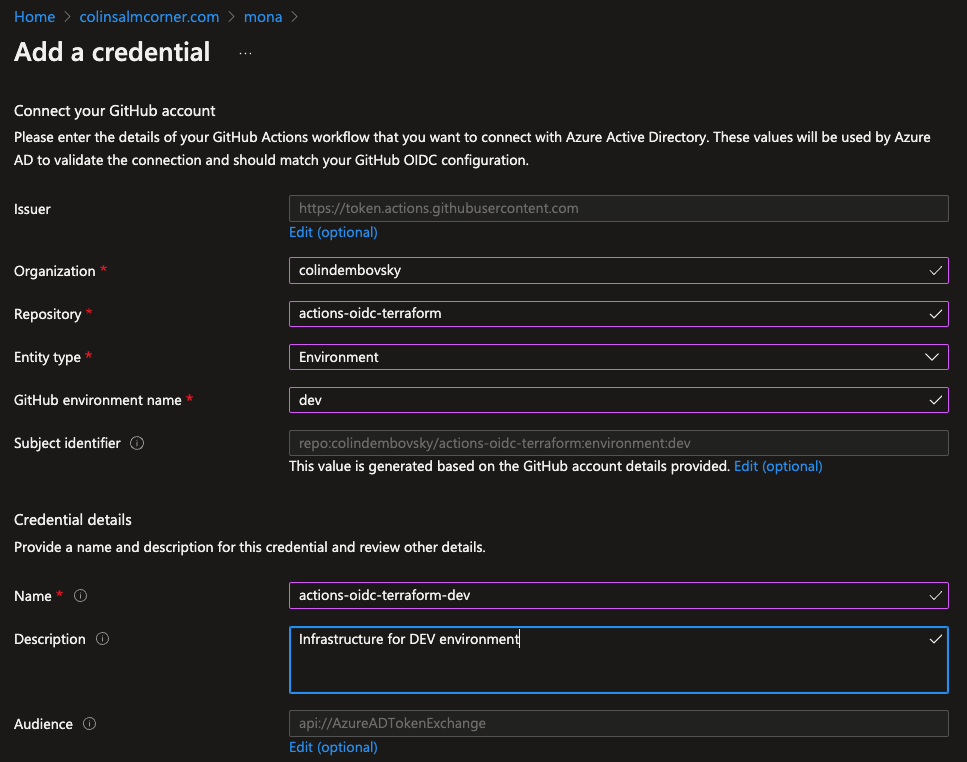
Adding a dev environment credential.
My credentials look as follows (note I have some other repo credentials here too):
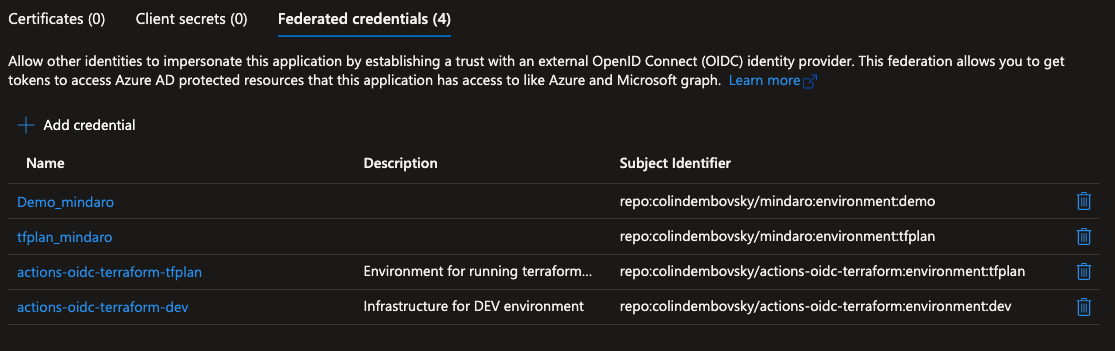
Viewing the federated credentials.
Setting Repo “Secrets”
Now that we have configured the federated credential, we need to store the tenant ID, the subscription ID and the client ID (the ID of the service principle). None of this information is really sensitive, since we do not need to store the client secret. However, repo secrets are an easy place to store these IDs.
Navigate to the repo and click on Settings->Secrets->Actions and enter the values for the three IDs. Of course if you have different credentials for different environments, you’ll want to set these on the corresponding Environments. You can also use org-level secrets - tenant ID is something that’s usually common across the entire organization.
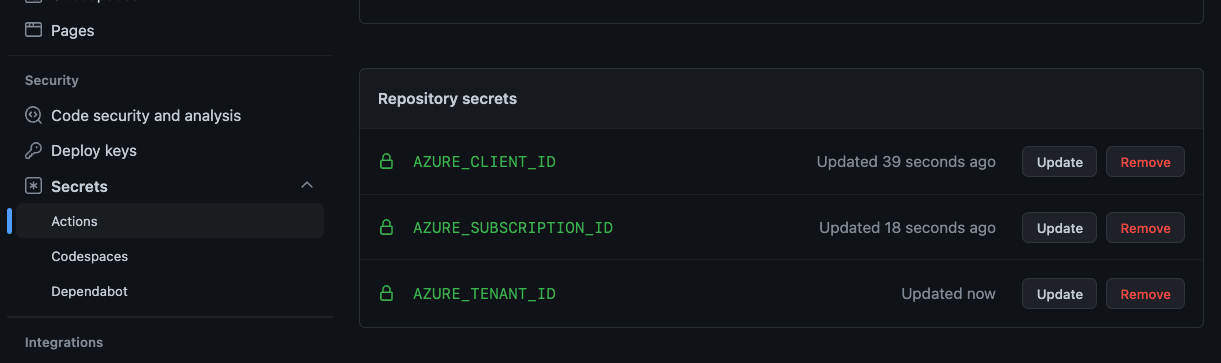
Adding the Azure IDs to the repo.
Configuring the Environments
Now we can configure approvals on the Environments (if we need to). Remember how we created separate credentials for tfplan and for dev? We can now create corresponding Environments (under the repo Settings page). I then add an approval on the dev environment, but not on the tfplan environment:
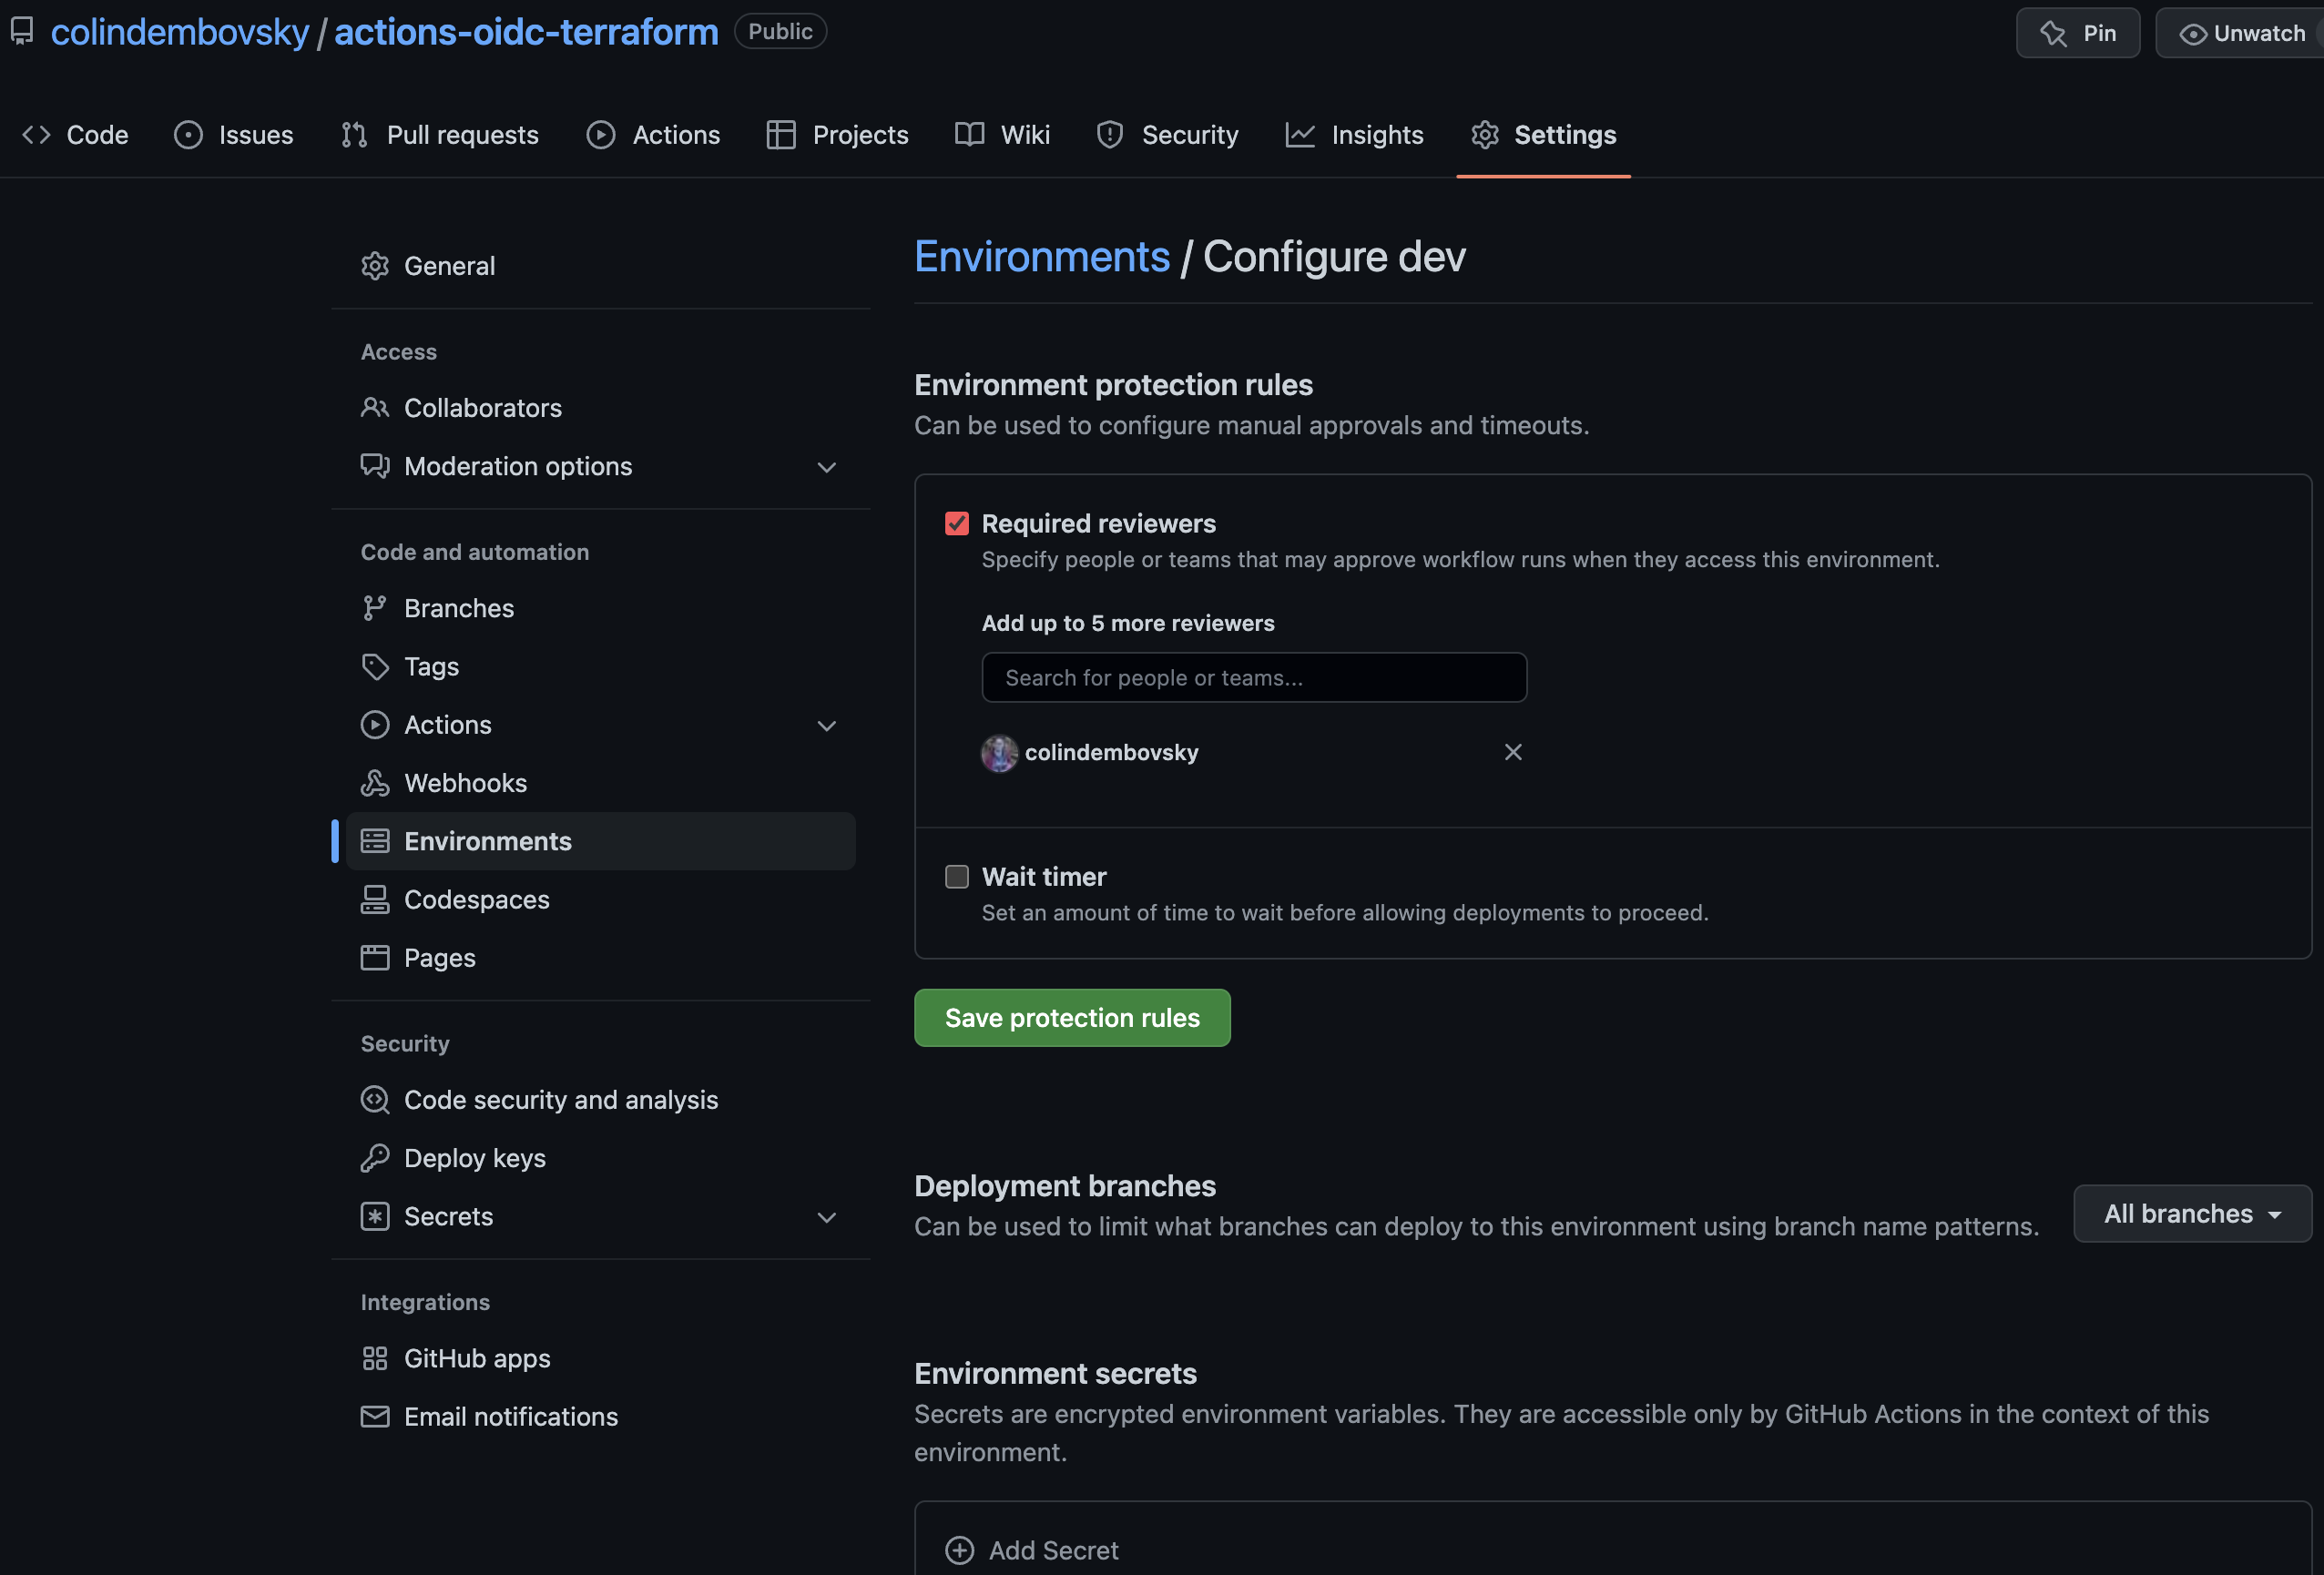
Configuring the dev enviromnet.
Note: You can also add branch constraints for
prodenvironments to only allow deployments from themainbranch.
The Workflow
Basic Config
We’re almost there! We can now configure the workflow to use OIDC to authenticate to Azure. Let’s start with defning the workflow and some basic settings:
# file: '.github/workflows/deploy-infra.yml'
name: Infra deploy

on:
  workflow_dispatch:
    inputs:
      destroy:
        type: boolean
        description: Destroy environment?
        required: true
        default: false

  pull_request:
    paths:
    - infra/**

env:
  tf_actions_working_dir: infra

permissions:
  id-token: write
  contents: read
Setting up the workflow basic config.
Notes:
- We start with the workflow name
- We have two triggers:
workflow_dispatch(manual) which has a boolean input to destroy the environment, andpull_requestfor any PR with changes in theinfrafolder of the repo (where the Terraform scripts are stored) - We define an environment variable called
tf_actions_working_dirand set it to the folder containing ourmain.tffile (in this caseinfra) - We need to give the
GITHUB_TOKENpermissions to create the Azure OIDC token request - so we addid-token: writeto thepermissions. The OIDC login will fail if you forget to do this!
The Plan Job
Now we define a job called plan that will run a terraform plan. We want to then upload the plan file as an artifact. The next job (the apply job) will donwload the plan and run terraform apply. Let’s have a look at the plan job:
# file: '.github/workflows/deploy-infra.yml'
jobs:
  plan:
    name: Terraform plan
    runs-on: ubuntu-latest
    environment: tfplan
    defaults:
      run:
        working-directory: ${{ env.tf_actions_working_dir }}

    steps:
    - uses: actions/checkout@v2

    - name: Log in to Azure using OIDC
      uses: azure/login@v1
      with:
        client-id: ${{ secrets.AZURE_CLIENT_ID }}
        tenant-id: ${{ secrets.AZURE_TENANT_ID }}
        subscription-id: ${{ secrets.AZURE_SUBSCRIPTION_ID }}

    - name: Setup Terraform
      uses: hashicorp/setup-terraform@v1

    - name: Terraform Init
      id: init
      run: terraform init
      env:
        ARM_CLIENT_ID: ${{ secrets.AZURE_CLIENT_ID }}
        ARM_SUBSCRIPTION_ID: ${{ secrets.AZURE_SUBSCRIPTION_ID }}
        ARM_TENANT_ID: ${{ secrets.AZURE_TENANT_ID }}
        ARM_USE_OIDC: true

    - name: Calculate destroy arg
      id: destroy_arg
      run: |
        if [ $DESTROY == "true" ]; then
          echo "::set-output name=val::-destroy"
        else
          echo "::set-output name=val:: "
        fi
      env:
        DESTROY: ${{ github.event.inputs.destroy }}

    - name: Terraform Plan
      id: plan
      run: terraform plan $DESTROY -no-color --out=out.tfplan
      env:
        ARM_CLIENT_ID: ${{ secrets.AZURE_CLIENT_ID }}
        ARM_SUBSCRIPTION_ID: ${{ secrets.AZURE_SUBSCRIPTION_ID }}
        ARM_TENANT_ID: ${{ secrets.AZURE_TENANT_ID }}
        ARM_USE_OIDC: true
        DESTROY: ${{ steps.destroy_arg.outputs.val }}

    - name: Upload the plan
      uses: actions/upload-artifact@v3
      with:
        name: tf-plan
        path: ${{ env.tf_actions_working_dir }}/out.tfplan
The guts of the plan job.
Notes:
- We’re running this job on the
ubuntu-latestimage - We specify that the working directory for the job (for all steps) is the
infrafolder - We specify
tfplanas the environment - we need this for the OIDC to work correctly (and this environment does not require an approval, so the steps will run as soon as the job starts) - We login using
azure/login- note how there is no client secret! - We install Terraform (latest) using
ashicorp/setup-terraform - We can now run
terraform init, passing in the three Azure IDs (tenant, subscription and client). Again, no secret! We do also have to make sure to setARM_USE_OIDCtotrueso that Terraform knows to use the OIDC context. - We then calculate if the
destroyinput is set to true so that we know whether or not to generate adestroyplan. - Finally, we can call
terraform plan- again, we pass in theARM_USE_OIDC, the IDs for Azure as well as theDESTROYarg. We output the plan to a file calledout.tfplan - Last step, we upload the plan file as an artifact using
actions/upload-artifact
Terraform Quality
Those steps are functional, but there are opportunities to improve by adding in some quality steps. How about we run terraform validate to validate the configuration? What about running terraform fmt to format the scripts (or at least let us know we need to). How about running tflint to lint the scripts?
Here are the steps we need to perform all these actions:
# file: '.github/workflows/deploy-infra.yml'
    # the setup terraform step from before
    - name: Setup Terraform
      uses: hashicorp/setup-terraform@v1

    - name: Setup TFLint
          uses: terraform-linters/setup-tflint@v1

    - name: Terraform fmt
        id: fmt
        run: terraform fmt -check
        continue-on-error: true

    # the init step from before...
    - name: Terraform Init
      ...

    - name: Terraform Validate
        id: validate
        run: terraform validate -no-color

    - name: Init TFLint
      run: tflint --init

    - name: Run TFLint
      run: tflint -f compact

    # the plan  step from before...
    - name: Terraform Plan
      ...
Adding in some quality checks.
Notes:
- We add in a new
setupstep to installtflint(terraform-linters/setup-tflint), This extension uses problem matchers so any linting issues will be annotated inline in PRs. - We run
terraform fmt -checkto check the formatting - (We run
terraform initas before) - We run
terraform validateafter theinitto validate the configuration - We run
tflint -f compactto perform the linting and annotate the code with any issues
Bonus: Step Summaries
Now we can create a plan - but digging into the logs to see the plan output or view formatting or validation results isn’t the best user experience. What if we could surface the changes to the infrastructure in a more readable way? Good news is that we can using a Step Summary!
Fortunately, we’ve already given ids to a number of the existing steps (see terraform plan, validate and fmt steps). We can now combine these step outputs with a dump of the plan to create a markdown document, which in turn we can pipe to $GITHUB_STEP_SUMMARY and we’ll get a step summary on the run home page:
# file: '.github/workflows/deploy-infra.yml'
    # just above is the plan step from before

    - name: Create the plan summary
      uses: actions/github-script@v6
      if: always()
      id: summary
      env:
        PLAN: '${{ steps.plan.outputs.stdout }}'
      with:
        github-token: ${{ secrets.GITHUB_TOKEN }}
        script: |
          // 1. Prep the output
          const output = `#### Terraform Format and Style 🖌\`${{ steps.fmt.outcome }}\`
          #### Terraform Initialization ⚙️\`${{ steps.init.outcome }}\`
          #### Terraform Validation 🤖\`${{ steps.validate.outcome }}\`
          <details><summary>Validation Output</summary>
          \`\`\`\n
          ${{ steps.validate.outputs.stdout }}
          \`\`\`
          </details>
          #### Terraform Plan 📖\`${{ steps.plan.outcome }}\`

          <details><summary>Show Plan</summary>

          \`\`\`\n
          ${process.env.PLAN}
          \`\`\`

          </details>

          *Pusher: @${{ github.actor }}, Action: \`${{ github.event_name }}\`, Working Directory: \`${{ env.tf_actions_working_dir }}\`, Workflow: \`${{ github.workflow }}\`*`;

          // 2. Set the output variable
          const fs = require('fs');
          fs.writeFileSync('${{ env.tf_actions_working_dir }}/summary.md', output);
          core.setOutput('summary', output);

    - name: Write the step summary
      if: always()
      run: cat summary.md >> $GITHUB_STEP_SUMMARY

    # the upload  step from before...
    - name: Upload the plan
      ...
Adding in the step summary.
Now when we run the workflow, we see the following step summary:
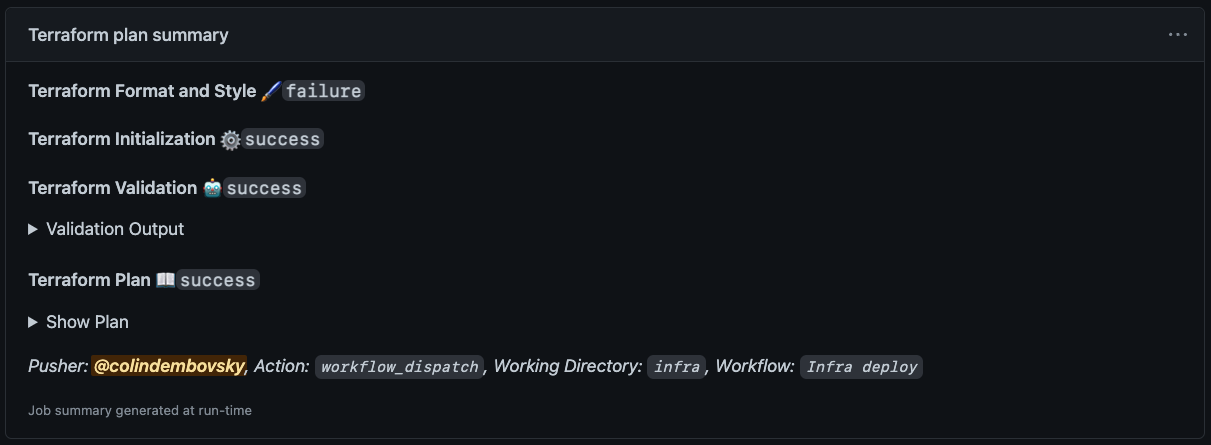
The step summary.
Note: We can see that the
fmtoperation failed - this is just stylistic, so we don’t fail the workflow, but it’s good to know that we should format the files next time we edit them!
We can expand the details to see the full output:
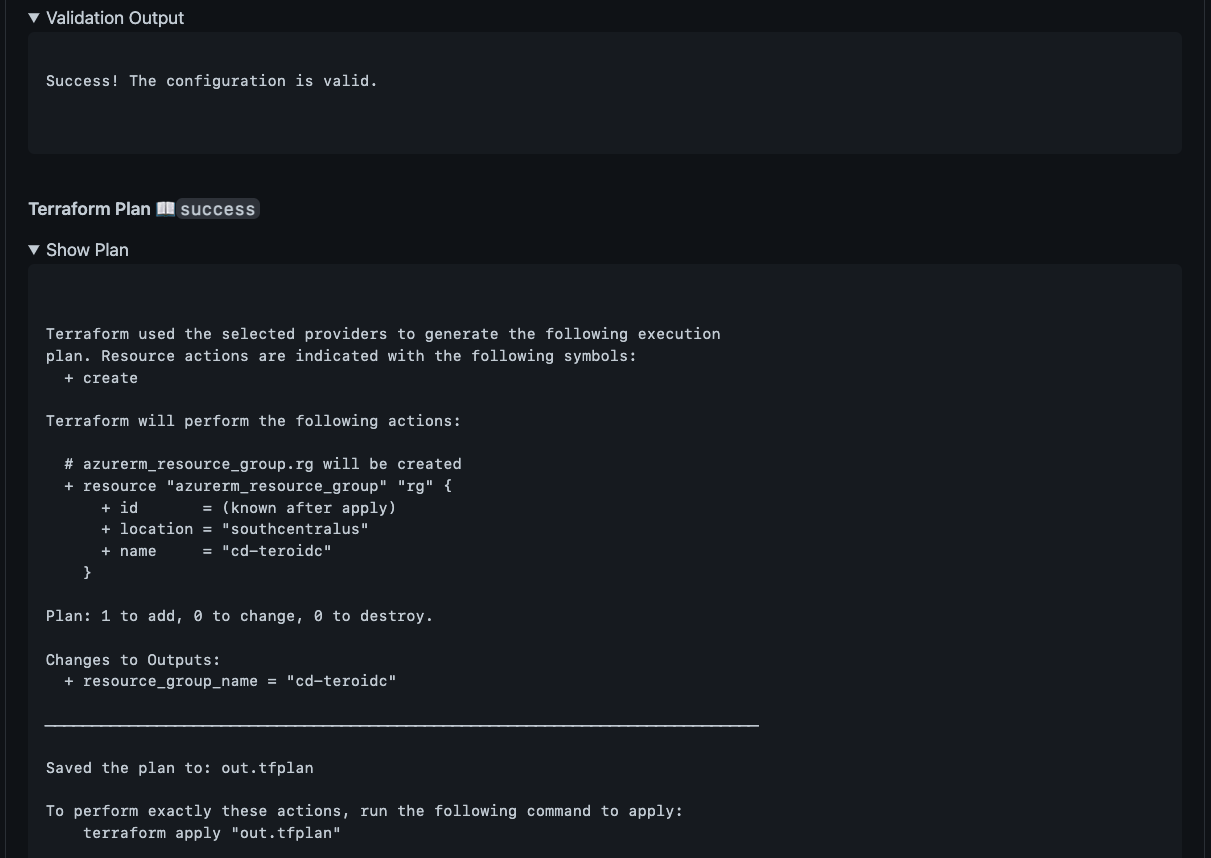
Expanding the summary details.
The Apply Job
The Apply job is much the same - except we download the out.tfplan artifact after running terraform init and then we can run terraform apply. We make sure that the environment is set to dev or prod or whatever environment we’re targeting - that will wait for any approvals we’ve configured. The point is to run the plan immediately and then await an approval before applying the plan. Approvers can look at the step summary to see what changes the plan is proposing.
The full workflow file, including the Apply job, is here.
Conclusion
GitHub Actions allows you to securely connect to Azure without having to store secrets. However, you need to configure Terraform to use OIDC too. In this post I walked you through how to use OIDC with Terraform so that you can now do Infrastructure as Code without secrets!
Happy Terraforming!