Links to this series:

Part 2: Setup and Configuration
The best way to do this is to follow the instructions from the “Configuration Quick Reference” page in the Integration help file. In this post I’ll add some summaries and screen shots to augment the manual a bit.
Required Accounts
- An account that will be used to configure the integration globally – or at least at the Project Collection<->PWA level. (I used the tfssetup account that was used to install and configure TFS). (For the rest of this post, this account will be referred to as tfssetup)
- Accounts that will be used to manage mappings per project – at the TeamProject<->Enterprise Project level (these can be Project Admins or Team Leads on the TFS side). (This can also be the tfssetup account if you want – for this post, I will use the colind account)
- The TFS Service account ( tfsservice for this post).
Configuring Permissions on TFS
- Make sure the global config account ( tfssetup ) is a in the Team Foundation Administrator group
- Open the TFS Admin Console and click on the Application Tier node
- Click on the “Group Membership” link in the Application Tier Summary section
- Add the user (tfssetup) to the Team Foundation Administrator group

- Make sure each account that will be managing mapping at the project level ( colind ) has “Administer Project Server integration” permissions.
- Open the TFS Admin Console and click on the “Team Project Collections” node
- Click on the Project Collection you want to configure
- Click on “Administer Security”
- Select the group that the user is in (or add the user explicitly) and make sure the “Administer Project Server integration” permission is allowed

- Make sure the resources you are going to use on the project are part of some group on the TFS Team Project that you will be mapping to Project Server (usually just place them into the Contributors group).
Configuring Permissions on Project Server 2010
- Configure service account permissions on the Project Server Application in Sharepoint Central Admin
- Open the Sharepoint central admin console and click on the “Manage Service Applications” link

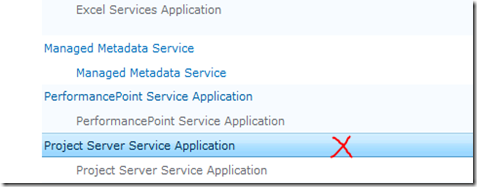
- Look for the “Project Server Service Application” and click next to the name (don’t click the hyperlink – you just want to select the row, not follow the link – see the red ‘x’ in the picture below). This highlights the row and activates some buttons in the ribbon at the top.

- Click on the “Permissions” button in the ribbon.
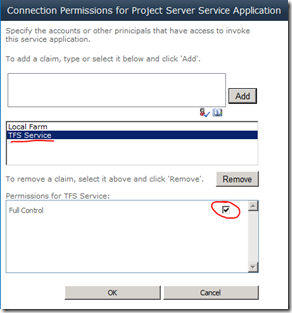
- Add the TFSService account and make sure it has full control checked in the permissions section.

Configuring Permissions in PWA
To configure the integration, you’ll need to create 2 user accounts on the PWA – one for the TFSService account and one for the account you’ll use to register the PWA (TFSSetup). You can add them to the Administrator group on PWA or assign the accounts the minimum permissions as described in the Integration help file.
Each user that is going to have tasks must be created as an enterprise resource. Make sure the display name matches the display name for the user in Active Directory – and it’s recommended that you let Project server sync users from Active Directory.
The resources will need to be part of the Team Members group in Project Server (or have the same permission set).
Once you’ve created the Enterprise Project, make sure that you select “Build Team” and assign the enterprise resources to the project.
So now you’ve got the permissions set and the components installed – next we’ll configure the bits.
