Testing Windows 8 Applications

Windows Store applications are slowly becoming more popular. If you’re going to do any Windows Store development, you’ll need to shift a few paradigms in how you code – and how you test. There are hundreds of webcasts and blogs detailing Windows Store programming, but I want to explore testing Windows Store apps.
The Summary (or, TL;DR)
There’s ok news and bad news. The good news is you can test Windows Store apps – the bad news is, it’s hard to do it properly.
First let’s consider unit test capabilities:
JavaScript .NET Test Project Template QUnit for Metro has a project template Out-of-the-box using “Unit Test Library for Windows Store apps” Run Tests in Test Explorer No Yes Run Tests in Team Build No Using Interactive Build Agent (No code coverage) Coded UI Tests No No
Here’s a summary of Manual Testing capabilities:
Capability Yes or No? Test on Local Machine No Test on Remote Device Yes Action Log Yes Manual Code Coverage No Event Log Yes IntelliTrace No Voice and Video Recording No System Information Yes Test Impact Analysis No Manual Screen Captures Yes Fast Forwarding No
Read on if you want some more details and explanations!
Unit Testing (.NET)
If you want to unit test your application, you’ll need to add a Unit Test project. For Windows Store apps using .NET, you get a project template out-the-box.
When you add this project to your solution, you’ll see that the test project actually has a structure that is very similar to a Windows Store app – it has a certificate and an app manifest too. This is because if you’re going to use and of the Windows capabilities in your tests (like File Storage, Camera, Location and so on) you’re going to need to enable them in the app manifest, just like you would a normal app.
You can run tests that are in the project in the Test Explorer window, but automating them as part of a Team Build will require you to run the Build Agent in the Interactive Mode (as opposed to as a service) since the Windows capabilities require interaction with the desktop. Furthermore, you won’t get Code Coverage when running these tests either through the Test Explorer or in a Team Build.
Unit Testing (JavaScript)
For JavaScript apps, you’re almost out of luck. You can install QUnit for Metro which gives similar functionality to the C# Unit Test Library. The difference is you’ll need to set the test project as your Start project and then run that to actually execute your tests – there is no “headless” way to run these tests. If you’ve installed Chutzpah Test Adapter, then you’ll see the tests in the Test Explorer Window, but they’ll fail if you try to run them. There’s no integration with Team Build, so you can’t run automated tests using this framework.
Once you’ve created a QUnit Test Project, you have to add links to the js files in the project you want to test. Then you write your QUnit tests, and run the application (setting the test project as the start up project). When you run that, it’ll execute your test cases:
Manual Testing (.NET or JavaScript)
The manual testing story for both .NET and JavaScript apps is the same. The trick here is that you can’t test on the local machine – you’ll have to have a separate Windows 8 device to run your app on. The steps you need to follow for manual testing are as follows:
Step 1: Install the Remote Debugger on your remote device
- Download the Remote Debugger for your architecture (x64, x86 or ARM)
- Install the debugger on your remote device (amazingly, the ARM exe installs even on WinRT!)
- Launch the “Microsoft Test Tools Adapter” application from the Start screen

Step 2: Create a TFS Build to build your application
Step 3: Push your application to your remote device via MTM
- Launch MTM and go to the Test Tab. Look for the links “Modify” and “Install Windows Store App”.

- Press “Modify” and connect to your remote device.

- Enter the name of the remote device and press the “Test” link. You’ll probably be prompted for credentials (if you’re logged in as a different user). In my case, my development machine is on a domain and my remote device (a Surface RT) is not – so I enter my Microsoft Account details to connect to the device.

- Once you press enter, MTM will attempt to connect to the remote device. Make sure your device is not locked and that the “Microsoft Test Tools Adapter” is running.

- Next you’ll have to click the “Install Windows Store App” in MTM to push your app. Browse to the drop folder of your application and find the appx file for your application.

- Once you click “Open”, MTM will push the app to your device. If this is the fist time you’re doing it, you’ll need to get a developer licence (on the remote device) – MTM will pause until you complete this step. Go to the remote device, and open the Desktop app if you don’t see anything happening. Once you’ve signed in with your Microsoft Account details, you’ll see a notice saying that a developer license has been installed.
- MTM then also installs your app’s certificate. Again, you’ll have to go to the Desktop on the remote device and allow the certificate to install before MTM actually installs the app.
Step 4: Set the build for your Test Plan
- This ensures a tie-in from the executable you have and any bugs that you file
Step 5: Configure Test Settings
- You can try to collect video or IntelliTrace or do Test Impact Analysis – none of those collectors work.

- What will work is the Action Log, Event Log and System Information. Just set them for the “Local” role, even though these are the collectors that will run on the remote device.

Step 6: Execute Your Tests
- Click on a Test and hit “Run” to run the test
- When you do, you’ll see a message pop up on the Remote Device notifying you that a test session has started. All your actions are now being recorded (tap by tap, as it were).

- As you complete each step, remember to mark it as “Pass or Fail” in the Test Runner that is running on your development machine
- Press “Screenshot” to take a screenshot – this actually pulls the remote device’s screen onto the development machine and allows you to mark a rectangle to be attached to the test results.
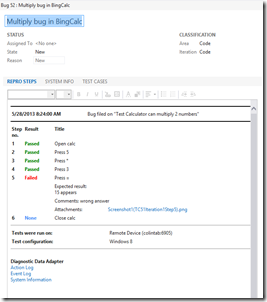
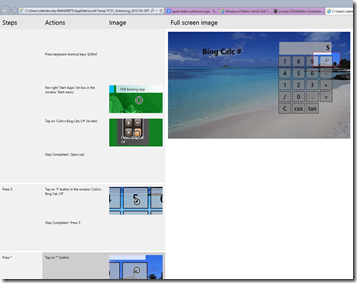
When you log a bug, you’ll get detailed info. The Action Log opens really nicely as an HTML page with links showing where you tapped and so on.
Exploratory Testing
This works in exactly the same manner – except you don’t have a test case to follow. You can filter the steps out when you log bugs (or test cases) as you go.
Coded UI Testing
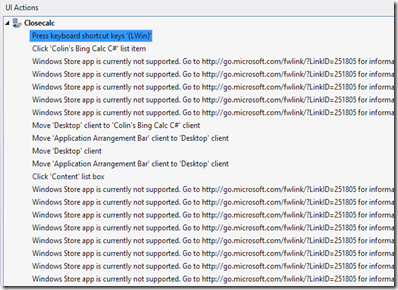
I was really hoping that this would be something that you could do from Visual Studio – except, that it’s not. Here’s what happens when you generate a coded UI test from a test case action recording:
That’s right, sports fans – no coded UI support yet.
Conclusion
Unfortunately it’s a bit of a bleak outlook at the moment for testing Windows Store apps. Even when you can do some testing, you’re limited, and you’re going to have to invest significant effort. I am hoping that the story will improve with future versions of TFS and VS. For now, the best value-for-time-and-money is on manual testing using a remote device. If your Windows Store App is written in .NET, you can do some unit testing, but you’ll have to make your build agent interactive to run the tests as part of a build. If you’ve got JavaScript Windows Store Apps, then try out the QUnit for Metro extension, but it feels a bit hacky and you won’t get any build integration.
Links
- There is a great MSDN article about testing Windows Store Apps
- Brian Keller does a great 11 minute video showing some of these capabilities
- The support matrix for Coded UI and Action Recordings currently showing no support for Windows Store Apps
- Christopher Bennage apparently got some unit tests working for his JavaScript Windows Store Apps, though I couldn’t seem to get the “headless” experience he claims. I also didn’t like polluting my application with tests (since his method has the tests in the App itself).
(Un)Happy Windows Store App Testing!


