Source Control Operations During Deployments in Release Management
Before we start: Don’t ever do this.
But if you really have to, then it can be done. There are actually legitimate cases for doing source control operations during a deployment. For example, you don’t have source control and you get “files” from a vendor that need to be deployed to servers. Or you have a vendor application that has “extensions” that are just some sort of script file that is deployed onto the server – so you don’t compile anything for customizations. Typically these sorts of applications are legacy applications.
Simple Solution: Install Team Explorer on the Target Servers
The simplest way to do source control operations is just to install Team Explorer on your target server. Then you can use the “Run Command” tool from Release Management and invoke tf.exe directly, or create a script that does a number of tf operations.
However, I was working at a customer where they have hundreds of servers, so they don’t want to have to manually maintain Team Explorer on all their servers.
Creating a TF.exe Tool
Playing around a bit, I realized that you can actually invoke tf.exe on a machine that doesn’t have Team Explorer. You copy tf.exe to the target machine – as well as all its dependencies – and you’re good to go. Fortunately it’s not a huge list of files – around 20 altogether.
That covers the exe itself – however, a lot of TF commands are “location dependent” – they use the directory you’re in to give context to the command. For example, running “tf get” will get files for the current directory (assuming there is a mapping in the workspace). When RM deploys a tool to the target server, it copies the tool files to a temporary directory and executes them from there. This means that we need a script that can “remember” the path where the tool (tf.exe) is but execute from a target folder on the target server.
PowerShell is my scripting language of choice – so here’s the PowerShell script to wrap the tf.exe call:
<p>param(
[string]$targetPath,
[string]$tfArgs
)
try {
$tf = "$pwd\tf.exe"
Push-Location
if (-not(Test-Path $targetPath)) {
mkdir $targetPath
}
cd $targetPath
&$tf $tfArgs.Split(" ")
if (-not($?)) {
throw "TF.exe failed"
}
}
finally {
Pop-Location
}
</p><p> </p>
Notes:
- Line 2: We pass in the $targetPath – this is the path on the target server we want to perform tf commands from
- Line 3: We in $tfArgs – these are the arguments to pass to tf.exe
- Line 7-8: get the path to tf.exe and store it
- Line 10-12: if the $targetPath does not exist, create it
- Line 14: change directory to the $targetPath
- Line 15: Invoke tf.exe passing the $tfArgs we passed in as parameters
- Line 17-19: Since this script invokes tf.exe, you could get a failure from the invocation, but have the script still “succeed”. In order to make sure the deployment fails if tf.exe fails, we need to check if the tf.exe invocation succeeded or not – that’s what these lines are doing
- Line 22: Change directory back to the original directory we were in – not strictly necessary, but “clean”
Here’s the list of dependencies for tf.exe:
- Microsoft.TeamFoundation.Build.Client.dll
- Microsoft.TeamFoundation.Build.Common.dll
- Microsoft.TeamFoundation.Client.dll
- Microsoft.TeamFoundation.Common.dll
- Microsoft.TeamFoundation.TestManagement.Client.dll
- Microsoft.TeamFoundation.VersionControl.Client.dll
- Microsoft.TeamFoundation.VersionControl.Common.dll
- Microsoft.TeamFoundation.VersionControl.Common.Integration.dll
- Microsoft.TeamFoundation.VersionControl.Common.xml
- Microsoft.TeamFoundation.VersionControl.Controls.dll
- Microsoft.TeamFoundation.WorkItemTracking.Client.DataStoreLoader.dll
- Microsoft.TeamFoundation.WorkItemTracking.Client.dll
- Microsoft.TeamFoundation.WorkItemTracking.Client.QueryLanguage.dll
- Microsoft.TeamFoundation.WorkItemTracking.Common.dll
- Microsoft.TeamFoundation.WorkItemTracking.Proxy.dll
- Microsoft.VisualStudio.Services.Client.dll
- Microsoft.VisualStudio.Services.Common.dll
- TF.exe
- TF.exe.config
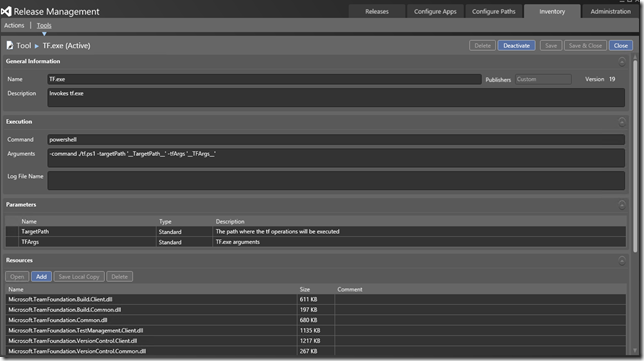
Open up the Release Management client and navigate to Inventory->Tools. Click New to create a new tool, and specify a good name and description. For the command, specify “powershell” and for arguments type the following: -command ./tf.ps1 –targetPath ‘ __TargetPath__ ’ –tfArgs ‘ __TFArgs__ ’
Note that the quotes around the parameters __TargetPath__ and __TFArgs__ should be single-quotes.
Finally, click “Add” on the Resources section and add all the tf files – don’t forget the tf.ps1 file!
Creating TF Actions
Once you have the tf.exe tool, you can then create TF.exe actions – like “Create Workspace” and “Get Files”. Let’s do “Create Workspace”:
Navigate to Inventory->Actions and click “New”. Enter an appropriate name and description. I created a new Category called “TFS Source Control” for these actions, but this is up to you. For “Tool used” specify the TF.exe tool you just created. When you select this tool, it will bring in the arguments for the tool – we’re going to edit those to be more specific for this particular Action. I set my arguments to: -command ./tf.ps1 -targetPath ' __TargetPath__' -tfArgs 'workspace /new /noprompt /collection: http://rmserver:8080/tfs/ __TPC__ " __WorkspaceName__"'
(Note where the single and double quotes are).
The parameters are as follows:
- __TargetPath__: the path we want to create the workspace in
- __TPC__: the name of the Team Project Collection in the rmserver TFS – this can be totally hardcoded (if you only have one TFS server) or totally dynamic (if you have multiple TFS servers). In this case, we have a single server but can run deployments for several collections, so that’s why this parameter is “partly hardcoded” and “partly dynamic”
- __WorkspaceName__: the name we want to give to the workspace
Using Create Workspace Action in a Release Template
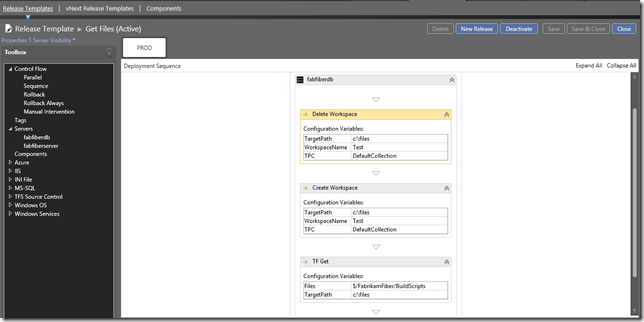
Now that you have the action, you can use it in a release template:
Here you can see that I’ve create some other actions (Delete Workspace and TF Get) to perform other TF.exe commands. This workflow deletes the workspace called “Test”, then creates a new Workspace in the “c:\files” folder, and then gets a folder from source control. From there, I can copy or run or do whatever I need to with the files I got from TFS.
Happy releasing from Source Control (though you can’t really be happy about this – it’s definitely a last-resort).


