Protecting a VSTS Web Hook with Basic Authentication

VSTS supports service hooks like Slack, AppVeyor, Bamboo and a host of other ALM tools. You can also create your own hooks using a simple WebHooks API. There’s an example here. However, one thing that is missing from the sample is any kind of authentication.
Why care? Well, simply put - without authentication, anyone could trigger events to your event sink. That may or may not be a big deal, but I prefer to be secure by default.
Now there are a couple of ways you could do auth - you could use AAD or OpenConnect and get a token and use that for the WebHook subscription. That would probably work, but VSTS won’t renew the token automatically (at least I don’t think it will) so you’ll have to update the webhook subscription manually every time the token expires.
The other way is to use Basic Auth. When you subscribe to a webhook in VSTS, you can pass a Basic username/password. The username and password are base64 encoded and added to a header for the requests. Assuming your using HTTPS (so that you don’t get man-in-the-middle attacks) you can use this for a relatively safe authentication method. Once you extract the username/password from the header, you can validate them however you want.
In this post I’ll cover how to create a Web Hook project that includes Basic Auth as well as logging to Application Insights. I’ll also cover how to debug and test your service using Postman.
The source code for this stub project is here so you can just grab that if you want to get going.
Creating the Project
Initially I wanted to create the project in .NET Core. However, I wanted to use a NuGet package and the package unfortunately only supports .NET 4.x. So I’ll just use that.
Open Visual Studio 2017 and click File->New Project and create a new ASP.NET Web Application. Select Web API from the project type dialog (oh how I love that you don’t have to do this in ASP.NET Core) and ensure you have “No authentication” (we’ll add Basic Auth shortly). This creates a new project and even includes Application Insights.
Adding Packages
We’re going to add a few NuGet packages. Right-click the web project and add the following packages: Microsoft.AspNet.WebHooks.Receivers.VSTS (contains webhook handler abstract class and event payload classes) and Microsoft.ApplicationInsights.TraceListener (which will send Trace.WriteLines to AppInsights).
Once the packages are installed, you can (optionally) update all the packages. The project templates sometimes have older package versions, so I usually like to do this so that I’m on the latest NuGet package versions from the get go.
Adding a WebHook Handler
This is the class that will do the work. Add a new folder called “Handlers” and create a new class called “VSTSHookHandler”.
using Microsoft.AspNet.WebHooks;
using Microsoft.AspNet.WebHooks.Payloads;
using System.Threading.Tasks;
using System.Diagnostics;

namespace vsts_webhook_with_auth.Handlers
{
	public class VSTSHookHandler : VstsWebHookHandlerBase
	{
		public override Task ExecuteAsync(WebHookHandlerContext context, WorkItemCreatedPayload payload)
		{
			Trace.WriteLine($"Event WorkItemCreated triggered for work item {payload.Resource.Id}");
			return base.ExecuteAsync(context, payload);
		}
	}
}
Notes:
- Line 8: We inherit from VstsWebHookHandlerBase - this base class has abstract methods for all the VSTS service hook events that we can listen for.
- Line 10: We override the async WorkItemCreated event - there are other events that you can override depending on what you need. Add as many overrides as you need. This method also gets the context and the payload for the event for us.
- Line 12: We are writing log entries to Trace - because we’ve added the AppInsights TraceListener, these end up in AppInsights where we can search for particular messages.
- Line 13: Here is where you will implement your logic to respond to the event. For this stub project, I just call the base method (which is essentially a no-op).
Adding a BasicAuthHandler
Add a new class to the Handlers folder called BasicAuthHandler. You can get the full class here, but we only need to see the SendAsync method for our discussion:
protected override Task<HttpResponseMessage> SendAsync(HttpRequestMessage request, CancellationToken cancellationToken)
{
	var credentials = ParseAuthorizationHeader(request);

	if (credentials != null && CredentialsAreValid(credentials))
	{
		var identity = new BasicAuthenticationIdentity(credentials.Name, credentials.Password);
		Thread.CurrentPrincipal = new GenericPrincipal(identity, null);
		return base.SendAsync(request, cancellationToken);
	}
	else
	{
		var response = request.CreateResponse(HttpStatusCode.Unauthorized, "Access denied");
		AddChallengeHeader(request, response);
		return Task.FromResult(response);
	}
}
Notes:
- Line 3: The ParseAuthorizationHeader() method extracts the username/password from the auth header
- Line 5: We check that there are credentials and that they “are valid” (in this case that they match hard-coded values we’ll add to the web.config)
- Lines 7,8: We add the auth details to the CurrentPrincipal, which has the effect of marking the request as “authenticated”
- Line 9: We forward the request on to the remainder of the pipeline - which is the VSTSHookHandler class methods at this point
- Lines 13-15: We handle the unauthorized scenario
Configuration
We can now add the handlers into the message processing pipeline. Open the Global.asax.cs file and modify the Application_Start() method by adding in the highlighted line (and resolving the namespace):
protected void Application_Start()
{
	GlobalConfiguration.Configuration.MessageHandlers.Add(new BasicAuthenticationHandler());

	AreaRegistration.RegisterAllAreas();
	GlobalConfiguration.Configure(WebApiConfig.Register);
	FilterConfig.RegisterGlobalFilters(GlobalFilters.Filters);
	RouteConfig.RegisterRoutes(RouteTable.Routes);
	BundleConfig.RegisterBundles(BundleTable.Bundles);
}
Our auth handler is now configured to trigger on requests.
Next, open up App_Start/WebApiConfig.cs and modify the Register() method with the highlighted line:
config.Routes.MapHttpRoute(
	name: "DefaultApi",
	routeTemplate: "api/{controller}/{id}",
	defaults: new { id = RouteParameter.Optional }
);

config.InitializeReceiveVstsWebHooks();
This registers the handler class to respond to VSTS events.
Finally, open the web.config file and add the following appSetting keys:
  <appSettings>
	...
	<add key="WebHookUsername" value="vsts"/>
	<add key="WebHookPassword" value="P@ssw0rd"/>
	<add key="MS_WebHookReceiverSecret_VSTS" value="C8B7F962-2B5A-4973-81F3-8888D53CF86E"/>
  </appSettings>
Notes:
- The MS_WebHookReceiverSecret_VSTS is a “code” that the VSTS webhook requires to be in the query params for the service call. This can be anything as long as it is longer than 32 and less than 128 chars. You can also have multiple codes. This code lets you handle different projects firing the same events - you can tie the code to a project so that you can do project specific logic.
- WebHookUsername and WebHookPassword are hardcoded username/password for validation - you can ignore these if you need some other way to validate the values.
Configuring SSL in VS
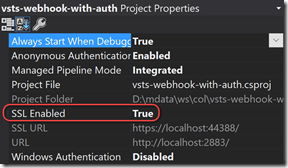
To run the site using SSL from VS, you’ll need to enable that in the project properties. Click on the web project node (so that it is selected in the Solution Explorer). Then press F4 to open the properties pane (this is different to right-click -> Properties). Change SSL Enabled to true. Make a note of the https URL.
You can now right-click the project and select Properties. Change the startup URL to the https URL so that you always get the SSL site.
Testing from PostMan
You can now run the site. You’ll notice when you first run it that the cert is invalid (it’s self-signed). In order to get Postman working to test the webhooks, I had to read these instructions. In the end, I just opened the https URL in IE and imported the cert to Trusted Root Certification Authorities. I then shut down Chrome and restarted and all was good.
I opened Postman and entered this url: https://localhost:44388/api/webhooks/incoming/vsts?code=C8B7F962-2B5A-4973-81F3-8888D53CF86E, changing the method to POST. I made sure that the code was the same value as the MS_WebHookReceiverSecret_VSTS key in my web.config. I then opened the docs page and grabbed the sample payload for the WorkItemCreated event and pasted this into the Body for the request. I updated the type to application/json (which adds a header).
Hitting Send returns a 401 - which is expected since we haven’t provided a username/password. Nice!
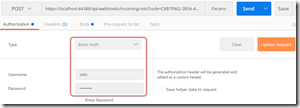
Now let’s test adding the auth. Go back to Postman and click on Authorization. Change the Type to “Basic Auth” and enter the username/password that you hard-coded into your web.config. Click “Update Request” to add the auth header:
Now press Send again. We get a 200!
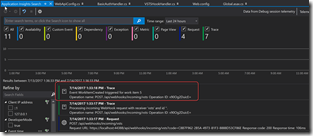
Of course you can now set breakpoints and debug normally. If you open AppInsights Viewer in VS you’ll see the traces - these will eventually make their way to AppInsights (remember to update your key when you create a real AppInsights resource in Azure).
Registering the Secure Hook in VSTS
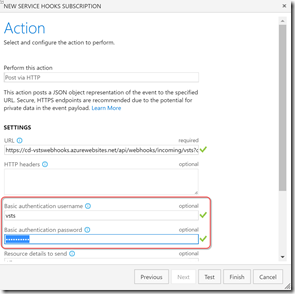
You can now clean up the project a bit (remove the home controller etc.) and deploy the site to Azure (or your own IIS web server) using VSTS Build and Release Management (friends don’t let friends right-click Publish) and you’re ready to register the hook in VSTS. Open your VSTS Team Project and head to Configuration->Service Hooks. Add a new service hook. Enter the URL (including the code query param) for your service. Then just enter the same username/password you have in the website web.config and you’re good to go! Hit test to make sure it works.
Conclusion
Securing your WebHooks from VSTS isn’t all that hard - just add the BasicAuthHandler and configure the basic auth username/password in the WebHook subscription in VSTS. Now you can securely receive events from VSTS. I would really like to see the VSTS team update the NuGet packages to support .NET Core WebAPI, but the 4.x version is fine in the interim.
Happy hooking!


