.NET Core Multi-Stage Dockerfile with Test and Code Coverage in Azure Pipelines
I read a great blogpost recently by my friend and fellow MVP Jakob Ehn. In this post he outlines how he created a multi-stage Dockerfile to run .NET Core tests. I’ve always been on the fence about running tests during a container build - I usually run the tests outside and then build/publish the container proper only if the tests pass. However, this means I have to have the test frameworks on the build agent - and that’s where doing it inside a container is great, since the container can have all the test dependencies without affecting the host machine. However, if you do this then you’ll have test assets in your final container image, which isn’t ideal. Fortunately, with multi-stage Dockerfiles you can compile (and/or test) and then create a final image that just has the app binaries!
I was impressed by Jakob’s solution, but I wanted to add a couple enhancements:
- Jakob builds the container twice and runs the tests twice: one build for the test runs (in a shell task using the –target arg) and one to build the container proper - which would end up execute the tests again. I wanted to improve this if I could.
- Add code coverage. I think that it’s almost silly to not do code coverage if you have tests, so I wanted to see how easy it was to add coverage to the test runs too!
tl;dr
If you want the final process, have a look at my fork of the PartsUnlimited repo on Github (on the k8sdevops branch). You’ll see the final Dockerfile and the azure-pipelines.yml build definition file there.
Adding Code Coverage
I wanted to take things one step further and add code coverage into the mix. Except that doing code coverage in .NET Core is non-trivial. For that it seems you have to use Coverlet. I ended up adding a coverlet.msbuild package reference to my test project and then I just configured the test args for “dotnet test” to specify coverage options in the “dotnet test” command - we’ll see that in the Dockerfile next.
Removing the Redundancy
Jakob runs a shell script which builds the container only to the point of running the tests - he doesn’t want to build the rest of the container if the tests fail. However, when I was playing with this I realized that if tests fail, then the docker build process fails too - so I didn’t worry about the test and final image being in the same process. If the process completes, I know the tests have passed - if not, then I might have to diagnose to figure out if there is a build issue or a test issue, but logging in Azure pipelines is fantastic so that’s not too much of a concern.
The next issue was getting the test and coverage files out of the interim image and have a clean final image without test artifacts. That’s where labels come in. Let’s look at the final Dockerfile:
FROM microsoft/dotnet:2.2-sdk AS build-env
WORKDIR /app
ARG version=1.0.0

# install npm for building
RUN curl -sL https://deb.nodesource.com/setup_8.x | bash - && apt-get update && apt-get install -yq nodejs build-essential make

# Copy csproj and restore as distinct layers
COPY PartsUnlimited.sln ./
COPY ./src/ ./src
COPY ./test/ ./test
COPY ./env/ ./env

# restore for all projects
RUN dotnet restore PartsUnlimited.sln

# test
# use the label to identity this layer later
LABEL test=true
# install the report generator tool
RUN dotnet tool install dotnet-reportgenerator-globaltool --version 4.0.6 --tool-path /tools
# run the test and collect code coverage (requires coverlet.msbuild to be added to test project)
# for exclude, use %2c for ,
RUN dotnet test --results-directory /testresults --logger "trx;LogFileName=test_results.xml" /p:CollectCoverage=true /p:CoverletOutputFormat=cobertura /p:CoverletOutput=/testresults/coverage/ /p:Exclude="[xunit.*]*%2c[StackExchange.*]*" ./test/PartsUnlimited.UnitTests/PartsUnlimited.UnitTests.csproj
# generate html reports using report generator tool
RUN /tools/reportgenerator "-reports:/testresults/coverage/coverage.cobertura.xml" "-targetdir:/testresults/coverage/reports" "-reporttypes:HTMLInline;HTMLChart"
RUN ls -la /testresults/coverage/reports

# build and publish
RUN dotnet publish src/PartsUnlimitedWebsite/PartsUnlimitedWebsite.csproj --framework netcoreapp2.0 -c Release -o out /p:Version=${version}

# Build runtime image
FROM microsoft/dotnet:2.2-aspnetcore-runtime
WORKDIR /app
EXPOSE 80
COPY --from=build-env /app/src/PartsUnlimitedWebsite/out .
ENTRYPOINT ["dotnet", "PartsUnlimitedWebsite.dll"]
Notes:
- Line 1: I’m getting the big bloated .NET Core SDK image which is required to compile, test and publish the app
- Line 6: install npm prerequisites. I could create a custom build image with this on it, but it’s really quick if these dependencies don’t exist. If you’re running on a private agent, this layer is cached so you don’t do it on every run anyway.
- Lines 9-12: copy app and test files into the container
- Line 15: restore packages for all the projects
- Line 19: add a label which we can use later to identify this layer
- Line 21: install the report generator tool for coverage reports
- Line 24: run “dotnet test” to invoke the test. I specify the results directory which I’ll copy out later and specify a trx logger to get a VSTest results file. The remainder of the args are for coverage: the format is cobertura, I specify a folder and specify some namespaces to exclude (note how I had to use %2c for commas to get this to work correctly)
- Line 26: run the report generator tool to produce html coverage reports
- Line 30: publish the app - this is the only bit I really want in the final image
- Lines 33-37: copy the final binaries into an image based on the .NET Core runtime - which is far lighter than the SDK image the previous steps started on (about 10% of the size)
- Line 36: this is where we do the actual copy of any artifacts we want in the final image
When the build completes, we’ll end up with a number of interim images as well as a final deployable image with just the app - this is the image we’re going to push to container registries and so on. Doing some docker images queries shows how important slimming down the final image is:
$> docker images --filter "label=test=true" | head -2
REPOSITORY TAG IMAGE ID CREATED SIZE
<none> <none> 13151da78ddb 2 hours ago 2.53 GB
$> docker images | grep partsunlimited
partsunlimitedwebsite 1.0.1 957346c64b03 2 hours ago 308 MB
You can see that we get a 2.53GB image for the SDK build process (it’s repo and tag are both <none> since this is an intermediary layer). The final image is only 308MB!
You’ll also note how we used the label in the filter expression to get only the layers that have a label “test=true”. If we add the “-q” parameter, we’ll get just the id of that layer, which is what we’ll need to get the test and coverage files out to publish in the CI build.
The Azure Pipelines YML File
The CI definition turns out to be quite simple:
name: 1.0$(Rev:.r)

trigger:
- k8sdevops

pool:
  vmImage: 'Ubuntu-16.04'

variables:
  imageName: 'partsunlimitedwebsite:$(build.buildNumber)'

steps:
- script: docker build -f Dockerfile -t $(imageName) .
  displayName: 'docker build'
  continueOnError: true

- script: |
    export id=$(docker images --filter "label=test=true" -q | head -1)
    docker create --name testcontainer $id
    docker cp testcontainer:/testresults ./testresults
    docker rm testcontainer
  displayName: 'get test results'

- task: PublishTestResults@2
  inputs:
    testResultsFormat: 'VSTest'
    testResultsFiles: '**/test*.xml'
    searchFolder: '$(System.DefaultWorkingDirectory)/testresults'
    publishRunAttachments: true
  displayName: 'Publish test results'

- task: PublishCodeCoverageResults@1
  inputs:
    codeCoverageTool: 'cobertura'
    summaryFileLocation: '$(System.DefaultWorkingDirectory)/testresults/coverage/coverage.cobertura.xml'
    reportDirectory: '$(System.DefaultWorkingDirectory)/testresults/coverage/reports'
  displayName: 'Publish coverage reports'
Notes:
- Lines 13-15: build and tag the docker image using the Dockerfile
- Lines 17-22: get the id of the interim image and create a container. Then copy out the test results files and then delete the container.
- Lines 24-30: publish the test file
- Lines 32-37: publish the coverage results and reports
Final Results
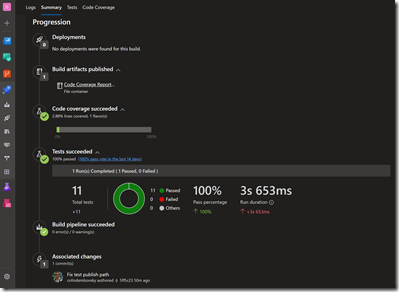
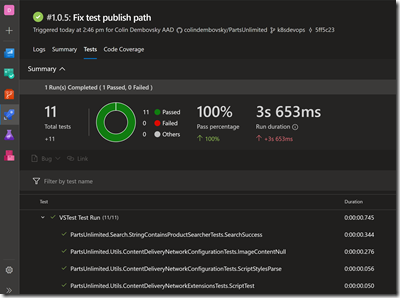
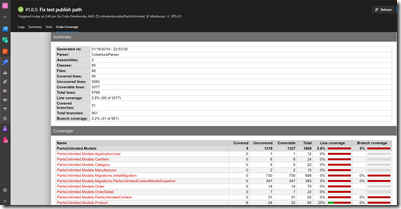
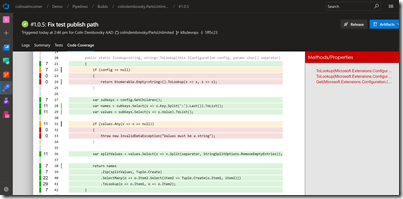
The final results are fantastic. Below are screenshots of the summary page, the test results page, the coverage report and a drill-down to see coverage for a specific class:
Conclusion
Running tests (with code coverage) inside a container is actually not that bad - you need to do some fancy footwork after the build to get the test/coverage results, but all in all the process is pleasant. We’re able to run tests inside a container (not that this mandates real unit tests - tests that have no external dependencies!), get the results out and publish a super-slim final image.
Happy testing!


