DotNet Core, VS 2015, VSTS and Docker

I unashamedly love Docker. Late last year I posted some thoughts I had on Docker DevOps. In this post I’m going to take a look at Docker DevOps using DotNet Core 1.0.0, Docker Tools for Visual Studio, Docker for Windows and VSTS.
Just before I continue – I’m getting tired of typing “DotNet Core 1.0.0” so for the rest of this post when I say “.NET Core” I mean “DotNet Core 1.0.0” (unless otherwise stated!).
Highlights
For those of you that just want the highlights, here’s a quick summary:
- .NET Core does indeed run in a Docker container
- You can debug a .Net Core app running in a container from VS
- You can build and publish a DotNet Core app to a docker registry using VSTS Build
- You can run a Docker image from a registry using VSTS Release Management
- You can get frustrated by the lack of guidance and the amount of hacking required currently
So what’s the point of this anyway? Well I wanted to know if I could create the following workflow:
- Docker for Windows as a Docker host for local dev
- Visual Studio with the Docker Tools for VS for local debugging within a container
- VSTS for building (and publishing) a Docker image with an app
- VSTS for releasing (running) an image
This is a pretty compelling workflow, and I was able to get it running relatively easily. One of the biggest frustrations was the lack of documentation and the immaturity of some of the tooling.
Grab a cup of coffee (or tea or chai latte – or if it’s after hours, a good IPA) and I’ll take you on my journey!
Docker Host in Azure
I started my journey from this post in article: Deploy ASP.NET Core 1.0 apps to a Docker Container (aka the VSTS Docker article). While certainly helpful, there are some issue with this article. Firstly, it’s designed for ASP.NET Core 1.0.0-rc1-update1 and not the RTM release (1.0.0). This mainly had some implications for the Dockerfile, but wasn’t too big an issue. The bigger issue is that it’s a little ambiguous in places, and the build instructions were quite useless. We’ll get to that later.
After skimming the article, I decided to first stand up a Docker host in Azure and create the service connections that VSTS requires for performing Docker operations. Then, I figured, I’d be ready to start coding and I’ll have a host to deploy to.
Immediately I hit a strange limitation – the Docker image in Azure can only be created using “classic” and not “Resource Group” mode. I ended up deciding that wasn’t too big a deal, but it’s still frustrating that the official image isn’t on the latest tech within Azure.
The next challenge was getting Docker secured. I followed the VSTS Docker articles link to instructions on how to protect the daemon socket. I generated the ssh keys without too much fuss. However, I ran into issues ensuring that the Docker daemon starts with the keys! The article doesn’t tell you how to do that (it tells you how to start Docker manually), so I had to scratch around a bit. I found that you could set the daemon startup options by editing /etc/default/docker, so I opened it up and edited the DOCKER_OPTS to look like this: DOCKER_OPTS="--tlsverify --tlscacert=/var/docker/ca.pem --tlscert=/var/docker/server-cert.pem --tlskey=/var/docker/server-key.pem -H=0.0.0.0:2376”
Of course I copied the pem files to /var/docker. I then restarted the Docker service.
It didn’t work. After a long time of hacking, searching, sacrificing chickens and anything else I could think of to help, I discovered that the daemon ignores the /etc/default/docker file altogether! Perhaps it’s just the Azure VM and linux distro I’m on? Anyway, I had to edit the /etc/systemd/system/docker.service file. I changed the ExecStart
command and added an EnviromentFile
command in the [Service]
section as follows: EnvironmentFile=/etc/default/docker ExecStart=/usr/bin/docker daemon $DOCKER_OPTS
Now when I restart the service (using sudo service restart docker
) the daemon starts correctly and is protected with the keys.
I could now run docker commands on the machine itself. However, I couldn’t run commands from my local machine (which is running Docker for Windows) because: Error response from daemon: client is newer than server (client API version: 1.24, server API version: 1.23)
I tried in vain to upgrade the Docker engine on the server, but could not for the life of me do it. The apt packages are on 1.23, and so eventually I gave up. I can run Docker commands by ssh-ing to the host machine if I really need to, so while irritating, it wasn’t a show-stopper.
.NET Core and Docker in VS
Now that I (finally) had a Docker host configured, I installed Docker Tools for Visual Studio onto my Visual Studio 2015.3. I also installed the .NET Core 1.0 SDK. I then did a File->New->Project and created an ASP.NET project – you know, the boilerplate one. I then followed the instructions from the VSTS article and right-clicked the project and selected “Add->Docker support”. This created a DockerTask.ps1 file, a Dockerfile (and Dockerfile.debug) and some docker-compose yml files. Great! However, nothing worked straight away (argh!) so I had to start debugging the scripts.
I kept getting this error: .\DockerTask.ps1 : The term '.\DockerTask.ps1' is not recognized as the name of a cmdlet, function, script file, or operable program. After lots of hacking, I finally found that there is a path issue somewhere. I opened up the Properties\Docker.targets file and edited the <DockerBuildCommand>: I changed “.\DockerTask.ps1” to the full path – c:\projects\docker\TestApp\src\TestApp\DockerTask.ps1. I did the same for the <DockerCleanCommand>. This won’t affect the build, but other developers who share this code will have to have the same path structure for this to work. Gah!
Now the command was being executed, but I was getting this error: No machine name(s) specified and no “default” machines exist
. I again opened the DockerTask.ps1 script. It’s checking for a machine name to invoke docker-machine
commands, but it’s only supposed to do this if the Docker machine name is specified. For Docker for Windows, you don’t have to use docker-machine
, so the script makes provision for this by assuming Docker for Windows if the machine name is empty. At least, that’s what it’s supposed to do. For some reason, this line in the script is evaluating to true, even when $Machine was set to ‘’ (empty string):
if (![System.String]::IsNullOrWhiteSpace($Machine))
So I commented out the entire if block since I’ve got Docker for Windows and don’t need it to do and docker-machine
commands.
Now at least the build operation was working, and I could see VS creating an image in my local Docker for Windows:
Next I tried debugging an app in the container. No dice. The issue seemed to be that the container couldn’t start on port 80. Looking at the Dockerfile and the DockerTask.ps1 files, I saw that the port is hard-coded to 80. So I changed the port to 5000 (making it a variable in the ps1 script and an ARG in my Dockerfile). Just remember that you have a Dockerfile.debug as well – and that the ports are hard-coded in the docker-compose.yml and docker-compose.debug.yml files too. The image name is also hardcoded all over the place to “username/appname”. I tried to change it, but ended up reverting back. This only affects local dev, so I don’t really care that much.
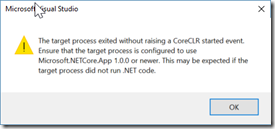
At this point I could get the container to run in Release, so I knew Docker was happy. However, I couldn’t debug. I was getting this error:
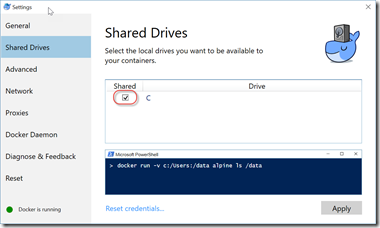
Again a bit of googling led me to enable volume sharing in Docker for Windows (which is disabled by default). I clicked the moby in my task bar, opened the Docker settings and enabled volume sharing on my c drive:
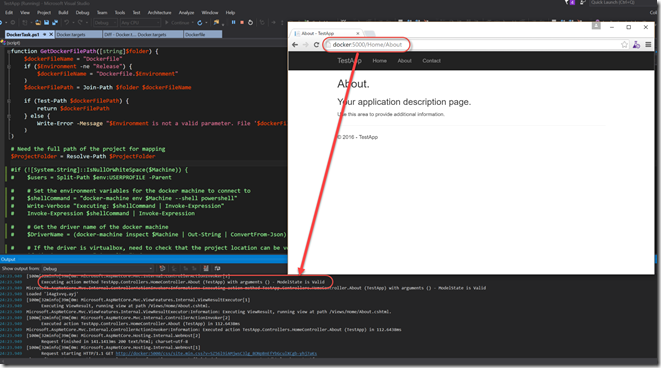
Debugging then actually worked – the script starts up a container (based on the image that gets created when you build) and attaches the remote debugger. Pretty sweet now that it’s working!
In the above image you can see how I’m navigating to the About page (the url is http://docker:5000) and VS is spewing logging into the console showing the server (in the container) responding to the request).
One more issue – the clean command wasn’t working. I kept getting this error: The handle could not be duplicated during redirection of handle 1. Turns out some over-eager developer had the following line in function Clean() in the DockerTask.ps1 file:
Invoke-Expression "cmd /c $shellCommand `"*>&1`"" | Out-Null
I changed *>&1
to 2>&1
like this:
Invoke-Expression "cmd /c $shellCommand `"2>&1`"" | Out-Null
And now the clean was working great.
So I could get an ASP.NET Core 1.0 app working in VS in a container (with some work). Now for build and release automation in VSTS!
Build and Release in VSTS
In order to execute Docker commands during build or release in VSTS, you need to install the Docker extension from the marketplace. Once you’ve installed it, you’ll get some new service endpoint types as well as a Docker task for builds and releases. You need two connections: one to a Docker registry (like DockerHub) and one for a Docker host. Images are built on the Docker host and published to the registry during a build. Then an image can be pulled from the registry and run on the host during a release. So I created a new private DockerHub repo (using the account that I created on DockerHub to get access to Docker for Windows). This info I used to create the Docker registry endpoint. Next I copied all the keys I created on my Azure Docker host and created a service endpoint for my Docker host. The trick here was the URL – initially I had “http://my-docker-host.cloudapp.net:2376” but that doesn’t work – it has to be “tcp://my-docker-host.cloudapp.net:2376”.
The cool thing about publishing to the repo is that you can have any number of hosts pull the image to run it!
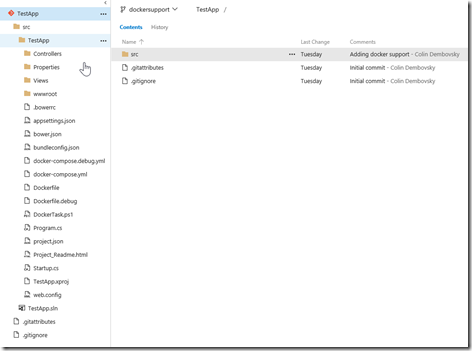
Now I had the endpoints ready for build/deploy. I then added my solution to a Git repo and pushed to VSTS. Here’s the project structure:
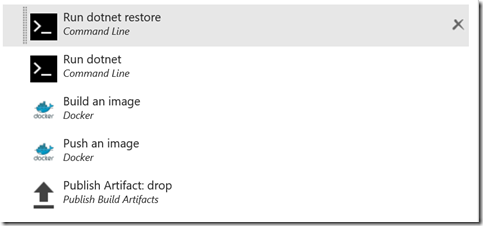
I then set up a build. In the VSTS Docker article, they suggest just two Docker tasks: the first with a “Build” action and the second with a “Push” action. However, I think this is meant to copy the source to the image and have the image do a dotnet restore – else how it work? However, I wanted the build to do the dotnet restore and publish (and test) and then just have the output bundled into the Docker image (as well as uploaded as a build drop). So I had to include two “run command” tasks and a publish build artifacts task. Here’s what my build definition ended up looking like:
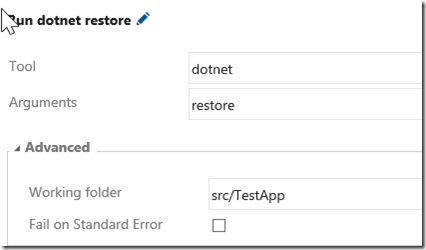
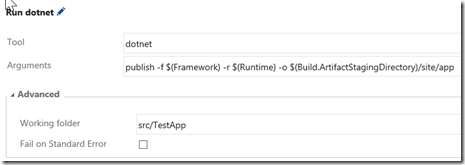
The first two commands are fairly easy – the trick is setting the working directory (to the folder containing the project) and the correct framework and runtimes for running inside a Docker container:
You’ll see that I output the published site to $(Build.ArtifactStagingDirectory)/site/app which is important for the later Docker commands.
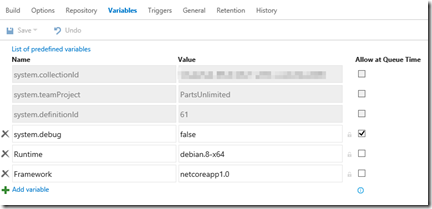
I also created two variables (the values of which I got from the DockerTask.ps1 script) for this step:
For building the Docker image, I specified the following arguments:
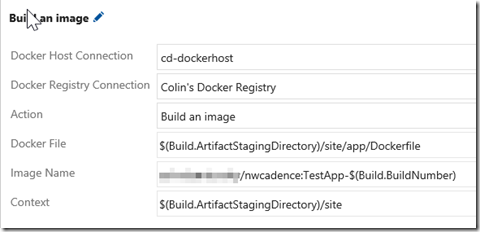
I use the two service endpoints I created earlier and set the action to “Build an Image”. I then specify the path to the Dockerfile – initially I browsed to the location in the src folder, but I want the published app so I changed this to the path in the artifact staging directory (otherwise Docker complains that the Dockerfile isn’t within the context). I then specify a repo/tag name for the Image Name, and use the build number for the version. Finally, the context is the folder which contains the “app” folder – the Dockerfile needs to be in this location. This location is used as the root for any Dockerfile COPY commands.
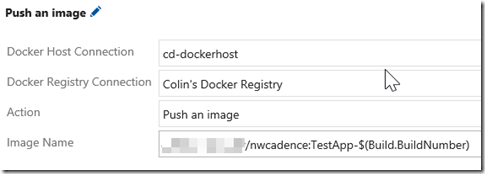
Next step is publishing the image – I use the same endpoints, change the action to “Push an image” and specify the same repo/tag name:
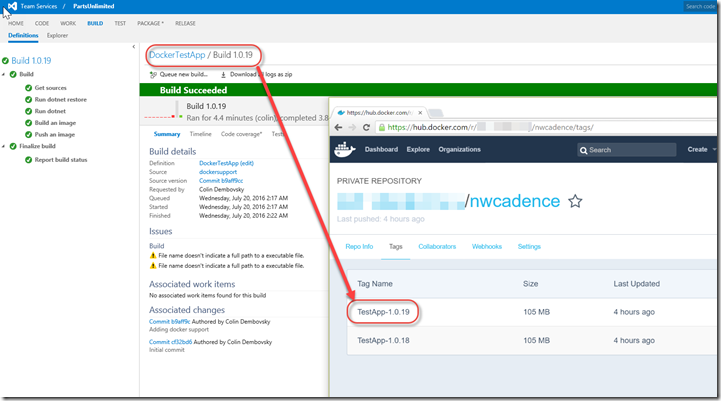
Now after running the build, I can see the image in my DockerHub repo (you can see how the build number and tag match):
Now I could turn to the release. I have a single environment release with a single task:
I named the ARG for the port in my Dockerfile APP_PORT, so I make sure it’s set to 5000 in the “Environment Variables” section. The example I followed had the HOST_PORT specified as well – I left that in, though I don’t know if it’s necessary. I linked the release to the build, so I can use the $(Build.BuildNumber) to specify which version (tag) of the container this release needs to pull.
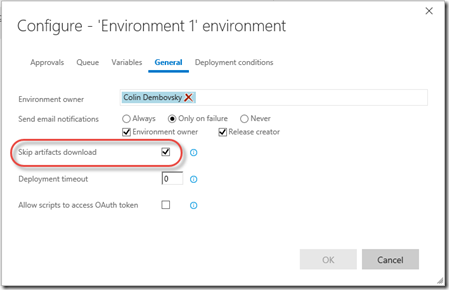
Initially the release failed while attempting to download the drops. I wanted the drops to enable deployment of the build somewhere else (like Azure webapps or IIS), so this release doesn’t need them. I configured this environment to “Skip artifact download”:
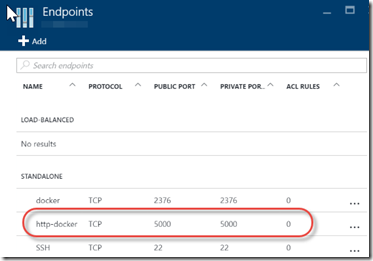
Lo and behold, the release worked after that! Unfortunately, I couldn’t browse to the site (connection refused). After a few moments of thinking, I realized that the Azure VM probably didn’t allow traffic on port 5000 – so I headed over to the portal and added an new endpoint (blegh – ARM network security groups are so much better):
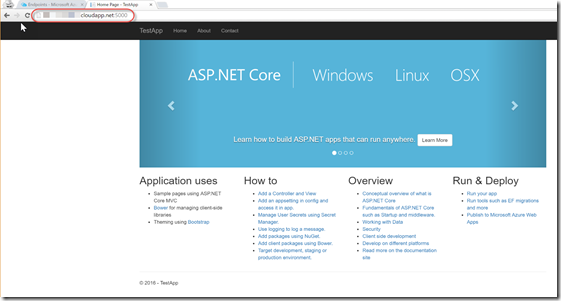
After that, I could browse to the ASP.NET Core 1.0 App that I developed in VS, debugged in Docker for Windows, source controlled in Git in VSTS, built and pushed in VSTS build and released in VSTS Release Management. Pretty sweet!
Conclusion
The Docker workflow is compelling, and having it work (nearly) out the box for .NET Core is great. I think teams should consider investing into this workflow as soon as possible. I’ve said it before, and I’ll say it again – containers are the way of the future! Don’t get left behind – start learning Docker today and skill up for the next DevOps wave – especially if you’re embarking on .NET Core dev!
Happy Dockering!

