DevOps with Kubernetes and VSTS: Part 2
In Part 1 I looked at how to develop multi-container apps using Kubernetes (k8s) - and more specifically, minikube, which is a full k8s environment that runs a single node on a VM on your laptop. In that post I walk through cloning this repo (be sure to look at the docker branch) which contains two containers: a DotNet Core API container and a frontend SPA (Aurelia) container (also hosted as static files in a DotNet Core app). I show how to build the containers locally and get them running in minikube, taking advantage of ConfigMaps to handle configuration.
In this post, I will show you how to take the local development into CI/CD and walk through creating an automated build/release pipeline using VSTS. We’ll create an Azure Container Registry and Azure Container Services using k8s as the orchestration mechanism.
I do recommend watching Nigel Poulton’s excellent Getting Started with Kubernetes PluralSight course and reading this post by Atul Malaviya from Microsoft. Nigel’s course was an excellent primer into Kubernetes and Atul’s post was helpful to see how VSTS and k8s interact - but neither course nor post quite covered a whole pipeline. How do you update your images in a CI/CD pipeline was a question not answered to my satisfaction. So after some experimentation, I am writing this post!
Creating a k8s Environment using Azure Container Services
You can run k8s on-premises, or in AWS or Google Cloud. However, I think Azure Container Services makes spinning up an k8s cluster really straightforward. However, the pipeline I walk through in this post is cloud-host agnostic - it will work against any k8s cluster. We’ll also set up a private Container Registry in Azure, though once again, you can use any container registry you choose.
To spin up a k8s cluster you can use the portal, but the Azure CLI makes it a snap and you get to save the keys you’ll need to connect, so I’ll use that mechanism. I’ll also use Bash for Windows with kubectl, but any platform running kubectl and the Azure CLI will do.
Here are the commands:
# set some variables
export RG="cd-k8s"
export clusterName="cdk8s"
export location="westus"
# create a folder for the cluster ssh-keys
mkdir cdk8s

# login and create a resource group
az login
az group create --location $location --name $RG

# create an ACS k8s cluster
az acs create --orchestrator-type=kubernetes --resource-group $RG --name=$ClusterName --dns-prefix=$ClusterName --generate-ssh-keys --ssh-key-value ~/cdk8s/id_rsa.pub --location $location --agent-vm-size Standard_DS1_v2 --agent-count 2

# create an Azure Container Registry
az acr create --resource-group $RG --name $ClusterName --location $location --sku Basic --admin-enabled

# configure kubectl
az acs kubernetes get-credentials --name $ClusterName --resource-group $RG --file ~/cdk8s/kubeconfig --ssh-key-file ~/cdk8s/id_rsa
export KUBECONFIG="~/cdk8s/kubeconfig"

# test connection
kubectl get nodes
NAME STATUS AGE VERSION
k8s-agent-96607ff6-0 Ready 17m v1.6.6
k8s-agent-96607ff6-1 Ready 17m v1.6.6
k8s-master-96607ff6-0 Ready,SchedulingDisabled 17m v1.6.6
Notes:
- Lines 2-4: create some variables
- Line 6: create a folder for the ssh-keys and kubeconfig
- Line 9: login to Azure (this prompts you to open a browser with the device login - if you don’t have an Azure subscription create a free one now!)
- Line 10: create a resource group to house all the resources we’re going to create
- Line 13: create a k8s cluster using the resource group we just created and the name we pass in; generate ssh-keys and place them in the specified folder; we want 2 agents (nodes) with the specified VM size
- Line 16: create an Azure Container registry in the same resource group with admin access enabled
- Line 19: get the credentials necessary to connect to the cluster using kubectl; use the supplied ssh-key and save the creds to the specified kubeconfig file
- Line 20: tell kubectl to use this config rather than the default config (which may have other k8s clusters or minikube config)
- Line 23: test that we can connect to the cluster
- Lines 24-27: we are indeed connecting successfully!
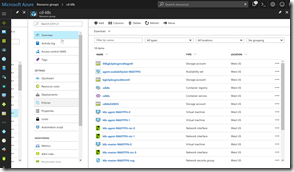
If you open a browser and navigate to the Azure portal and then open your resource group, you’ll see how much stuff got created by the few preceding simple commands:
Don’t worry - you’ll not need to manage these resources yourself. Azure and the k8s cluster manage them for you!
Namespaces
Before we actually create the build and release for our container apps, let’s consider the promotion model. Typically there’s Dev->UAT->Prod or something similar. In the case of k8s, minikube is the local dev environment - and that’s great since this is a full k8s cluster on your laptop - so you get to run your code locally including using k8s “meta-constructs” such as configMaps. So what about UAT and Prod? You could spin up separate clusters, but that could end up being expensive. You can also share the prod cluster resources by leveraging namespaces. Namespaces in k8s can be security boundaries, but they can also be isolation boundaries. I can deploy new versions of my app to a dev namespace - and even though that namespace shares the resources of the prod namespace, it’s completely invisible, including its own IPs etc. Of course I shouldn’t load test in this configuration since loading the dev namespace is going to potentially steal resources from prod apps. This is conceptually similar to deployment slots in Azure App Services - they can be used to test apps lightly before promoting to prod.
When you spin up a k8s cluster, besides kube-system and kube-public namespaces (which house the k8s pods) there is a “default” namespace. If you don’t specify otherwise, any services, deploymens or pods you create will go to this namespace. However, let’s create two additional namespaces: dev and prod. Here’s the yml:
apiVersion: v1
kind: Namespace
metadata:
  name: dev
---
apiVersion: v1
kind: Namespace
metadata:
  name: prod
This file contains the definitions for both namespaces. Run the apply command to create the namespaces. Once completed, you can list all the namespaces in the cluster:
kubectl apply -f namespaces.yml
namespace "dev" created
namespace "prod" created

kubectl get namespaces
NAME STATUS AGE
default Active 27m
dev Active 20s
kube-public Active 27m
kube-system Active 27m
prod Active 20s
Configuring the Container Registry Secret
One more piece of setup before we get to the code: when the k8s cluster is pulling images to run, we’re going to want it to pull from the Container Registry we just created. Access to this registry is secured since this is a private registry. So we need to configure a registry secret that we can just reference in our deployment yml files. Here are the commands:
az acr credential show --name $ClusterName --output table
USERNAME PASSWORD PASSWORD2
---------- -------------------------------- --------------------------------
cdk8s some-long-key-1 some-long-key-2

kubectl create secret docker-registry regsecret --docker-server=$ClusterName.azurecr.io --docker-username=$ClusterName --docker-password=<some-long-key-1> --docker-email=admin@azurecr.io
secret "regsecret" created
The first command uses az to get the keys for the admin user (the admin username is the same as the name of the Container registry: so I created cdk8s.azurecr.io and so the admin username is cdk8s). Pass in one of the keys (it doesn’t really matter which one) as the password. The email address is not used, so this can be anything. We now have a registry secret called “regsecret” that we can refer to when deploying to the k8s cluster. K8s will use this secret to authenticate to the registry.
Configure VSTS Endpoints
We now have the k8s cluster and container registry configured. Let’s add these endpoints to VSTS so that we can push containers to the registry during a build and perform commands against the k8s cluster during a release. The endpoints allow us to abstract away authentication so that we don’t need to store credentials in our release definitions directly. You can also restrict who can view/consume the endpoints using endpoint roles.
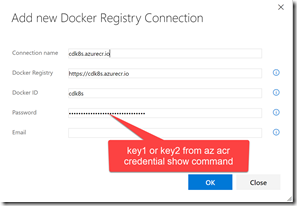
Open VSTS and navigate to a Team Project (or just create a new one). Go to the team project and click the gear icon to navigate to the settings hub for that Team Project. Then click Services. Click “+ New Services” and create a new Docker Registry endpoint. Use the same credentials you used to create the registry secret in k8s using kubectl:
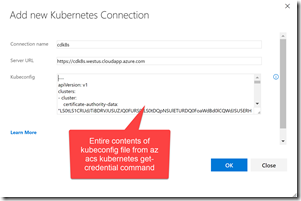
Next create a k8s endpoint. For the url, it will be https://$ClusterName.$location.cloudapp.azure.com (where clustername and location are the variables we used earlier to create the cluster). You’ll need to copy the entire contents of the ~/cdk8s/kubeconfig file (or whatever you called it) that was output when you ran the az acs kubernetes get-credential command into the credentials textbox:
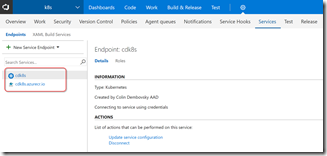
We now have two endpoints that we can use in the build/release definitions:
The Build
We can now create a build that compiles/tests our code, creates docker images and pushes the images to the Container Registry, tagging them appropriately. Click on Build & Release and then click on Builds to open the build hub. Create a new build definition. Select the ASP.NET Core template and click apply. Here are the settings we’ll need:
- Tasks->Process: Set the name to something like k8s-demo-CI and select the “Hosted Linux Preview” queue
- Options: change the build number format to “1.0.0$(rev:.r)” so that the builds have a 1.0.0.x format
- Tasks->Get Sources: Select the Github repo, authorizing via OAuth or PAT. Select the AzureAureliaDemo and set the default branch to docker. You may have to fork the repo (or just import it into VSTS) if you’re following along.
- Tasks->DotNet Restore - leave as-is
- Tasks->DotNet Build - add “–version-suffix $(Build.BuildNumber)” to the build arguments to match the assembly version to the build number
- Tasks->DotNet Test - disable this task since there are no DotNet tests in this solution (you can of course re-enable this task when you have tests)
- Tasks->Add an “npm” task. Set the working folder to “frontend” and make sure the command is “install”
- Tasks->Add a “Command line” task. Set the tool to “node”, the arguments to “node_modules/aurelia-cli/bin/aurelia-cli.js test” and the working folder to “frontend”. This will run Aurelia tests.
- Tasks->Add a “Publish test results” task. Set “Test Results files” to “test*.xml” and “Search Folder” to “$(Build.SourcesDirectory)/frontend/testresults”. This publishes the Aurelia test results.
- Tasks->Add a “Publish code coverage” task. Set “Coverage Tool” to “Cobertura”, “Summary File” to “$(Build.SourcesDirectory)/frontend/reports/coverage/cobertura.xml” and “Report Directory” to “$(Build.SourcesDirectory)/frontend/reports/coverage/html”. This publishes the Aurelia test coverage results.
- Tasks->Add a “Command line” task. Set the tool to “node”, the arguments to “node_modules/aurelia-cli/bin/aurelia-cli.js build –env prod” and the working folder to “frontend”. This transpiles, processes and packs the Aurelia SPA app.
- Tasks->DotNet Publish. Change the Arguments to “-c $(BuildConfiguration) -o publish” and uncheck “Zip Published Projects”
- Tasks->Add a “Docker Compose” task. Set the “Container Registry Type” to “Azure Container Registry” and set your Azure subscription and container registry to the registry we created an endpoint for earlier. Set “Additional Docker Compose Files” to “docker-compose.vsts.yml”, the action to “Build service images” and “Additional Image Tags” to “$(Build.BuildNumber)” so that the build number is used as the tag for the images.
- Clone the “Docker Compose” task. Rename it to “Push service images” and change the action to “Push service images”. Check the “Include Latest Tag” checkbox.
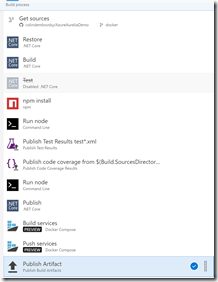
- Tasks->Publish Artifact. Set both “Path to Publish” and “Artifact Name” to k8s. This publishes the k8s yml files so that they are available in the release.
The final list of tasks looks something like this:
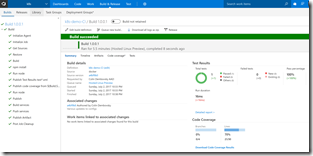
You can now Save and Queue the build. When the build is complete, you’ll see the test/coverage information in the summary.
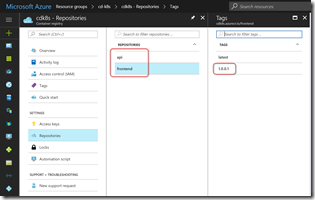
You can also take a look at your container registry to see the newly pushed service images, tagged with the build number.
The Release
We can now configure a release that will create/update the services we need. For that we’re going to need to manage configuration. Now we could just hard-code the configuration, but that could mean sensitive data (like passwords) would end up in source control. I prefer to tokenize any configuration and have Release Management keep the sensitive data outside of source control. VSTS Release Management allows you to create secrets for individual environments or releases or you can create them in reusable Variable Groups. You can also now easily integrate with Azure Key Vault.
To replace the tokens with environment-specific values, we’re going to need a task that can do token substitution. Fortunately, I’ve got a (cross-platform) ReplaceTokens task in Colin’s ALM Corner Build & Release Tasks extension on the VSTS Marketplace. Click on the link to navigate to the page and click install to install the extension onto your account.
From the build summary page, scroll down on the right hand side to the “Deployments” section and click the “Create release” link. You can also click on Releases and create a new definition from there. Start from an Empty template and select your team project and the build that you just completed as the source build. Check the “Continuous Deployment” checkbox to automatically trigger a release for every good build.
Rename the definition to “k8s” or something descriptive. On the “General” tab change the release number format to “$(Build.BuildNumber)-$(rev:r)” so that you can easily see the build number in the name of the release. Back on Environments, rename Environment 1 to “dev”. Click on the “Run on Agent” link and make sure the Deployment queue is “Hosted Linux Preview”. Add the following tasks:
- Replace Tokens
- Source Path: browse to the k8s folder
- Target File Pattern: “*-release.yml”. This performs token replacement on any yml file with a name that ends in “-release.” There’s 3: back- and frontend service/deployment files and the frontend config file. This task finds the tokens in the file (with pre- and postfix __) and looks for variables with the same name. Each variable is replaced with its corresponding value. We’ll create the variables shortly.
- Kubernetes Task 1 (apply frontend config)
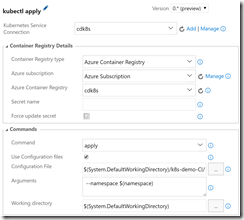
- Set the k8s connection to the endpoint you created earlier. Also set the connection details for the Azure Container Registry. This applies to all the Kubernetes tasks. Set the Command to “apply”, check the “Use Configuration Files” option and set the file to the k8s/app-demo-frontend-config-release.yml file using the file picker. Add “–namespace $(namespace)” to the arguments textbox.
- Kubernetes Task 2 (apply backend service/deployment definition)
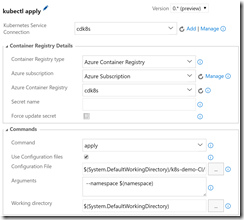
- Set the same connection details for the k8s service and Azure Container Registry. This time, set “Secret Name” to “regsecret” (this is the name of the secret we created when setting up the k8s cluster, and is also the name we refer to for the imagePullSecret in the Deployment definitions). Check the “Force update secret” setting. This ensures that the secret value in k8s matches the key from Azure. You could also skip this option since we created the key manually.
- Set the Command to “apply”, check the “Use Configuration Files” option and set the file to the k8s/app-demo-backend-release.yml file using the file picker. Add “–namespace $(namespace)” to the arguments textbox.
- Kubernetes Task 3 (apply frontend service/deployment definition)
- This is the same as the previous task except that the filename is k8s/app-demo-frontend-release.yml.
- Kubernetes Task 4 (update backend image)
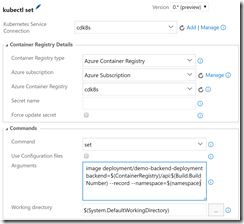
- Set the same connection details for the k8s service and Azure Container Registry. No secret required here. Set the Command to “set” and specify Arguments as “image deployment/demo-backend-deployment backend=$(ContainerRegistry)/api:$(Build.BuildNumber) –record –namespace=$(namespace)”.
- This updates the version (tag) of the container image to use. K8s will do a rolling update that brings new containers online and takes the old containers offline in such a manner that the service is still up throughout the bleed over.
- Kubernetes Task 5 (update the frontend image)
- Same as the previous task except the Arguments are “image deployment/demo-frontend-deployment frontend=$(ContainerRegistry)/frontend:$(Build.BuildNumber) –record –namespace=$(namespace)”
- Click on the “…” button on the “dev” card and click Configure Variables. Set the following values:
- BackendServicePort: 30081
- FrontendServicePort: 30080
- ContainerRegistry: <your container reg>.azurecr.io
- namespace: $(Release.EnvironmentName)
- AspNetCoreEnvironment: development
- baseUri: http://$(BackendServiceIP)/api
- BackendServiceIP: 10.0.0.1
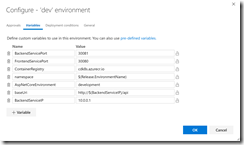
This sets environment-specific values for all the variables in the yml files. The Replace Tokens task takes care of injecting into the files for us. Let’s take a quick look at one of the tokenized files (tokenized lines are highlighted):
apiVersion: v1
kind: Service
metadata:
  name: demo-frontend-service
  labels:
    app: demo
spec:
  selector:
    app: demo
    tier: frontend
  ports:
    - protocol: TCP
      port: 80
      nodePort: __FrontendServicePort__
  type: LoadBalancer
---
apiVersion: apps/v1beta1
kind: Deployment
metadata:
  name: demo-frontend-deployment
spec:
  replicas: 2
  template:
    metadata:
      labels:
        app: demo
        tier: frontend
    spec:
      containers:
        - name: frontend
          image: __ContainerRegistry__ /frontend
          ports:
          - containerPort: 80
          env:
          - name: "ASPNETCORE_ENVIRONMENT"
            value: " __AspNetCoreEnvironment__"
          volumeMounts:
            - name: config-volume
              mountPath: /app/wwwroot/config/
          imagePullPolicy: Always
      volumes:
        - name: config-volume
          configMap:
            name: demo-app-frontend-config
      imagePullSecrets:
        - name: regsecret
A note on the value for BackendServiceIP: we use 10.0.0.1 as a temporary placeholder, since Azure will create an IP for this service when k8s spins up the backend service (you’ll see a public IP address in the resource group in the Azure portal). We will have to run this once to create the services and then update this to the real IP address so that the frontend service works correctly. We also use $(Release.EnvironmentName) as the value for namespace - so “dev” (and later “prod”) need to match the namespaces we created, including casing.
If the service/deployment and config don’t change, then the first 3 k8s tasks are essentially no-ops. Only the “set” commands are actually going to do anything. But this is great - since the service/deployment and config files can be applied idempotently! They change when they have to and don’t mess anything up when they don’t change - perfect for repeatable releases!
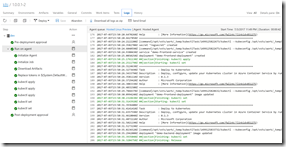
Save the definition. Click “+ Release” to create a new release. Click on the release number (it will be something like 1.0.0.1-1) to open the release. Click on logs to see the logs.
Once the release has completed, you can see the deployment in the Kubernetes dashboard. To open the dashboard, execute the following command:
az acs kubernetes browse -n $ClusterName -g $RG --ssh-key-file ~/cdk8s/id_rsa

Proxy running on 127.0.0.1:8001/ui
Press CTRL+C to close the tunnel...
Starting to serve on 127.0.0.1:8001
The last argument is the path to the SSH key file that got generated when we created the cluster - adjust your path accordingly. You can now open a browser to http://localhost:8001/ui. Change the namespace dropdown to “dev” and click on Deployments. You should see 2 successful deployments - each showing 2 healthy pods. You can also see the images that are running in the deployments - note the build number as the tag!
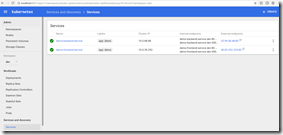
To see the services, click on Services.
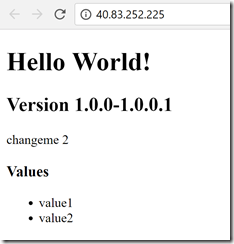
Now we have the IP address of the backend service, so we can update the variable in the release. We can then queue a new release - this time, the frontend configuration is updated with the correct IP address for the backend service (in this case 23.99.58.48). We can then browse to the frontend service IP address and see our service is now running!
Creating Prod
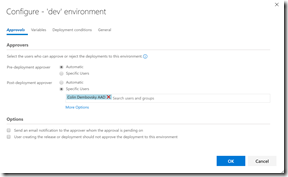
Now that we are sure that the dev environment is working, we can go back to the release and clone “dev” to “prod”. Make sure you specify a post-approval on dev (or a pre-approval on prod) so that there’s a checkpoint between the two environments.
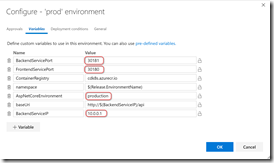
We can then just change the node ports, AspNetCoreEnvironment and BackendServiceIP variables and we’re good to go! Of course we need to deploy once to the prod namespace before we see the k8s/Azure assigned IP address for the prod backend and then re-run the release to update the config.
We could also remove the nodePort from the definitions altogether and let k8s decide on a node port - but if it’s explicit then we know what port the service is going to run on within the cluster (not externally).
I did get irritated having to specify “–namespace” for each command - so irritated, in fact, that I’ve created a Pull Request in the vsts-tasks Github repo to expose namespace as an optional UI element!
End to End
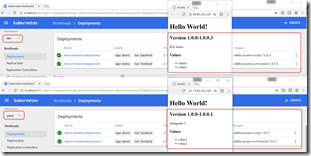
Now that we have the dev and prod environments set up in a CI/CD pipeline, we can make a change to the code. I’ll change the text below the version to “K8s demo” and commit the change. This triggers the build, creating a newer container image and running tests, which in turn triggers the release to dev. Now I can see the change in dev (which is on 1.0.0.3 or some newer version than 1.0.0.1), while prod is still on version 1.0.0.1.
Approve dev in Release Management and prod kicks off - and a few seconds later prod is now also on 1.0.0.3.
I’ve exported the json definitions for both the build and the release into this folder - you can attempt to import them (I’m not sure if that will work) but you can refer to them in any case.
Conclusion
k8s shows great promise as a solid container orchestration mechanism. The yml infrastructure-as-code is great to work with and easy to version control. The deployment mechanism means you can have very minimal (if any) downtime when deploying and having access to configMaps and secrets makes the entire process secure. Using the Azure CLI you can create a k8s cluster and Azure Container registry with a couple simple commands. The VSTS integration through the k8s tasks makes setting up CI/CD relatively easy - all in all it’s a great development workflow. Throw in minikube as I described in Part 1 of this series, which gives you a full k8s cluster for local development on your laptop, and you have a great dev/CI/CD workflow.
Of course a CI/CD pipeline doesn’t battle test the actual applications in production! I would love to hear your experiences running k8s in production - sound out in the comments if you have some experience of running apps in a k8s cluster in prod!
Happy k8sing!
