Custom CodeQL

CodeQL is a powerful code scanning tool that can be integrated into your pipelines. In this post I show you some basics, as well as how to develop and integrate custom queries into your pipelines.
- CodeQL to the Rescue
- CodeQL Scanning Example
- Customizing Scans
- Custom Queries
- Custom Queries in Your Action
- Conclusion
Security is a big deal. So big that the marketing folks have created the moniker “DevSecOps” to highlight a focus on security. I’ve never liked that term, since DevOps is supposed to include security by definition. However, integrating security into your culture and into your pipelines can be a challenge.
Typically, security is left to the end of the delivery life cycle. Perhaps you’re fortunate enough to work in a team where you are at least somewhat security conscious - but you probably don’t have InfoSec involved in your daily routine. This challenge has given rise to the term “shift left” where teams work to intentionally embed security earlier in the life cycle.
But how do you do that? Security professionals often work with arcane tools that don’t integrate into pipelines and are difficult to automate. If the tooling doesn’t support the culture shift, then it can be doomed from the start.
CodeQL to the Rescue
Enter CodeQL. CodeQL (or Code Query Language) is a code scanning tool. It was called Semmle (pronounced “sem-il”) before being acquired by GitHub. GitHub now offers CodeQL as part of the GitHub Advanced Security Suite.
CodeQL can be used for a variety of popular languages: C/C++, C#, JavaScript/TypeScript, Java, Python and Go. To integrate CodeQL into your workflow, you create an Action. The Action initializes the CodeQL scanner which intercepts compilation calls in order to build a database of your code. After compilation, you can run queries against the code database using CodeQL syntax.
The CodeQL syntax is very powerful - but, just like many other security tools, it too is arcane. However, the beauty of CodeQL is that you can tap into the community. There are some very smart security professionals in the community who have already written suites of queries that check for common security vulnerabilities and have open-sourced them! You don’t need to know how to write CodeQL to integrate it into your pipelines.
CodeQL Scanning Example
Let’s look at an example GitHub Action that performs a CodeQL scan on a Python repo:
    jobs:
      analyze:
        name: Analyze
        runs-on: ubuntu-latest

        strategy:
          fail-fast: false
          matrix:
            language: ['python']

        steps:
        - name: Checkout repository
          uses: actions/checkout@v2

        # Initializes the CodeQL tools for scanning.
        - name: Initialize CodeQL
          uses: github/codeql-action/init@v1
          with:
            languages: ${{ matrix.language }}

        # - name: Autobuild
        # uses: github/codeql-action/autobuild@v1

        - name: Perform CodeQL Analysis
          uses: github/codeql-action/analyze@v1
Notes:
- Lines 6 - 9: We define an array (matrix) of languages - in this case, just
python.fail-fastis set tofalsefor multiple languages: if one fails, we want the others to run to completion rather than aborting all the jobs. - Lines 12/13: We checkout the repo - nothing special here
- Lines 16 - 19: We initialize the CodeQL scanner - this sets up the interception calls so that CodeQL can build a database of our code as we compile. This step would cause the entire job to “fan out” to multiple jobs if we had more than 1 language specified.
- Lines 21/22: For Python we don’t run a compilation, so I’ve commented out the
autobuildstep. If you’re using a compiled language like C++ or C#, theautobuildwill attempt to build your code. If this fails, you can swap it out for your own set of steps to build your code. - Lines 24/25: This is where CodeQL will run a scan using a default set of queries
This already gets us a good way into integrating security into our pipelines. Without having to understand CodeQL or write our own custom queries, we can start scanning our code on whatever trigger makes sense. Typically, you want to scan on merges into your main branch. You may also want to add a scheduled scan so that the latest suites are run against your code even if it hasn’t changed.
Customizing Scans
There are a couple of levels of customizations for scanning. The easiest are customizing the suites and customizing the paths to include in your scans.
To do this, add a yml file to your repo - you can place it anywhere, but convention is to place this file in .github/codeql inside your repo. Let’s look at this simple config:
    name: "Custom CodeQL Config"

    queries:
    - uses: security-and-quality

    paths:
    - src

    paths-ignore:
    - src/node_modules
    - '**/*.test.js'
Notes:
- Line 1: we specifying a name for this configuration
- Line 4: we customize the scans to use the
security-and-qualitysuite (the default is justsecurity-extendedwhich does not include code quality scans) - Lines 6 - 11: we use
pathsandpaths-ignoreto specify which folders should be included or ignored in the scans
Ignoring paths is useful when you want to exclude test code or 3rd party libraries: though you’ll want to integrate Dependabotto ensure you’re scanning 3rd party libraries for vulnerabilities! Fortunately Dependabot is automatically enabled for public repos on GitHub.
Next, we update the codeql-action/init task to tell it to use our custom config file:
    - name: Initialize CodeQL
      uses: github/codeql-action/init@v1
      with:
        languages: ${{ matrix.language }}
        config-file: ./.github/codeql/codeql-config.yml
Now when scans are performed, CodeQL will read in the config file and configure itself according to our settings.
Custom Queries
We can, however, also create custom queries. As I mentioned previously, CodeQL is a strange and arcane language, so this is only recommended for advanced scenarios and users.
There are two considerations with creating custom queries: firstly, the development environment. You need to create and run the queries locally. Once you’ve created a query, you can integrate it into your pipeline with some more config customization.
Local Development
To develop queries locally, you should install VSCode. After that, install the CodeQL extension. If you don’t have any code to work on, you can install the starter workspace. However, I want to show you how you can get CodeQL working on your code.
The trick is to clone the CodeQL core libraries to your VSCode workspace. Clone your repo locally and open it in VSCode. Then clone the CodeQL repo to a location on your machine (not inside your repo). Finally, use File->Add Folder to Workspace to add the codeQL folder to your VSCode workspace. Your Workspace explorer should look something like this: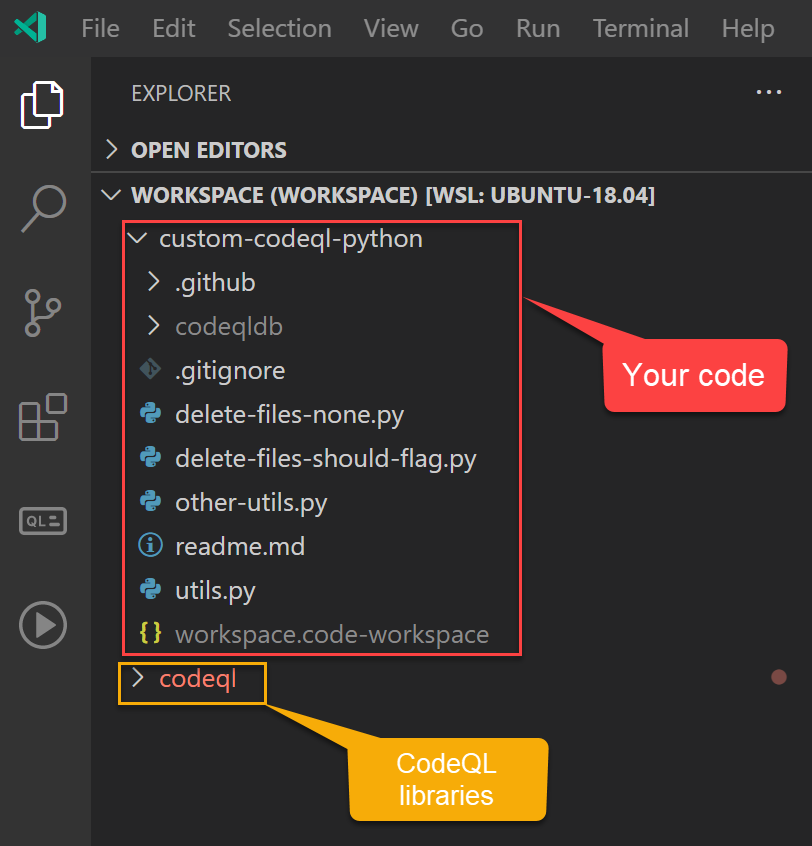
Now you need to create a code database. In a console, cd to your repo directory and run the following command:
codeql database create codeqldb --language=python
Of course you’ll have to update the --language setting to the appropriate language. This will create a code database inside a folder called codeqldb (you can customize that name too if needed). Don’t forget to add this folder to your .gitignore file! In your CI/CD workflows, CodeQL will create a new database from the latest code, so you don’t want this database in source control.
Now you can open your code database in the CodeQL extension. Click on the CodeQL icon in the extension pane. In the DATABASES section, click Add from folder and browse to the folder above - in my case, codeqldb. It should import the database and show a check-mark: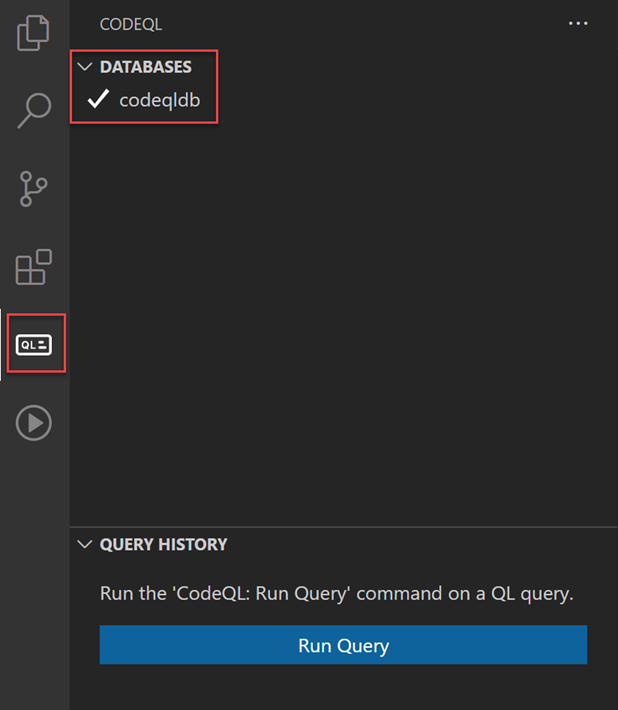
Now you can run queries that you write against the code database.
Writing CodeQL for Code Scanning
A full CodeQL tutorial is beyond the scope of this post, but you can follow these fun detective tutorials here. They’re good for introducing CodeQL concepts, but mapping these to actual code is a challenge.
If you just want to analyze your code, you can output whatever you want from a custom query. However, for custom queries to work in a pipeline, they must output specific values.
There are two kinds of query: problem and path-problem. problem is used for detecting issues in a specific location in the code, while path-problem is used to analyze flow between sources and sinks.
For problem queries, we must only output two values: a CodeQL object and a description string. You’ll also want to add meaningful metadata to describe what the query is doing - the metadata is used to mark up results in the repo itself. There is also the ability to write CodeQL help files that can guide developers on what the query is detecting and include examples of how to fix issues and links to CVEs and other useful information. Unfortunately, help files only render for standard queries, and not for custom queries.
Update: 11/23/2021 GitHub will now render custom help files! You can read more about how to do this in this post.
Example CodeQL Query
I was working with a customer that wanted to ensure that files are deleted in a certain way. As a naïve check, we wanted to find all calls to shutil.rmtree() in the code base and surface them as warnings for review. Here’s the problem CodeQL query we wrote:
    /**
    * @id python/call-to-shutil-rmtree
    * @name Use of shutil.rmtree
    * @description We have specific ways to delete files - this query
    * notifies when there are calls to `shutil.rmtree` so
    * that we can revue how deletion is done.
    * @kind problem
    * @problem.severity warning
    * @precision high
    * @tags correctness
    * rmtree
    *
    */

    import python

    from ControlFlowNode call, Value eval
    where eval = Value::named("shutil.rmtree") and
          call = eval.getACall()
    select call, "Call to 'shutil.rmtree' detected."
Let’s first examine the metadata:
- Line 2 - 4: we specify an
id,nameanddescriptionfor this query - Line 7: we specify that this is a
problemquery (as opposed to apath-problem) - Line 8: we specify the
severityof this query - in this case we just wanted to surface this as awarning - Line 9: we specify the
precisionishighsince we will not get many false positives for this query - Line 10/11: we add tags that can be used to filter/analyze results
We can now look at the query itself:
- Line 15: we import the
pythoncore libraries that contain definitions about python programs and constructs - Line 17: we are looking for
Valueobjects as well asControlFlowNodenodes - Line 18/19: we are looking for any
callthat is targetingshutil.rmtreeeither directly or indirectly - Line 20: we select the
callobject and specify a string message for matches
In VSCode, we write this query in a .ql file. This file can reside anywhere, but conventionally we should put it into the .github/codeql/custom-queries/<language> folder (where language is one of the supported CodeQL languages).
We can test this against our code by right-clicking the file and selecting CodeQL: Run Query: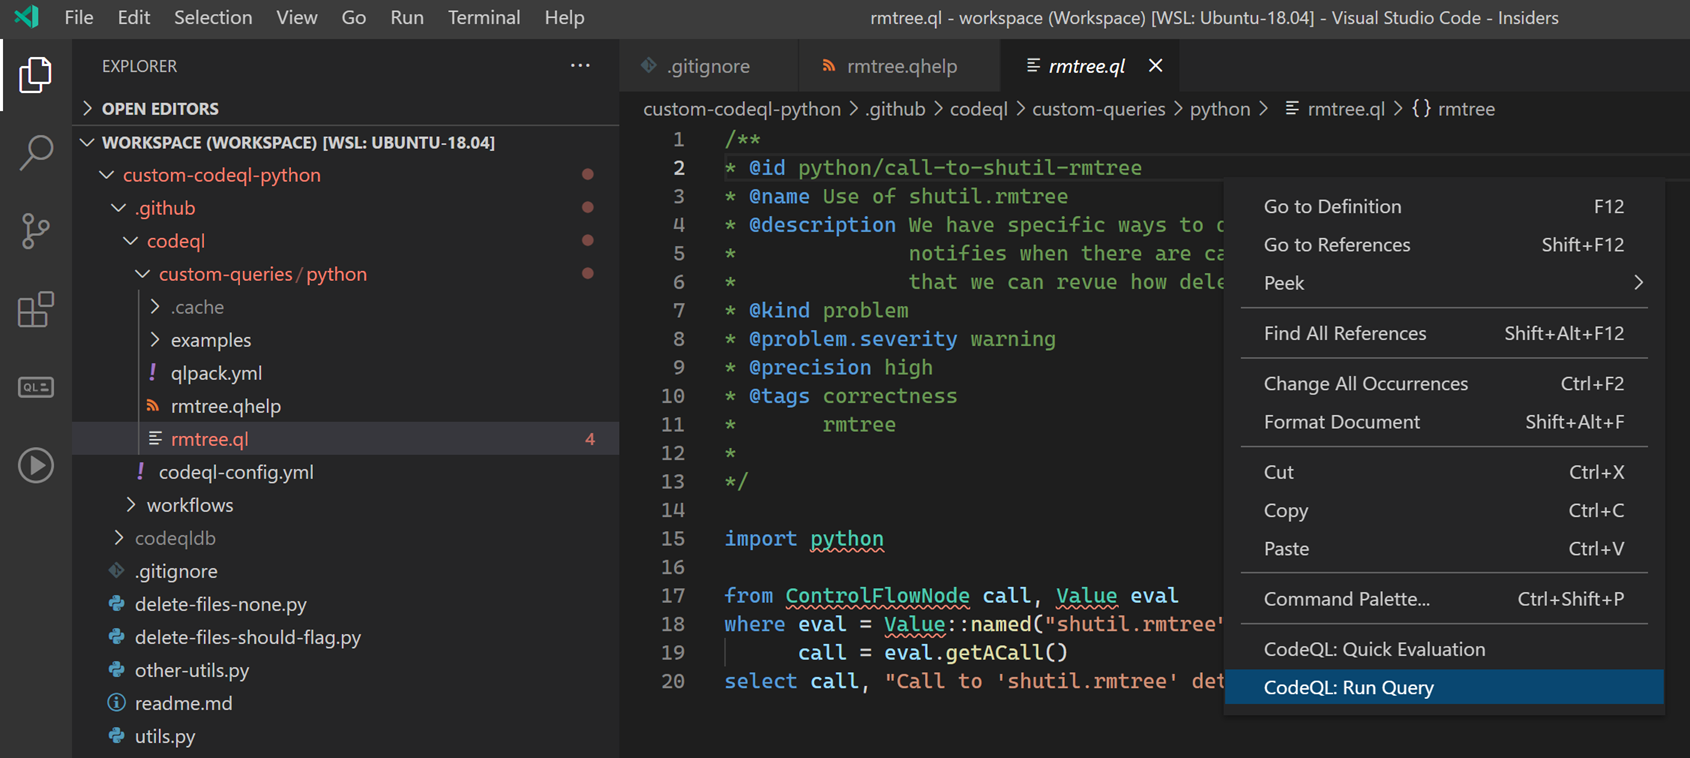
Assuming everything works, we should see results: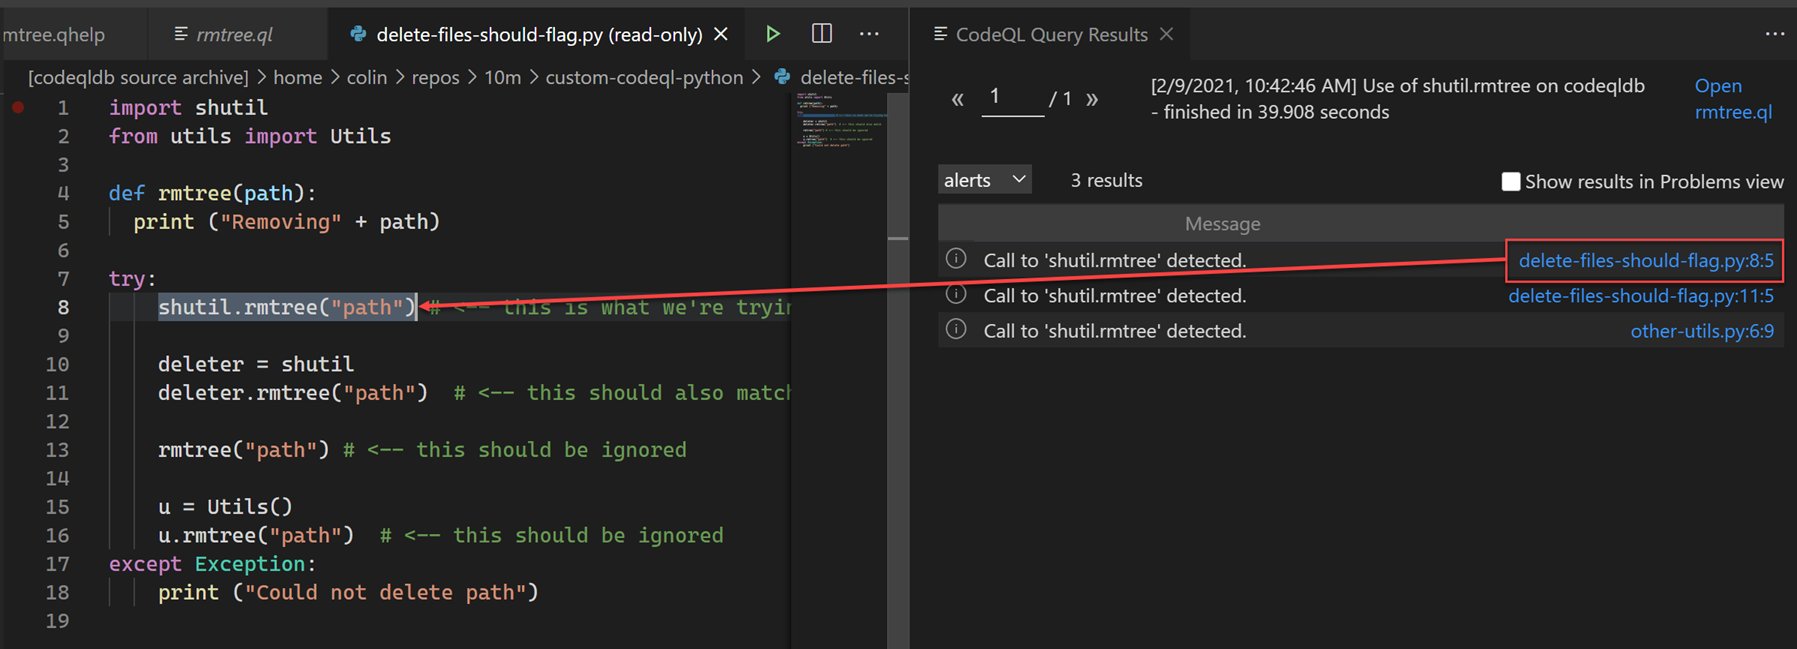
In the results pane on the right, we can see the message text as well as a link (this is generates from the object we selected). Clicking on the link will navigate us to the location of that object in the code.
Note: This does not simply do a regex match - CodeQL understands syntax, so it will find references to shutil.rmtree even if you try to obfuscate it by creating a var for shutil and calling var.rmtree. It will also exclude functions called rmtree that are not defined in shutil.
When this is run against a codebase that contains calls to shutil.rmtree, we’ll see alerts like this in the CodeQL scanning alerts section of the Security tab in the repo: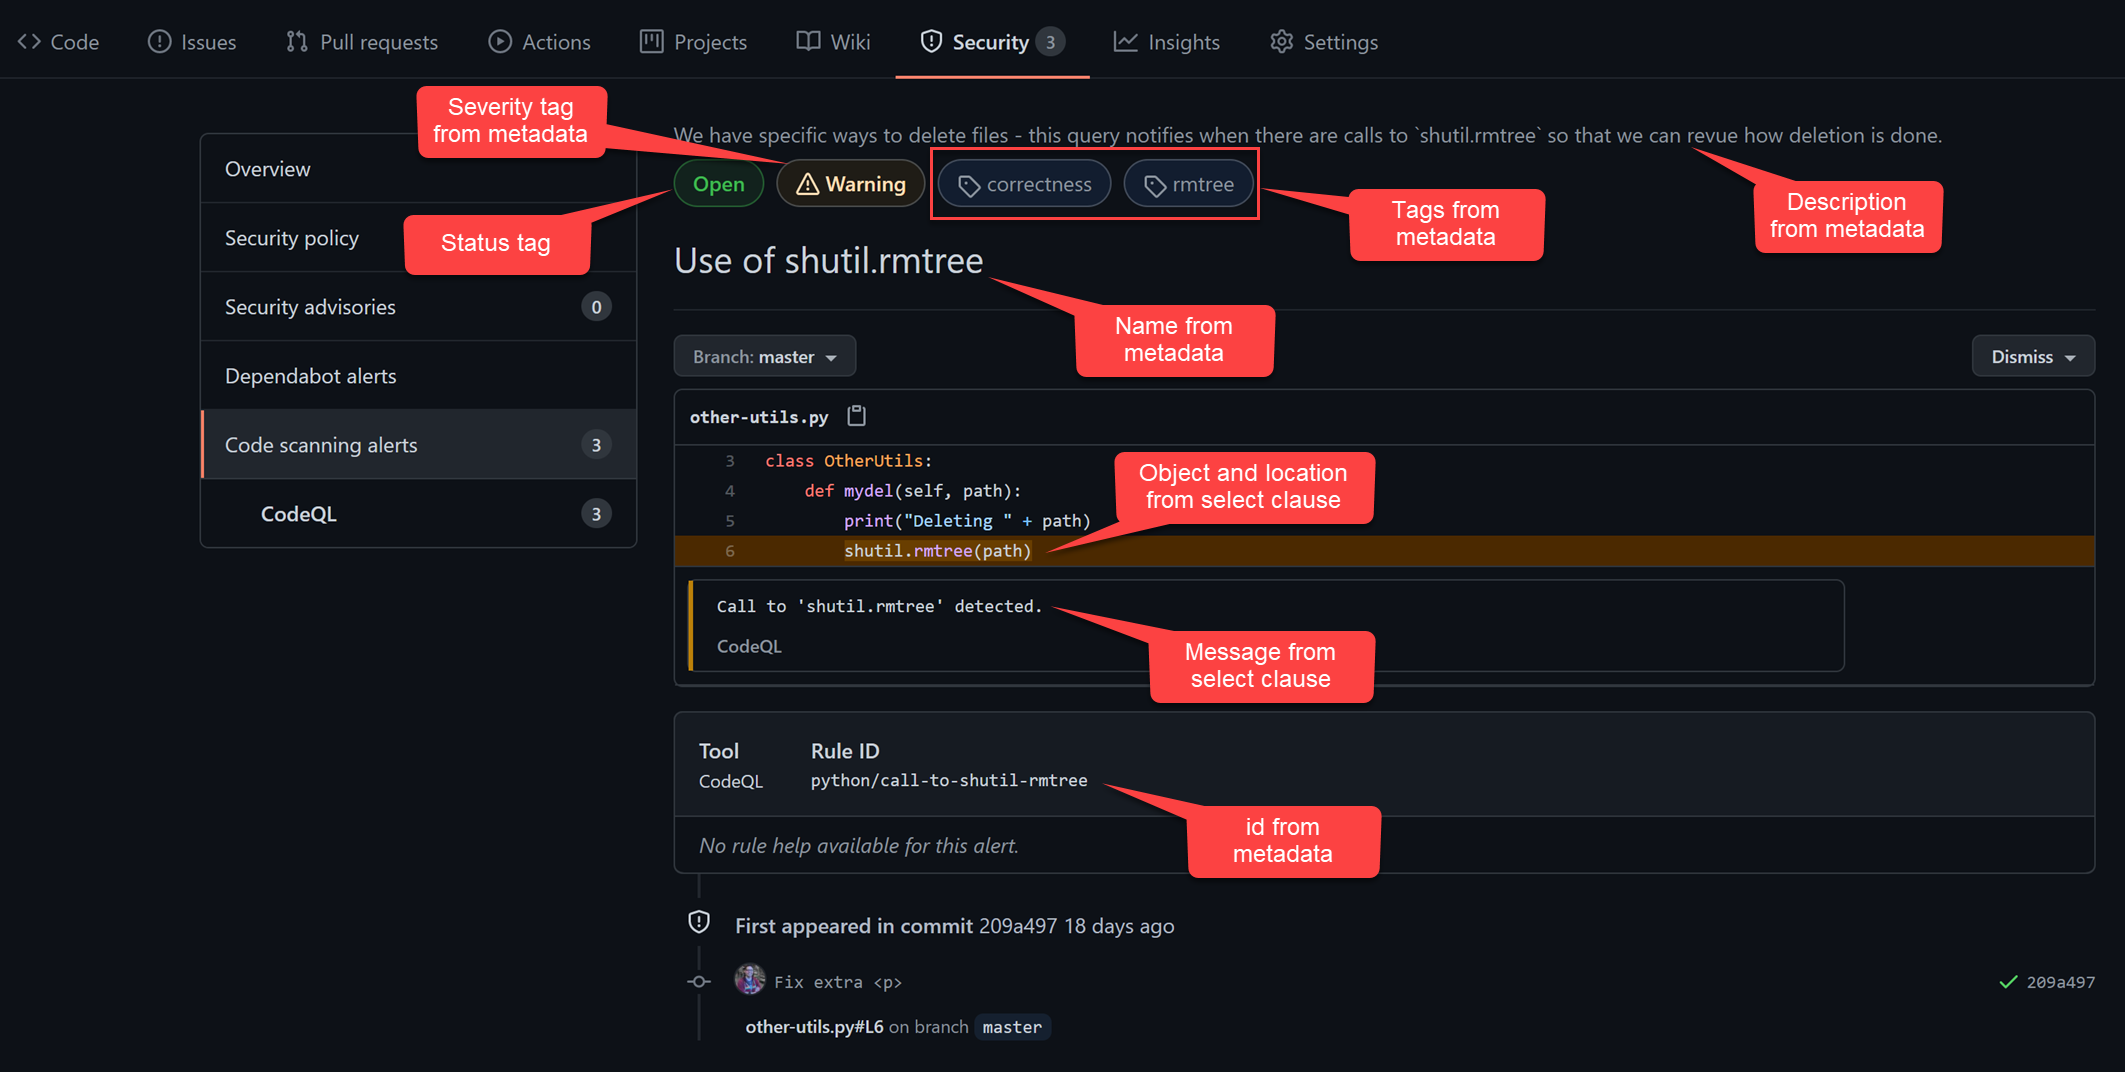
Custom Queries in Your Action
Now that we have a query, we need to customize the CodeQL config to tell the engine to include our query when performing a scan.
The first thing we need to do is create a qlpack file - this tells the CodeQL engine where to find any dependencies. In our case, we have a dependency on the python core libs, so we create a qlpack file like so:
    name: Custom Python Queries
    version: 0.0.0
    libraryPathDependencies:
    - codeql-python
This specifies a name for the pack (which is any query in this folder, so we put the qlpack file in the .github/codeql/custom-queries/python folder). We also specify a version and list the libraryPathDependencies.
Next, we update the codeql-config.yml file to look as follows:
    name: "Custom CodeQL Config"

    disable-default-queries: true

    queries:
    - uses: security-and-quality
    - uses: ./.github/codeql/custom-queries/python
We disable the default queries (so that we don’t get duplicates) and specify that we want to run the security-and-quality suite as well as the custom queries in the .github/codeql/custom-queries/python folder.
That’s it! Now we’ll get alerts as shown above.
Repo
The code I used can be found in this repo.
You cannot see the security alerts unless you are a repo owner, so if you want to follow along with this and see the results, you’ll have to fork the repo and then enable Actions (by default Actions are disabled on forks).
Conclusion
CodeQL is a powerful tool that can be incorporated fairly easily into your daily workflow. By using the standard queries, you get a strong foundation for securing your code.
If you have security professionals who can author CodeQL queries, you can integrate those queries into your pipelines to customize the scanning.
Unfortunately, the documentation for CodeQL, while extensive, proved to be a bit hard to apply to real-world examples. I also spent several hours trying to figure out why my qhelp file was not rendering - only to be informed by a GitHub engineer that custom query qhelp rendering is not currently supported - something the documentation does not mention anywhere.
However, assuming you can get a grasp on CodeQL, it is easy to integrate into scanning Actions. CodeQL is a great tool for shifting security left, so use it!
Happy securing!
Post image from ShutterStock
