Custom Build Task: Include Merged Changesets (and Work Items) in Build Report
Update 2013-07-24 : This activity is now part of Community TFS Build Extensions.
I’ve said it before and I’ll say it again – TFS is more than just source control. It’s more than just Work Item Tracking. One of the defining capabilities of TFS is integration across the ALM landscape.
Currently, if you’re using TeamBuild, you can check code in and build – and the build report will associate the checkins (and their associated work items) with the build. This works great if you don’t have branching… however, if you want to see the changesets that were merged in the build report too, you’re stuck. The information is in TFS – it’s just not easy to surface.
For example, let’s say you have a DEV-MAIN-LIVE branching hierarchy. Presumably, you’ll work on DEV and do a bunch of checkins. When you do a DEV build, you get a report of all the changes (and work items) that you’ve been working on. So far so good. Now let’s say you have a LIVE build that you merge to once in a while and it’s the LIVE build that you push to the testers. No problem – merge from DEV to MAIN, and then again from MAIN to LIVE. Run the build. Now the tester checks the build report to see what’s “in the build” and they see… nothing. Oh wait, there’s some merge or something – but no work items. What gives?
The “problem” here is that TeamBuild won’t traverse the merges for the build report. So the only change that’s associated to the LIVE build is the merge from MAIN. Not too helpful.
But wait: there’s an API that you can use to get the merge sources and so you *could* go and generate your own report. And after years of working with TFS, everyone says you *can* do that in theory, but I haven’t seen anyone actually go and do it.
The other alternative is to customize the build template to do the heavy lifting for you, so that your LIVE build report shows the merges as well as the merge sources (and their work items).
Custom Activity
Unfortunately this is not a trivial customization to make. I had to cuddle up around Reflector and manually “re-code” some Activities from the Microsoft.TeamFoundation.Build.Workflow.Activities namespace (the ones I wanted to use are marked internal – sigh). I’m getting quite good at taking code like this:
ParameterExpression expression;
ParameterExpression expression2;
ParameterExpression expression3;

DelegateInArgument<changeset> changeset = new DelegateInArgument<changeset>();

ForEach<changeset> each = new ForEach<changeset>();
each.Values = new InArgument<ienumerable<changeset>>(
    Expression.Lambda<func<activitycontext, ienumerable<changeset="">>>(
        Expression.Call(
            Expression.Property(
                Expression.Constant(this, typeof(AssociateChangesets)),
                (MethodInfo) methodof(AssociateChangesets.get_Changesets)),
                (MethodInfo) methodof(InArgument<ienumerable<changeset>>.Get,
                InArgument<ienumerable<changeset>>
            ),
            new Expression[]
            {
                expression = Expression.Parameter(typeof(ActivityContext), "env")
            }),
            new ParameterExpression[] { expression }
        )
    );

ActivityAction<changeset> action = new ActivityAction<changeset>();
action.Argument = changeset;
Sequence sequence = new Sequence();
WriteBuildInformation<associatedchangeset> item = new WriteBuildInformation<associatedchangeset>();
item.ParentToBuildDetail = new InArgument<bool>(true);
item.Value = new InArgument<associatedchangeset>(
    Expression.Lambda<func<activitycontext, associatedchangeset="">>(
        Expression.MemberInit(
            Expression.New((ConstructorInfo) methodof(AssociatedChangeset..ctor), new Expression[0]),
            new MemberBinding[]
            {
                Expression.Bind((MethodInfo) methodof(AssociatedChangeset.set_ChangesetId),
                Expression.Property(Expression.Call(Expression.Constant(changeset),
                (MethodInfo) methodof(DelegateInArgument<changeset>.Get, DelegateInArgument<changeset>),
                new Expression[] { expression2 = Expression.Parameter(typeof(ActivityContext), "env")
            }),
            (MethodInfo) methodof(Changeset.get_ChangesetId)
        )
    ),
    Expression.Bind((MethodInfo) methodof(AssociatedChangeset.set_ChangesetUri),
        Expression.Property(Expression.Call(Expression.Constant(changeset),
            (MethodInfo) methodof(DelegateInArgument<changeset>.Get, DelegateInArgument<changeset>),
            new Expression[] { expression2 }
        ),
        (MethodInfo) methodof(Changeset.get_ArtifactUri))
    ),
    Expression.Bind(
        (MethodInfo) methodof(AssociatedChangeset.set_CheckedInBy),
        Expression.Property(
            Expression.Call(Expression.Constant(changeset),
                (MethodInfo) methodof(DelegateInArgument<changeset>.Get, DelegateInArgument<changeset>),
                new Expression[] { expression2 }
            ),
            (MethodInfo) methodof(Changeset.get_OwnerDisplayName)
        )
    ),
    Expression.Bind((MethodInfo) methodof(AssociatedChangeset.set_Comment),
        Expression.Property(Expression.Call(
            Expression.Constant(changeset),
            (MethodInfo) methodof(DelegateInArgument<changeset>.Get, DelegateInArgument<changeset>),
            new Expression[] { expression2 }
        ),
        (MethodInfo) methodof(Changeset.get_Comment))
    )
    }
),
new ParameterExpression[] { expression2 }
));
sequence.Activities.Add(item);
WriteBuildMessage message = new WriteBuildMessage();
message.Importance = new InArgument<buildmessageimportance>(BuildMessageImportance.Low);
message.Message = new InArgument<string>(Expression.Lambda<func<activitycontext, string="">>(
    Expression.Call(
        null,
        (MethodInfo) methodof(ActivitiesResources.Format),
        new Expression[] {
            Expression.Constant("BuiltChangeset", typeof(string)),
            Expression.NewArrayInit(typeof(object),
            new Expression[] {
                Expression.Convert(Expression.Property(
                    Expression.Call(
                        Expression.Constant(changeset),
                        (MethodInfo) methodof(DelegateInArgument<changeset>.Get, DelegateInArgument<changeset>
                    ),
            new Expression[] {
                expression3 = Expression.Parameter(typeof(ActivityContext), "env")
            }
        ),
        (MethodInfo) methodof(Changeset.get_ChangesetId)
        ), typeof(object))
    })
    }),
     new ParameterExpression[] { expression3 }));

sequence.Activities.Add(message);
action.Handler = sequence;
each.Body = action;
and turning it into a Workflow Activity like this:

Anyway, I’ve created an “AssociateMergedChangesetsAndWorkItems” activity that you can plop into your Default workflow that will give you the merged changes too. There’s a little bit of work to get the custom activity in, but it’s nothing you can’t handle!
1. Copy your existing Default Workflow
Of course, by Default here I mean the workflow that you use to compile-and-test-and-associate-changesets-and-workitems. You may have already added some of your own customizations. No problem.
First, create a copy of your Default workflow (if you want to keep the original around). The easiest way to do this is to create a new build definition, then go to the Process page and expand the “Show Details” section at the top. Click the “New” button:

Now just select the “Copy” option and type a name for the new template. In this case I’m going from the DefaultTemplate11.1.xaml which comes out-the-box in TFS 2012).

Click OK and TFS will create a new XAML for you.
Open Source Control Explorer and go to your BuildProcessTemplates folder. Make sure you refresh to see the new workflow.
2. Import the Custom Assembly
Now check in ColinsALMCorner.CustomBuildTasks.dll (skip right to the bottom of this post for the attachment links) into a folder in Source Control – this folder is where any custom build assembly needs to be located. If you don’t have one, then I suggest you create it under the BuildProcessTemplates folder so that your workflows and custom activities exist together.

Now go to team explorer and go to the Builds pane. Click on the Action dropdown (see below) and select “Manage Build Controllers…”.

Select the Build Controller you want to run the builds through, and click “Properties…”. In the “Version control path to custom assemblies” section, select the folder you just imported the custom dll to. Click OK.

3. Create a Project for Customizing the Workflow
(If you’re using the DefaultTemplate and want to skip, you can download this project from the bottom of this post).
Now comes the painful part: in order to add custom activities in custom assemblies to workflows, you need to make the workflow part of a VS project.
So – File->New Project and select “Class Library” and give it a suitable name (I chose MergeWorkflow). Make sure you place it in a source controlled folder!
Delete the “Class1.cs” file (you won’t need it) and add a reference to ColinsALMCorner.CustomBuildTasks.dll (you can even make this reference the local path for the corresponding server path you used for your build controller!). Check this solution into TFS.
Now go back to Source Control Explorer and branch the Merge workflow that you created in Step 1. You’re going to branch this into your newly imported project folder:

Click OK. Now go back to the solution explorer and click on your project (not the solution, the project). Enable “View All Files” and include the XAML file. Your solution should now look like this:
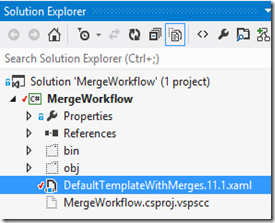
To get the project compiling, you’ll need to add a bunch of assemblies. These ones are from the GAC:
- System.Activities
- System.Activities.Presentation
- PresentationFramework
- WindowsBase
- System.Xaml
- System.Drawing
- Microsoft.TeamFoundation.Client
- Microsoft.TeamFoundation.Common
- Microsoft.TeamFoundation.Build.Client
- Microsoft.TeamFoundation.Build.Workflow
- Microsoft.TeamFoundation.VersionControl.Client
- Microsoft.TeamFoundation.VersionControl.Common
- Microsoft.TeamFoundation.WorkItemTracking.Client
These ones you’ll have to copy from a TFS server (if you don’t have it installed on your machine). Look in c:\Program Files\Microsoft Team Foundation Server 11.0\Tools as well as in the GAC folders (c:\windows\assembly\GAC_MSIL):
- Microsoft.TeamFoundation.TestImpact.BuildIntegration
- Microsoft.TeamFoundation.TestImpact.Client
You should now be able to compile the solution. Double click the workflow to open the designer.
4. Adding the Custom Activity
Now you can add in the custom activity. In the tabs at the bottom of the workflow designer, click on “Imports”. Then click the dropdown and add ColinsALMCorner.CustomBuildTasks to import it into the workflow.
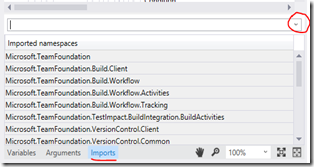
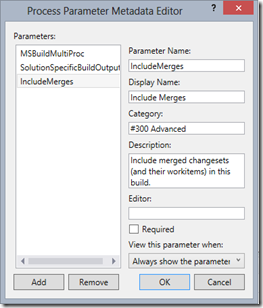
Click on Arguments and create a new Argument (direction: In, type: Boolean) called “IncludeMerges”. Set the default value to True. You can also specify the MetaData for this argument to expose it in the Build Definition wizard later.
Then click on Variables and add a variable called “associatedMergedChangesets” with Scope “Sequence” and type IList.
You’ll need to add the custom activity to the Toolbox. To do this, select a section in the toolbox, right click and select “Choose Items”. In the browse dialog, browse to ColinsALMCorner.CustomBuildActivities and click OK. There are a bunch of activities available, but the only one you really need is “AssociateMergedChangesetsAndWorkItems”.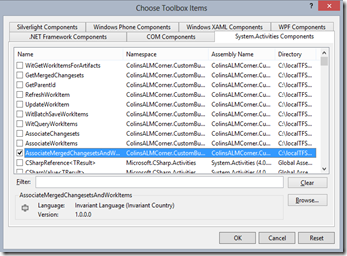
Now scroll down to the If called “If AssociateChangesetsAndWorkItems” (this is the default one in the workflow). Drop an “AssociateMergedChangesetsAndWorkItems” (that’s the new custom activity) into the workflow just below the “AssociateChangesetsAndWorkItems” activity. Set the properties as follows:
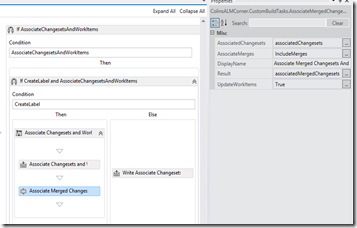
- AssociatedChangesets: set to associatedChangesets (this is the Result of the previous activity)
- AssociateMerges: set to IncludeMerges, the Argument you created earlier
- Result: set to associatedMergedChangesets, the Variable you created earlier
- UpdateWorkItems: set to True
Make sure the project builds, and check in.
5. Merge Back the Workflow
Once you’ve checked in, find the workflow XAML file in your project in Source Control Explorer. Right click, and merge it back to the template in the BuildProcessTemplates folder. Don’t forget to check in the merge!
Create a Build and Run it!
You’re now ready to run the build. Either create a new build definition or simply change the template of an existing build from the Default template to your newly customized template. Then go checkin, merge and build. Voila!
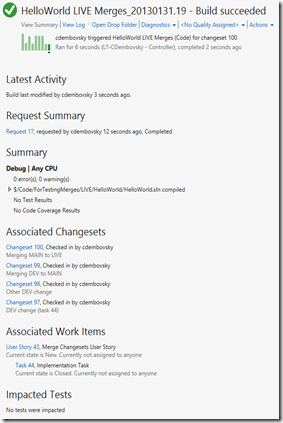
So for an example, I have User Story 43, which has a child Task 44. I work on the DEV branch and check in against Task 44 (changeset 97). I then make another DEV change, no work item (changeset 98). I then merge to MAIN (merging changes 97 and 98) in changeset 99. I then merge from MAIN to LIVE in changeset 100.
Now if you had this scenario and ran the “old” template, you’d get 1 associated changeset (100) and no associated work items. However, running your new flashy “merge-aware” template, you get 4 associated changesets and 2 associated work items (see the build output below). Much better!
Gotchas to be aware of
This does mean that the work items may end up having been associated with 2 (or more) builds. Let’s say you have a DEV build (for CI). In the example above, Task 44 would have its “IntegratedIn” in set to the DEV build. Then you merge DEV to MAIN and MAIN to LIVE, and run the merge workflow on the LIVE branch. The workflow will update the “IntegratedIn” field of Task 44 to the LIVE build. You’ll still see both associations in the History, but the Task’s “IntegratedIn” field is now updated to the latest build (the LIVE build) – which may or may not be what you want. For me, it makes sense this way. Now the build report is a REAL change-log (not just a log of the merge changesets).
Happy building!
P.S. Attachments
Here’s the link to the binaries on my skydrive. This zip file contains the dll (ColinsALMCorner.CustomBuildTasks) as well as the MergeWorkflow project. You can use this project to get started customizing your workflow. If you’re just using the default workflow without customizations, then you can use the workflow in this project instead of copying it etc. by checking the project into Source Control and then branching the template to the BuildProcessTemplates folder.
