Continuous Deployment of Service Fabric Apps using VSTS (or TFS)
Azure’s Service Fabric is breathtaking – the platform allows you to create truly “born in the cloud” apps that can really scale. The platform takes care of the plumbing for you so that you can concentrate on business value in your apps. If you’re looking to create cloud apps, then make sure you take some time to investigate Service Fabric.
Publishing Service Fabric Apps
Unfortunately, most of the samples (like this getting started one or this more real-world one) don’t offer any guidance around continuous deployment. They just wave hands and say, “Publish from Visual Studio” or “Publish using PowerShell”. Which is all well and good – but how do you actually do proper DevOps with ServiceFabric Apps?
Publishing apps to Service Fabric requires that you package the app and then publish it. Fortunately VSTS allows you to fairly easily package the app in an automated build and then publish the app in a release.
There are two primary challenges to doing this:
- Versioning. Versioning is critical to Service Fabric apps, so your automated build is going to have to know how to version the app (and its constituent services) correctly
- Publishing – new vs upgrade. The out-of-the-box publish script (that you get when you do a File->New Service Fabric App project) needs to be invoked differently for new apps as opposed to upgrading existing apps. In the pipeline, you want to be able to publish the same way – whether or not the application already exists. Fortunately a couple modifications to the publish script do the trick.
Finally, the cluster should be created or updated on the fly during the release – that’s what the ARM templates do.
To demonstrate a Service Fabric build/release pipeline, I’m going to use a “fork” of the original VisualObjects sample from the getting started repo (it’s not a complete fork since I just wanted this one solution from the repo). I’ve added an ARM template project to demonstrate how to create the cluster using ARM during the deployment and then I’ve added two publishing profiles – one for Test and one for Prod. The ARM templates and profiles for both Test and Prod are exactly the same in the repo – in real life you’ll have a beefier cluster in Prod (with different application parameters) than you will in test, so the ARM templates and profiles are going to look different. Having two templates and profiles gives you the idea of how to separate environments in the Release, which is all I want to demonstrate.
This entire flow works on TFS as well as VSTS, so I’m just going to show you how to do this using VSTS. I’ll call out differences for TFS when necessary.
Getting the Code
The easiest way is to just fork this repo on Github. You can of course clone the repo, then push it to a VSTS project if you prefer. For this post I’m going to use code that I’ve imported into a VSTS repo. If you’re on TFS, then it’s probably easiest to clone the repo and push it to your TFS server.
Setting up the Build
Unfortunately the Service Fabric SDK isn’t installed on the hosted agent image in VSTS, so you’ll have to use a private agent. Make sure the Service Fabric SDK is installed on the build machine. Use this help doc to get the bits.
The next thing you’ll need is my VersionAssemblies custom build task. I’ve bundled it into a VSTS marketplace extension. If you’re on VSTS, just click “Install” – if you’re on TFS, you’ll need to download it and upload it. You’ll only be able to do this on TFS 2015 Update 2 or later.
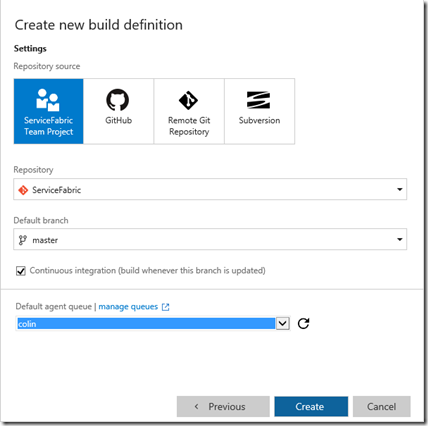
Now go to your VSTS account and navigate to the Code hub. Create a new Build definition using the Visual Studio template. Select the appropriate source repo and branch (I’m just going to use master) and select the queue with your private agent. Select Continuous Integration to queue the build whenever a commit is pushed to the repo:
Change the name of the build – I’ve called mine “VisualObjects”. Go to the General tab and change the build number format to be 1.0$(rev:.r)
This will give the build number 1.0.1, then 1.0.2, 1.0.3 and so on.
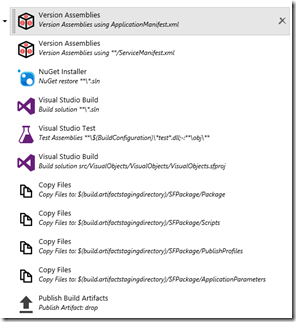
Now we want to change the build so that it will match the ApplicationTypeVersion (from the application manifest) and all the Service versions within the ServiceManifests for each service within the application. So click “Add Task” and add two “VersionAssembly” tasks. Drag them to the top of the build (so that they are the first two tasks executed).
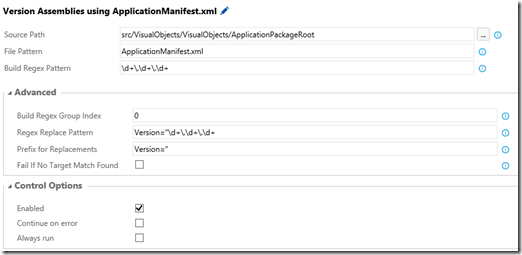
Configure the first one as follows:
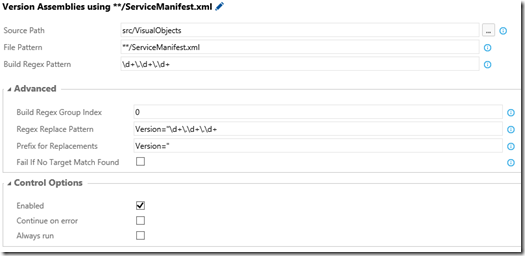
Configure the second one as follows:
The first task finds the ApplicationManifest.xml file and replaces the version with the build number. The second task recursively finds all the ServiceManifest.xml files and then also replaces the version number of each service with the build number. After the build, the application and service versions will all match the build number.
The next 3 tasks should be “NuGet Installer”, “Visual Studio Build” and “Visual Studio Test”. You can leave those as is.
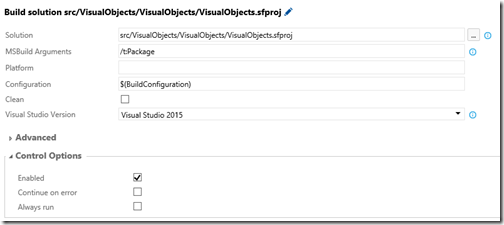
Add a new “Visual Studio Build” task and place it just below the test task. Configure the Solution parameter to the path of the .sfproj in the solution (src/VisualObjects/VisualObjects/VisualObjects.sfproj). Make the MSBuild Arguments parameter “/t:Package). Finally, add $(BuildConfiguration) to the Configuration parameter. This task invokes Visual Studio to package the Service Fabric app:
Now you’ll need to do some copying so that we get all the files we need into the artifact staging directory, ready for publishing. Add a couple “Copy” tasks to the build and configure them as follows:
This copies the Service Fabric app package to the staging directory.
This copies the Scripts folder to the staging directory (we’ll need this in the release to publish the app).
These tasks copy the Publish Profiles and ApplicationParameters files to the staging directory. Again, these are needed for the release.
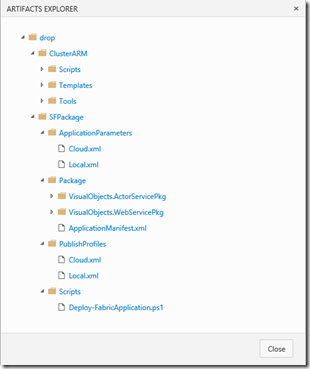
You’ll notice that there isn’t a copy task for the ARM project – that’s because the ARM project automagically puts its output into the staging directory for you when building the solution.
You can remove the Source Symbols task if you want to – it’s not going to harm anything if it’s there. If you really want to keep the symbols you’ll have to specify a network share for the symbols to be copied to.
Finally, make sure that your “Publish Build Artifacts” task is configured like this:
Of course you can also choose a network folder rather than a server drop if you want. The tasks should look like this:
Run the build to make sure that it’s all happy. The artifacts folder should look like this:
Setting up the Release
Now that the app is packaged, we’re almost ready to define the release pipeline. There’s a decision to make at this point: to ARM or not to ARM. In order to create the Azure Resource Group containing the cluster from the ARM template, VSTS will need a secure connection to the Azure subscription (follow these instructions). This connection is service principal based, so you need to have an AAD backing your Azure subscription and you need to have permissions to add new applications to the AAD (being an administrator or co-admin will work – there may be finer-grained RBAC roles for this, I’m not sure). However, if you don’t have an AAD backing your subscription or can’t create applications, you can manually create the cluster in your Azure subscription. Do so now if you’re going to create the cluster(s) manually (one for Test, one for Prod).
To create the release definition, go to the Release hub in VSTS and create a new (empty) Release. Select the VisualObjects build as the artifact link and set Continuous Deployment. This will cause the release to be created as soon as a build completes successfully. (If you’re on TFS, you will have to create an empty Release and then link the build in the Artifacts tab). Change the name of the release to something meaningful (I’ve called mine VisualObjects, just to be original).
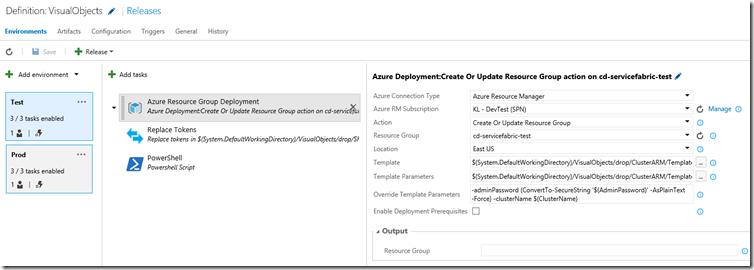
Change the name of the first environment to “Test”. Edit the variables for the environment and add one called “AdminPassword” and another called “ClusterName”. Set the admin password to some password and padlock it to make it a secret. The name that you choose for the cluster is the DNS name that you’ll use to address your cluster. In my case, I’ve selected “colincluster-test” which will make the URL of my cluster “colincluster-test.eastus.cloudapp.azure.com”.
Create or Update the Cluster
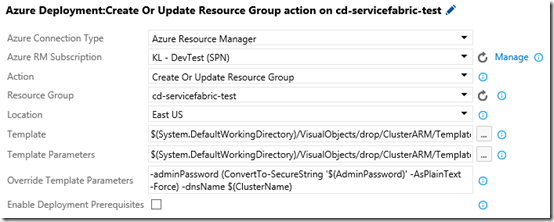
If you created the cluster manually, skip to the next task. If you want to create (or update) the cluster as part of the deployment, then add a new “Azure Resource Group Deployment” task to the Test environment. Set the parameters as follows:
- Azure Connection Type: Azure Resource Manager
- Azure RM Subscription: set this to the SPN connection you created from these instructions
- Action: Create or Update Resource Group
- Resource Group: a name for the resource group
- Location: the location of your resource group
- Template: brows to the TestServiceFabricClusterTemplate.json file in the drop using the browse button (…)
- Template Parameters: brows to the TestServiceFabricClusterTemplate.parameters.json file in the drop using the browse button (…)
- Override Template Parameters: set this to -adminPassword (ConvertTo-SecureString ‘$(AdminPassword)’ -AsPlainText -Force) –dnsName $(ClusterName)
You can override any other parameters you need to in the Override parameters setting. For now, I’m just overriding the clusterName and adminPassword parameters.
Replace Tokens
The Service Fabric profiles contain the cluster connection information. Since you could be creating the cluster on the fly, I’ve tokenized the connection setting in the profile files as follows:
<?xml version="1.0" encoding="utf-8"?>
<PublishProfile xmlns="http://schemas.microsoft.com/2015/05/fabrictools">
  <!-- ClusterConnectionParameters allows you to specify the PowerShell parameters to use when connecting to the Service Fabric cluster.
       Valid parameters are any that are accepted by the Connect-ServiceFabricCluster cmdlet.

       For a remote cluster, you would need to specify the appropriate parameters for that specific cluster.
         For example: <ClusterConnectionParameters ConnectionEndpoint="mycluster.westus.cloudapp.azure.com:19000" />

       Example showing parameters for a cluster that uses certificate security:
       <ClusterConnectionParameters ConnectionEndpoint="mycluster.westus.cloudapp.azure.com:19000"
                                    X509Credential="true"
                                    ServerCertThumbprint="0123456789012345678901234567890123456789"
                                    FindType="FindByThumbprint"
                                    FindValue="9876543210987654321098765432109876543210"
                                    StoreLocation="CurrentUser"
                                    StoreName="My" />

  -->
  <!-- Put in the connection to the Prod cluster here -->
  <ClusterConnectionParameters ConnectionEndpoint=" __ClusterName__.eastus.cloudapp.azure.com:19000" />
  <ApplicationParameterFile Path="..\ApplicationParameters\TestCloud.xml" />
  <UpgradeDeployment Mode="Monitored" Enabled="true">
    <Parameters FailureAction="Rollback" Force="True" />
  </UpgradeDeployment>
</PublishProfile>
You can see that there is a __ClusterName__ token (the highlighted line). You’ve already defined a value for cluster name that you used in the ARM task. Wouldn’t it be nice if you could simply replace the token called __ClusterName__ with the value of the variable called ClusterName? Since you’ve already installed the Colin’s ALM Corner Build and Release extension from the marketplace, you get the ReplaceTokens task as well, which does exactly that! Add a ReplaceTokens task and set it as follows:
IMPORTANT NOTE! The templates I’ve defined are not secured. In production, you’ll want to secure your clusters. The connection parameters then need a few more tokens like the ServerCertThumbprint and so on. You can also make these tokens that the ReplaceTokens task can substitute. Just note that if you make any of them secrets, you’ll need to specify the secret values in the Advanced section of the task.
Deploying the App
Now that we have a cluster and we have a profile that can connect to the cluster, and we have a package ready to deploy, we can invoke the PowerShell scrip to deploy! Add a “Powershell Script” task and configure it as follows:
- Type: File Path
- Script filename: browse to the Deploy-FabricApplication.ps1 script in the drop folder (under drop/SFPackage/Scripts)
- Arguments: Set to -PublishProfileFile ../PublishProfiles/TestCloud.xml -ApplicationPackagePath ../Package
The script needs to take at least the PublishProfile path and then the ApplicationPackage path. These paths are relative to the Scripts folder, so expand Advanced and set the working folder to the Scripts directory:
That’s it! You can now run the release to deploy it to the Test environment. Of course you can add other tasks (like Cloud Load Tests etc.) and approvals. Go wild.
Changes to the OOB Deploy Script
I mentioned earlier that this technique has a snag: if the release creates the cluster (or you’ve created an empty cluster manually) then the Deploy script will fail. The reason is that the profile includes an <UpgradeDeployment> tag that tells the script to upgrade the app. If the app exists, the script works just fine – but if the app doesn’t exist yet, the deployment will fail. So to work around this, I modified the OOB script slightly. I just query the cluster to see if the app exists, and if it doesn’t, the script calls the Publish-NewServiceFabricApplication cmdlet instead of the Publish-UpgradedServiceFabricApplication. Here are the changed lines:
$IsUpgrade = ($publishProfile.UpgradeDeployment -and $publishProfile.UpgradeDeployment.Enabled -and $OverrideUpgradeBehavior -ne 'VetoUpgrade') -or $OverrideUpgradeBehavior -eq 'ForceUpgrade'

# check if this application exists or not
$ManifestFilePath = "$ApplicationPackagePath\ApplicationManifest.xml"
$manifestXml = [Xml] (Get-Content $ManifestFilePath)
$AppTypeName = $manifestXml.ApplicationManifest.ApplicationTypeName
$AppExists = (Get-ServiceFabricApplication | ? { $_.ApplicationTypeName -eq $AppTypeName }) -ne $null

if ($IsUpgrade -and $AppExists)
Lines 1 to 185 of the script are original, (I show line 185 as the first line of this snippet). The if statement alters slightly to take the $AppExists into account – the remainder of the script is as per the OOB script.
Now that you have the Test environment, you can clone it to the Prod environment. Change the parameter values (and the template and profile paths) to make the prod-specific and you’re done! One more tip: if you change the release name format (under the general tab) to $(Build.BuildNumber)-$(rev:r)
then you’ll get the build number as part of the release number.
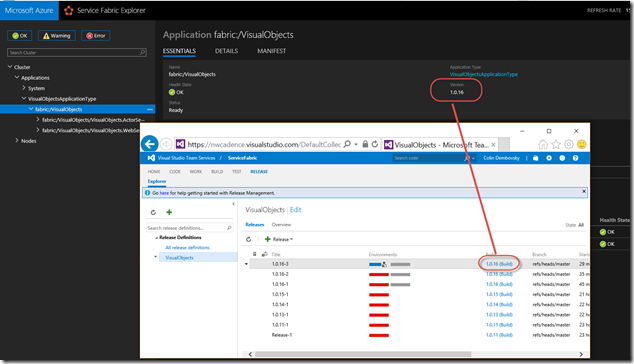
Here you can see my cluster with the Application Version matching the build number:
Sweet! Now I can tell which build was used for my application right from my cluster!
See the Pipeline in Action
A fun demo to do is to deploy the app and then open up the VisualObjects url – that will be at clustername.eastus.cloudapp.azure.com:8082/VisualObjects (where clustername is the name of your cluster). When you see the bouncing triangles.
Then you can edit src/VisualObjects/VisualObjects.ActorService/VisualObjectActor.cs
in Visual Studio or in the Code hub in VSTS. Look around line 50 for visualObject.Move(false);
and change it to visualObject.Move(true)
. This will cause the triangle to start rotating. Commit the change and push it to trigger the build and the release. Then monitor the Service Fabric UI to see the upgrade trigger (from the release) and watch the triangles to see how they are upgraded in the Service Fabric rolling upgrade.
Conclusion
Service Fabric is awesome – and creating a build/release pipeline for Service Fabric apps in VSTS is a snap thanks to an amazing build/release engine – and some cool custom build tasks!
Happy releasing!
