Build-Deploy-Test Workflow for Physical Environments

This week, Darshan Desai published a post about a build-deploy-test workflow for Physical environments. The solution is entirely XAML based – you don’t need any custom assemblies. However, the design-time experience is not as rich as the wizard that you get when you do a Lab workflow for build-deploy-test using the LabDefault.xaml template.
I’ve been working on building a workflow that includes a wizard similar to that of the Lab workflow. Seeing Darshan’s solution allowed me to iron out a few kinks in my solution, as well as overcome some of his solution’s limitations. Obviously, since this is a scenario for a Physical environment, there is no ability to do snapshots or restores - you’ll have to make sure you have some clean up scripts to run pre-deployment to get to a “clean-ish” state.
Notions Physical Build-Deploy-Test Solution
Setting up the environment is the same for my solution as it is for Darshan – you need to install and configure both a Build agent (or workflow agent, as it’s called in the Lab scenario) as well as a Test agent. Both agents need to be connected to controllers in your TFS environment. The name of the Build agent is important, since this is the way that you configure where deployment scripts are run.
If you’re going to test, you need to create a test plan with a test suite that contains tests that have automation associate with them. Also, you’ll need a “regular” build that can compile (and optionally unit test) the code as well as the dll’s that contain the automated tests (call this the “Source build”). Then you’ll need to create some automated test settings for your test plan. This test setup is exactly the same setup you’d need if you’re using the Lab workflow or Darshan’s workflow.
To use our workflow, you need the PhysicalDefaultWorkflow in source control somewhere, as well as a custom assembly. You’re controller needs to be configured to point to the folder in source control that contains this custom assembly. In contrast, Darshan’s workflow doesn’t require a custom assembly.
Here’s a walkthrough of what my workflow looks like once you’ve configured the physical environment, the Source build and the test plan.
Create a new Build Definition and set the workspace, drop location, trigger and retention policy just as you would for any other build.
Change the Build Process Template on the Process tab to the PhysicalDefaultTemplate.xaml.
You’ll see the familiar “Click here to edit details…” for the Workflow Process Details argument. Clicking the button with the ellipsis will launch the Physical Workflow Parameters wizard. You’ll see a welcome screen – click next to start configuring the build.
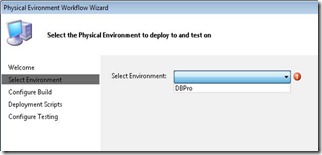
On the “Select Environment” screen, select the Physical environment that you want to deploy to
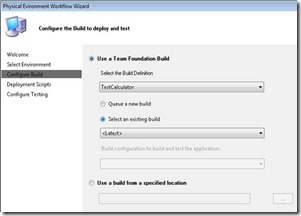
- On the “Configure Build” screen, configure the Source build. Here I overcome some of Darshan’s build’s limitations – you can choose a custom drop location, queue a new build or select the latest available build for your build definition.
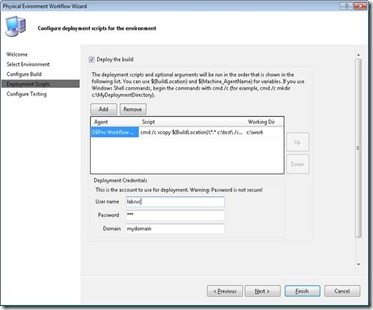
The next screen is “Deployment Scripts”. Here you can configure scripts for the deployment. This screen is slightly different from the same screen in the Lab Workflow. Instead of “Role” for the deployment script, you need to target the Build (Workflow) agent to run the script on (you may see agents that are not part of the environment in this list, so make sure you select the correct agents). You can use $(BuildLocation) as a parameter for the build drop folder of the Source build. I’ve also created a Machine_ parameter that’s similar to the Computer_ (and InternalComputer_) parameters of the Lab workflow. You use $(Machine_AgentName) as a variable for the physical machine name that the agent with name AgentName resides on. For example, if you have an agent called “MyAgent” on a machine called “MyMachine”, then you can use $(Machine_MyAgent) as the variable and when the build runs, this variable will be expanded to “MyMachine”.
You’ll need to configure an account to perform the deployment under. In the Lab Workflow, this is the account that the Lab Agent is configured with. This can be any account as long as it has permissions to execute the script and to the Source build drop folder. Warning: the password is not stored securely!
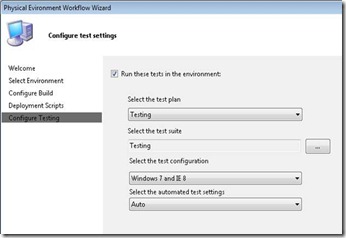
- Finally, configure testing on the “Configure Testing” screen. This screen is exactly the same as the “Configure Testing” screen in the Lab Workflow.
Now you can run your build! Here’s the output of one of my builds:


