Aurelia, Azure and VSTS

I am a huge fan of Aurelia – and that was even when I was working with it in the beta days. I recently had to do some development to display d3 graphs, and needed a simple SPA app. Of course I decided to use Aurelia. During development, I was again blown away by how well thought out Aurelia is – and using some new (to me) tooling, the experience was super. In this post I’ll walk through the tools that I used as well as the build/release pipeline that I set up to host the site in Azure.
Tools
Here are the tools that I used:
- aurelia-cli to create the project, scaffold and install components, build and run locally
- VS Code for frontend editing, with a great Aurelia extension
- Visual Studio 2017 for coding/running the API
- TypeScript for the Aurelia code
- Karma (with phantomJS) and Istanbul for frontend testing and coverage
- .NET Core for the Aurelia host as well as for an API
- Azure App Services to host the web app
- VSTS for Git source control, build and release
The Demo App and the Challenges
To walk through the development process, I’m going to create a stupid-simple app. This isn’t a coding walkthrough per se – I want to focus on how to use the tooling to support your development process. However, I’ll demonstrate the challenges as well as the solutions, hopefully showing you how quickly you can get going and do what you do best – code!
The demo app will be an Aurelia app with just a REST call to an API. While it is a simple app, I’ll walk through a number of important development concepts:
- Creating a new project
- Configuring VS Code
- Installing components
- Building, bundling and running the app locally
- Handling different configs for different environments
- Automated build, test and deployment of the app
Creating the DotNet Projects
There are some prerequisites to getting started, so I installed all of these:
- nodejs
- npm
- dotnet core
- aurelia-cli
- VS Code
- VS 2017
Once I had the prereqs installed, I created a new empty folder (actually I cloned an empty Git repo – if you don’t clone a repo, remember to git init). Since I wanted to peg the dotnet version, I created a new file called global.json:
{
  "sdk": {
    "version": "1.0.4"
  }
}
I also created a .gitignore (helpful tip: if you open the folder in Visual Studio and use Team Explorer->Settings->Repository Settings, you can create a default .gitignore and .gitattributes file).
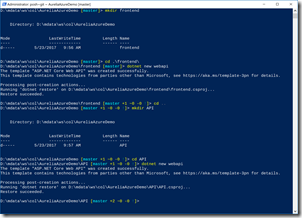
Then I created a new dotnet webapi project to “host” the Aurelia app in a folder called frontend and another dotnet project to be the API in a folder called API:
The commands are:
mkdir frontend
cd frontend
dotnet new webapi
cd ..
mkdir API
cd API
dotnet new webapi
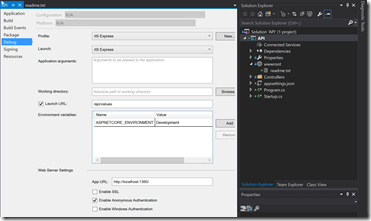
I then opened the API project in Visual Studio. Pressing save prompted me to create a solution file, which I did in the API folder. I also created an empty readme.txt file in the wwwroot folder (I’ll explain why when we get to the build) and changed the Launch URL in the project properties to “api/values”:
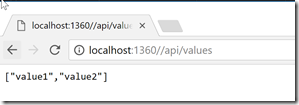
When I press F5 to debug, I see this:
Creating the Aurelia Project
I was now ready to create the Aurelia skeleton. The last time I used Aurelia, there was no such thing as the aurelia-cli – so it was a little bumpy getting started. I found using the cli and the project structure it creates for building/bundling made development smooth as butter. So I cd’d back to the frontend folder and ran the aurelia-cli command to create the Aurelia project: au new --here
. The “ --here
” is important because it tells the aurelia-cli to create the project in this directory without creating another subdirectory. A wizard then walked me through some choices: here are my responses:
- Target platform: .NET Core
- Transpiler: TypeScript
- Template: With minimum minification
- CSS Processor: Less
- Unit testing: Yes
- Install dependencies: Yes
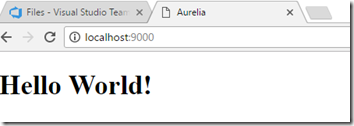
That created the Aurelia project for me and installed all of the nodejs packages that Aurelia requires. Once the install completed, I was able to run by typing “au run”:
Whoop! The skeleton is up, so it’s time to commit!
You can find the repo I used for this post here. There are various branches – start is the the start of the project up until now – in other words, the absolute bare skeleton of the project.
Configuring VS Code
Now that I have a project structure, I can start coding. I’ve already got Visual Studio for the API project, which I could use for the frontend editing, but I really like doing nodejs development in VS Code. So I open up the frontend folder in VS Code.
I’ve also installed some VS Code extensions:
- VSCode Great Icons – makes the icons in the file explorer purdy (don’t forget to configure your preferences after you install the extension!)
- TSLint – lints my TypeScript as I code
- aurelia – palette commands and html intellisense
Configuring TSLint
There is already an empty tslint.json file in the root of the frontend project. Once you’ve installed the VS Code TSLint extension, you’ll see lint warnings in the status bar: though you have to first configure which rules you want to run. I usually start by extending the tslint:latest rules. Edit the tslint.json file to look like this:
{
  "extends": ["tslint:latest"],
  "rules": {

  }
}
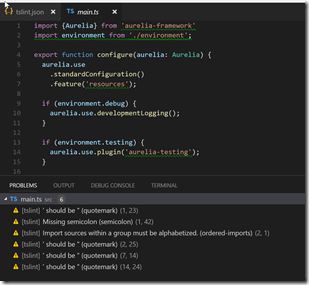
Now you’ll see some warnings and green squigglies in the code:
I don’t care about the type of quotation marks (single or double) and I don’t care about alphabetically ordering my imports, so I override those rules:
{
  "extends": ["tslint:latest"],
  "rules": {
    "ordered-imports": [
      false
    ],
    "quotemark": [
      false
    ]
  }
}
Of course you can put whatever ruleset you want into this file – but making a coding standard for your team that’s enforced by a tool rather than in a wiki or word doc is a great practice! A helpful tip is that if you edit the json file in VS Code you get intellisense for the rules – and you can see the name of the rule in the warnings window.
Installing Components
Now we can use the aurelia cli (au) to install components. For example, I want to do some REST calls, so I want to install the fetch-client: au install aurelia-fetch-client whatwg-fetch
This not only adds the package, but amends the aurelia.json manifest file (in the aurelia_project folder) so that the aurelia-fetch-client is bundled when the app is “compiled”. I also recommend installing whatwg-fetch which is a fetch polyfill. Let’s create a new class which is a wrapper for the fetch client:
import { autoinject } from 'aurelia-framework';
import { HttpClient } from 'aurelia-fetch-client';

const baseUrl = "http://localhost:1360/api";

@autoinject
export class ApiWrapper {
    public message = 'Hello World!';
    public values: string[];

    constructor(public client: HttpClient) {
		client.configure(config => {
			config
				.withBaseUrl(baseUrl)
				.withDefaults({
					headers: {
						Accept: 'application/json',
					},
				});
		});
	}
}
Note that (for now) we’re hard-coding the baseUrl. We’ll address config shortly.
We can now import in the ApiWrapper (via injection) and call the values method:
import { autoinject } from 'aurelia-framework';
import { ApiWrapper } from './api';

@autoinject
export class App {
  public message = 'Hello World!';
  public values: string[];

  constructor(public api: ApiWrapper) {
    this.initValues();
  }

  private async initValues() {
    try {
      this.values = await this.api.client.fetch("/values")
        .then((res) => res.json());
    } catch (ex) {
      console.error(ex);
    }
  }
}
Here’s the updated html for the app.html page:
<template>
  <h1>${message}</h1>
  <h3>Values</h3>
  <ul>
    <li repeat.for="val of values">${val}</li>
  </ul>
</template>
Nothing too fancy – but shown here to be complete. I’m not going to make a full app here, since that’s not the goal of this post.
Finally, we need to enable CORS on the Web API (since it does not allow CORS by default). Add the Microsoft.AspNet.Cors package to the API project and then add the services.AddCors() and app.UseCors() lines (see this snippet):
public void ConfigureServices(IServiceCollection services)
{
  // Add framework services.
  services.AddMvc();
	services.AddCors();
}

// This method gets called by the runtime. Use this method to configure the HTTP request pipeline.
public void Configure(IApplicationBuilder app, IHostingEnvironment env, ILoggerFactory loggerFactory)
{
  loggerFactory.AddConsole(Configuration.GetSection("Logging"));
  loggerFactory.AddDebug();

  app.UseCors(p => p.AllowAnyOrigin().AllowAnyMethod());
  app.UseMvc();
}
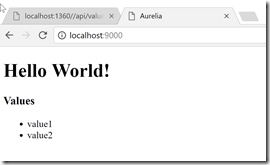
Now we can get this when we run the project (using “au run”):
If you’re following along in the repo code, the changes are on the “Step1-AddFetch” branch.
Running Locally
Running locally is trivial. I end up with Visual Studio open and pressing F5 to run the backend API project – the frontend project is just as trivial. In VSCode, with the frontend folder open, just hit ctrl-shift-p to bring up the command palette and then type/select “au run –watch” to launch the frontend “build”. This transpiles the TypeScript to JavaScript, compiles Less (or SASS) to css, bundles and minifies all your html, compiled css and JavaScript into a single app-bundle.js in wwwroot\scripts. It also minifies and bundles Aurelia and its dependencies into vendor-bundle.js, using the settings from the aurelia.json file. It’s a lot of work, but Aurelia takes care of it all for you – just run “au run” to do all that stuff and launch a server. If you add the –watch parameter, the process watches your source files (html, Less, TypeScript) and automatically recompiles everything and refreshes the browser automagically using browsersync. It’s as smooth as butter!
Config Management
Attempt 1 – Using environment.ts
Let’s fix up the hard-coded base URL for the api class. Aurelia does have the concept of “environments” – you can see that by looking in the src\environment.ts file. You would be tempted to change the values of that file, but you’ll see that if you do, the contents get overwritten each time Aurelia compiles. Instead, open up the aurelia-project\environments folder, where you’ll see three environment files – dev, stage and prod.ts. To change environment, just enter “au run –env dev” to get the dev environment or “au run –env prod” to get the prod environment. (Unfortunately you can’t change the environment using VSCode command palette, so you have to run the run command from a console or from the VSCode terminal).
Let’s edit the environments to put the api base URL there instead of hard-coding it:
export default {
  apiBaseUrl: "http://localhost:64705/api",
  debug: true,
  testing: true,
};
Of course we add the apiBaseUrl property to the stage and prod files too!
With that change, we can simply import the environment and use the value of the property in the api.ts file:
import { autoinject } from 'aurelia-framework';
import { HttpClient } from 'aurelia-fetch-client';
import environment from './environment';

@autoinject
export class ApiWrapper {
    public message = 'Hello World!';
    public values: string[];

    constructor(public client: HttpClient) {
        client.configure(config => {
            config
                .withBaseUrl(environment.apiBaseUrl)
                .withDefaults({
                    headers: {
                        Accept: 'application/json',
                    },
                });
        });
    }
}
The important changes are on line 2 (reading in the environment settings) and line 13 (using the value). Now we can run for different environments. If you’re following along in the repo code, the changes are on the “Step2-EnvTsConfig” branch.
Attempt 2 – Using a Json File
There’s a problem with the above approach though – if we have secrets (like access tokens or keys) then we don’t want them checked into source control. Also, when we get to build/release, we want the same build to go to multiple environments – using environment.ts means we have to build once for each environment and then select the correct package for the corresponding environment – it’s nasty. Rather, we want to be able to configure the environment settings during a release. This puts secret information in the release tool instead of source control, which is much better, and allows a single build to be deployed to any number of environments.
Unfortunately, it’s not quite so simple (at first glance). The environment.ts file is bundled into app-bundle.js, so there’s no way to inject values at deploy time, unless you want to monkey with the bundle itself. It would be much better to take a leaf out of the .NET CORE playbook and set up a Json config file. Fortunately, there’s an Aurelia plugin that allows you to do just that! Conveniently, it’s called aurelia-configuration.
Run “au install aurelia-configuration” to install the module.
Now (by convention) the config module looks for a file called “config\config.json”. So in the src folder, add a new folder called config and add a new file into the config folder called config.json:
{
      "api": {
            "baseUri": "http://localhost:12487/api"
      }
}
We can then inject the AureliaConfiguration class into our classes and call the get() method to retrieve a variable value. Let’s change the api.ts file again:
import { autoinject } from 'aurelia-framework';
import { HttpClient } from 'aurelia-fetch-client';
import { AureliaConfiguration } from 'aurelia-configuration';

@autoinject
export class ApiWrapper {
    public message = 'Hello World!';
    public values: string[];

    constructor(public client: HttpClient, private aureliaConfig: AureliaConfiguration) {
        client.configure(config => {
            config
                .withBaseUrl(aureliaConfig.get("api.baseUri"))
                .withDefaults({
                    headers: {
                        Accept: 'application/json',
                    },
                });
        });
    }
}
Line 3 has us importing the type, line 10 has the constructor arg for the autoinjection and we get the value on line 13.
We also have to tell Aurelia to use the config plugin. Open main.ts and add the plugin code (line 8 below):
import {Aurelia} from 'aurelia-framework';
import environment from './environment';

export function configure(aurelia: Aurelia) {
  aurelia.use
    .standardConfiguration()
    .feature('resources')
    .plugin('aurelia-configuration');
  ...
There’s one more piece to this puzzle: the config.json file doesn’t get handled anywhere, so running the program won’t work. We need to tell the Aurelia bundler that it needs to add in the config.json file and publish it to the wwwroot folder. To do that, we can add in a copyFiles target onto the aurelia.json settings file:
{
  "name": "frontend",
  "type": "project:application",
  "platform": {
    ...
  },
  ...
  "build": {
    "targets": [
     ...
    ],
    "loader": {
      ...
    },
    "options": {
      ...
    },
    "bundles": [
      ...
    ],
    "copyFiles": {
      "src/config/*.json": "wwwroot/config"
    }
  }
}
At the bottom of the file, just after the build.bundles settings, we add the copyFiles target. The config.json file is now copied to the wwwroot/config folder when we build, ready to be read at run time! If you’re following along in the repo code, the changes are on the “Step3-JsonConfig” branch.
Testing
Authoring the Tests
Of course the API project would require tests – but doing .NET testing is fairly simple and there’s a ton of guidance on how to do that. I was more interested in testing the frontend (Aurelia) code with coverage results.
When I created the frontend project, Aurelia created a test stub project. If you open the test folder, there’s a simple test spec in unit\app.spec.ts:
import {App} from '../../src/app';

describe('the app', () => {
  it('says hello', () => {
    expect(new App().message).toBe('Hello World!');
  });
});
We’ve changed the App class, so this code won’t compile correctly. Now we need to pass an ApiWrapper to the App constructor. And if we want to construct an ApiWrapper, we need an AureliaConfiguration instance as well as an HttpClient instance. We’re going to want to mock the API calls that the frontend makes, so let’s stub out a mock implementation of HttpClient. I add a new class in src\test\unit\utils\mock-fetch.ts:
import { HttpClient } from 'aurelia-fetch-client';

export class HttpClientMock extends HttpClient {
}
We’ll flesh this class out shortly. For now, it’s enough to get an instance of HttpClient for the ApiWrapper constructor. What about the AureliaConfiguration instance? Fortunately, we can create (and even configure) one really easily:
let aureliaConfig = new AureliaConfiguration();
aureliaConfig.set("api.baseUri", "http://test");
We add the “api.BaseUri” key since that’s the value that the ApiWrapper reads from the configuration object. We can now flesh out the remainder of our test:
import {App} from '../../src/app';
import {ApiWrapper} from '../../src/api';
import {HttpClientMock} from './utils/mock-fetch';
import {AureliaConfiguration} from 'aurelia-configuration';

describe('the app', () => {
  it('says hello', async done => {
    // arrange
    let aureliaConfig = new AureliaConfiguration();
    aureliaConfig.set("api.baseUri", "http://test");

    const client = new HttpClientMock();
    client.setup({
      data: ["testValue1", "testValue2", "testValue3"],
      headers: {
        'Content-Type': "application/json",
      },
      url: "/values",
    });
    const api = new ApiWrapper(client, aureliaConfig);

    // act
    let sut: App;
    try {
      sut = new App(api);
    } catch (e) {
      console.error(e);
    }

    // assert
    setTimeout(() => {
      expect(sut.message).toBe('Hello World!');
      expect(sut.values.length).toBe(3);
      expect(sut.values).toContain("testValue1");
      expect(sut.values).toContain("testValue2");
      expect(sut.values).toContain("testValue3");
      done();
    }, 10);
  });
});
Notes:
- Lines 13-19: configure the mock fetch response (we’ll see the rest of the mock HttpClient class shortly)
- Line 20: instantiate a new ApiWrapper
- Lines 23-28: call the App constructor
- Lines 31-38: we wrap the asserts in a timeout since the App constructor calls an async method (perhaps there’s a better way to do this?)
Let’s finish off the test code by looking at the mock-fetch class:
import { HttpClient } from 'aurelia-fetch-client';
export class HttpClientMock extends HttpClient {
}
export interface IMethodConfig {
url: string;
method?: string;
status?: number;
statusText?: string;
headers?: {};
data?: {};
};
export class HttpClientMock extends HttpClient {
private config: IMethodConfig[] = [];
public setup(config: IMethodConfig) {
this.config.push(config);
}
public async fetch(input: Request | string, init?: RequestInit) {
let url: string;
if (typeof input === "string") {
url = input;
} else {
url = input.url;
}
// find the matching setup method
let methodConfig: IMethodConfig;
methodConfig = this.config.find(c => c.url === url);
if (!methodConfig) {
console.error(`---MockFetch: No such method setup: ${url}`);
return Promise.reject(new Response(null,
{
status: 404,
statusText: `---MockFetch: No such method setup: ${url}`,
}));
}
// set up headers
let responseInit: ResponseInit = {
headers: methodConfig.headers || {},
status: methodConfig.status || 200,
statusText: methodConfig.statusText || "",
};
// get a unified request object
let request: Request;
if (Request.prototype.isPrototypeOf(input)) {
request = (<request> input);
} else {
request = new Request(input, responseInit || {});
}
// create a response object
let response: Response;
const data = JSON.stringify(methodConfig.data);
response = new Response(data, responseInit);
// resolve or reject accordingly
return response.status >= 200 && response.status < 300 ?
Promise.resolve(response) : Promise.reject(response);
}
}
</request>
I won’t go through the whole class, but essentially you configure a mapping of routes to responses so that when the mock object is called it can return predictable data.
With those changes in place, we can run the tests using “au test”. This launches Chrome and runs the test. The Aurelia project did the heavy lifting to configure paths for the test runner (Karma) so that the tests “just work”.
Going Headless and Adding Reports and Coverage
Now that we can run the tests in Chrome with results splashed to the console, we should consider how these tests would run in a build. Firstly, we want to produce a report file of some sort so that the build can save the results. We also want to add coverage. Finally, we want to run headless so that we can run this on an agent that doesn’t need access to a desktop to launch a browser!
We’ll need to add some development-time node packages to accomplish these changes:
yarn add karma-phantomjs-launcher karma-coverage karma-tfs gulp-replace –dev
With those package in place, we can change the karma.conf.js file to use phantomjs (a headless browser) instead of Chrome. We’re also going to add in the test result reporter, coverage reporter and a coverage remapper. The coverage will report coverage on the JavaScript files, but we would ideally want coverage on the TypeScript files – that’s what the coverage remapper will do for us.
Here’s the new karma.conf.js:
'use strict';
const path = require('path');
const project = require('./aurelia_project/aurelia.json');
const tsconfig = require('./tsconfig.json');

let testSrc = [
  { pattern: project.unitTestRunner.source, included: false },
  'test/aurelia-karma.js'
];

let output = project.platform.output;
let appSrc = project.build.bundles.map(x => path.join(output, x.name));
let entryIndex = appSrc.indexOf(path.join(output, project.build.loader.configTarget));
let entryBundle = appSrc.splice(entryIndex, 1)[0];
let files = [entryBundle].concat(testSrc).concat(appSrc);

module.exports = function(config) {
  config.set({
    basePath: '',
    frameworks: [project.testFramework.id],
    files: files,
    exclude: [],
    preprocessors: {
      [project.unitTestRunner.source]: [project.transpiler.id],
      'wwwroot/scripts/app-bundle.js': ['coverage']
    },
    typescriptPreprocessor: {
      typescript: require('typescript'),
      options: tsconfig.compilerOptions
    },
    reporters: ['progress', 'tfs', 'coverage', 'karma-remap-istanbul'],
    port: 9876,
    colors: true,
    logLevel: config.LOG_INFO,
    autoWatch: true,
    browsers: ['PhantomJS'],
    singleRun: false,
    // client.args must be a array of string.
    // Leave 'aurelia-root', project.paths.root in this order so we can find
    // the root of the aurelia project.
    client: {
      args: ['aurelia-root', project.paths.root]
    },

    phantomjsLauncher: {
      // Have phantomjs exit if a ResourceError is encountered (useful if karma exits without killing phantom)
      exitOnResourceError: true
    },

    coverageReporter: {
      dir: 'reports',
      reporters: [
        { type: 'json', subdir: 'coverage', file: 'coverage-final.json' },
      ]
    },

    remapIstanbulReporter: {
      src: 'reports/coverage/coverage-final.json',
      reports: {
        cobertura: 'reports/coverage/cobertura.xml',
        html: 'reports/coverage/html'
      }
    }
  });
};
Notes:
- Line 25: add a preprocessor to instrument the code that we’re going to execute
- Line 31: we add reporters to produce results files (tfs), coverage and remapping
- Lines 45-48: we configure a catch-all to close phantomjs if something fails
- Lines 50-55: we configure the coverage to output a Json coverage file
- Lines 57-63: we configure the remapper so that we get TypeScript coverage results
One gotcha I had that I couldn’t find a work-around for: the html files that are generated showing which lines of code were hit is generated with incorrect relative paths and the src folder (with detailed coverage) generated outside the html report folder. Eventually, I decided that a simple replace and file move was all I needed, so I modified the test.ts task in the aurelia-project\tasks folder:
// hack to fix the relative paths in the generated mapped html report
let fixPaths = done => {
  let repRoot = path.join(__dirname, '../../reports/');
  let repPaths = [
    path.join(repRoot, 'src/**/*.html'),
    path.join(repRoot, 'src/*.html'),
  ];
  return gulp.src(repPaths, { base: repRoot })
        .pipe(replace(/(..\/..\/..\/)(\w)/gi, '../coverage/html/$2'))
        .pipe(gulp.dest(path.join(repRoot)));
};

let unit;

if (CLIOptions.hasFlag('watch')) {
  unit = gulp.series(
    build,
    gulp.parallel(
      watch(build, onChange),
      karma,
      fixPaths
    )
  );
} else {
  unit = gulp.series(
    build,
    karma,
    fixPaths
  );
}
I add new tasks called “updateIndex” and “copySrc” that fix up the paths for me. Perhaps there’s a config setting for the remapper that will render this obsolete, but this was the best I could come up with.
Now when you run “au test” you get a result file and coverage results for the TypeScript code all in the html folder with the correct paths. If you’re following along in the repo code, these changes are on the master branch (this is the final state of the demo code).
Automated Build and Test
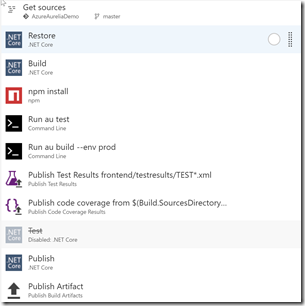
We now have all the pieces in place to do a build. The build is fairly straightforward once you work out how to invoke the Arelia cli. Starting with a .NET Core Web App template, here is the definition I ended up with:
Here are the task settings:
- .NET Core Restore – use defaults
- .NET Core Build
- Change “Arguments” to –configuration $(BuildConfiguration) –version-suffix $(Build.BuildNumber)
- The extra bit added is the version-suffix arg which produces binaries with the same version as the build number
- npm install
- Change “working folder” to frontend (this is the directory of the Aurelia project).\node_modules\aurelia-cli\bin\aurelia-cli.js test
- Run command
- Set “Tool” to node
- Set “Arguments” to .\node_modules\aurelia-cli\bin\aurelia-cli.js test
- Expand “Advanced” and set “Working folder” to frontend
- This runs the tests and produces the test results and coverage results files
- Run command
- Set “Tool” to node
- Set “Arguments” to .\node_modules\aurelia-cli\bin\aurelia-cli.js build –env prod
- Expand “Advanced” and set “Working folder” to frontend
- This does transpilation, minification and bundling so that we’re ready to deploy
- Publish Test Results
- Set “Test Result Format” to VSTest
- Set “Test results files” to frontend/testresults/TEST*.xml
- Set “Test run title” to Aurelia
- Publish code coverage Results
- Set “Code Coverage Tool” to Cobertura
- Set “Summary File” to $(Build.SourcesDirectory)/frontend/reports/coverage/cobertura.xml
- Set “Report Directory” to $(System.DefaultWorkingDirectory)/frontend/reports/coverage/html
- .NET Core Publish
- Make sure “Publish Web Projects” is checked – this is why I added a dummy readme file into the wwwroot folder of the API app, otherwise it’s not published as a web project
- Set “Arguments” to –configuration $(BuildConfiguration) –output $(build.artifactstagingdirectory) –version-suffix $(Build.BuildNumber)
- Make sure “Zip Published Projects” is checked
- On the Options Tab
- Set the build number format to 1.0.0$(rev:.r) to give the build number a 1.0.0.x format
- Set the default agent queue to Hosted VS2017 (or you can select a private build agent with VS 2017 installed)
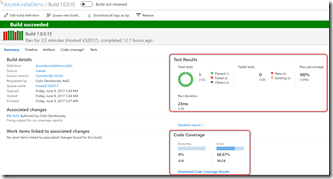
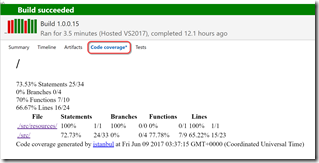
Now when I run the build, I get test and coverage results in the summary:
The coverage files are there if you click the Code Coverage results tab, but there’s a problem with the css.
The <link> elements are stripped out of the html pages when the iFrame for the coverage results shows – I’m working with the product team to find a workaround for this. If you download the results from the Summary page and unzip them, you get the correct rendering.
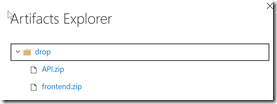
I can also see both web projects ready for deployment in the Artifacts tab:
We’re ready for a release!
The Release Definition
I won’t put the whole release to Azure here – the key point to remember is the configuration. We’ve done the work to move the configuration into the config.json file for this very reason.
Once you’ve set up an Azure endpoint, you can add in an “Azure App Services Deploy” task. Select the subscription and app service and then change the “Package or folder” from “$(System.DefaultWorkingDirectory)/**/*.zip” to “$(System.DefaultWorkingDirectory)/drop/frontend.zip” (or API.zip) to deploy the corresponding site. To handle the configuration, you simply add “wwwroot/config/config.json” to the “JSON variable substitution”.
Now we can define an environment variable for the substitution. Just add one with the full “JSON path” for the variable. In our case, we want “api.baseUri” to be the name and then put in whatever the corresponding environment value is:
We can repeat this for other variables if we need more.
Conclusion
I really love the Aurelia framework – and with the solid Aurelia cli, development is a really good experience. Add to that simple build and release management to Azure using VSTS, and you can get a complete site skeleton with full CI/CD in half a day. And that means you’re delivering better software, faster – always a good thing!
Happy Aurelia-ing!
